California doesn’t expect agents to be engineers, contractors, or city planners—but it does expect licensees to communicate accurately and avoid passing off assumptions as facts. The goal of this guide Read more...
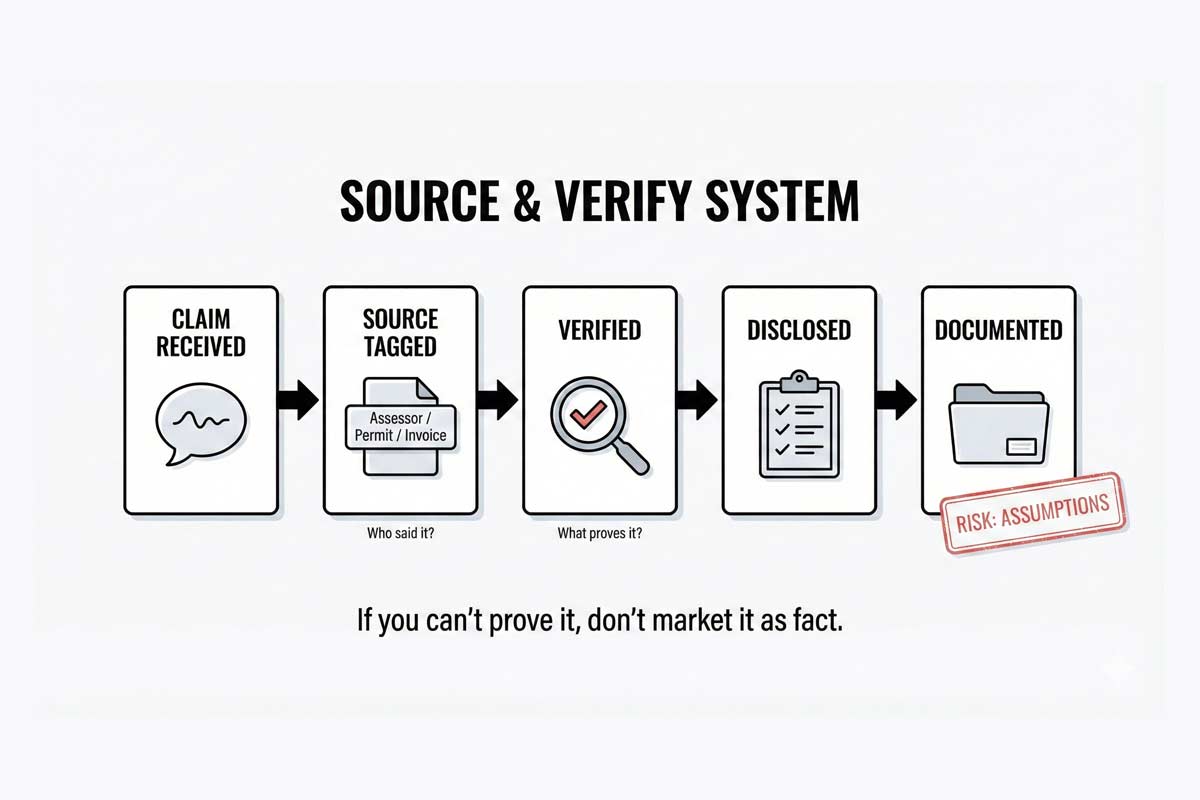
California doesn’t expect agents to be engineers, contractors, or city planners—but it does expect licensees to communicate accurately and avoid passing off assumptions as facts. The goal of this guide is simple: help you build a repeatable “source → verify → disclose → document” workflow so your MLS remarks, emails, and conversations stay clean and defensible.
Many agents assume lawsuits happen to “bad” people—scammers or fraudsters. But in California real estate, a significant portion of DRE discipline and civil litigation stems from negligent misrepresentation. It’s not that the agent lied on purpose; it’s that they repeated a seller’s claim without verifying it, or they made a casual assumption that turned out to be wrong.
If you want a long career, you must shift your mindset from salesperson to fact-checker.
What “misrepresentation” actually means
In plain English, misrepresentation is a false statement of fact that induces a party to enter into a contract. It isn’t just lying; it’s providing incorrect information that a buyer relies on.
While the definition seems simple, the application is complex because California holds licensees to a higher standard than the general public. That higher standard is the foundation of our California Real Estate Laws & Compliance Guide, and it’s why misrepresentation typically falls into three practical buckets:
1) Intentional misrepresentation (fraud)
This occurs when an agent actively hides a defect or lies about a feature.
Example: "You know the roof leaks, but you paint over the water stains and tell the buyer, 'The roof is in perfect condition.'"
Result: This is considered a career-ending category involving major civil exposure, severe discipline risk, and potentially punitive consequences.
2) Negligent misrepresentation (the danger zone)
This is where most agents get into trouble. It happens when you make a statement you believe is true, but you had no reasonable basis for believing it—usually because you didn’t verify it.
Example: The seller tells you the square footage is 2,500. You put 2,500 in the MLS without checking the source. It turns out to be 2,100.
Result: You’re exposed because you’re expected to treat material facts like verifiable facts, not casual conversation.
3) Innocent misrepresentation
This occurs when an agent makes a false statement that they had reasonable grounds to believe was true.
Example: You rely on a formal report from a licensed surveyor that later turns out to contain an error.
Result: Even without bad intent, deals can unwind and disputes can still happen.
The “material fact” rule
California operates under a strict disclosure standard. A material fact is anything that would affect the value of the property or a buyer’s decision to purchase it. If you are debating whether something is material, it almost certainly is.
The 10 most common misrepresentation traps in California
These are the scenarios where agents unknowingly drift into misrepresentation.
1) “Remodeled with permits”
The trap: The seller says, “We added that master bath with permits.” You list it as “Permitted Master Bath.”
The reality: The seller assumed their contractor pulled permits—but they didn’t.
The fix: Never claim permits exist unless you have seen the final permit sign-off or confirmed city records. Use language like “Buyer to verify all permits.”
2) Square footage & lot size
The trap: Copying the square footage from a prior MLS listing or trusting the owner’s estimate.
The fix: Always cite the source (“Per Assessor,” “Per Appraiser,” “Per Builder”). If there’s a discrepancy between records and the physical home, flag it immediately.
3) “The roof is new”
The trap: The seller says the roof is 5 years old. You market it as “Newer Roof.”
The fix: Avoid acting like a general contractor. State the age only if it’s documented, or treat it as a seller statement and recommend inspection.
4) Zoning and ADU potential
With the ADU boom, agents are eager to advertise “ADU Potential.”
The trap: Telling a buyer, “You can definitely build a back house here.”
The fix: Zoning is complex (setbacks, easements, utilities, overlays). Defer to the city: “Buyer to investigate feasibility with the city.”
5) Nuisances and stigmas
The trap: Failing to mention the loud plant that operates at night or an ongoing neighbor dispute over the fence line.
The fix: If a nuisance affects enjoyment or decision-making, it’s material. Hiding it conflicts with Ethical Duties Under the California Business & Professions Code, where honesty and fair dealing are not optional just because the deal is fragile.
6) Multiple offer pressure
The trap: Telling a buyer’s agent, “We have an offer higher than yours,” when you don’t—just to drive up price.
The fix: Communicate what’s true and only what’s true, especially in hot markets where buyers are already stressed—this is exactly why disciplined conduct matters in Handling Multiple Offers Ethically.
7) Marketing hyperbole vs. fact
The trap: “Walking distance to the beach” (it’s 3 miles) or “quiet street” (it’s a cut-through).
The fix: Let photos and maps do the persuasion. Subjective phrases can become “facts” in a dispute. Stick to measurable statements.
8) Repairs and credits
The trap: The seller agrees to fix a leak. You tell the buyer, “The leak has been fixed.”
The fix: Don’t confirm repairs yourself. Transfer documentation: invoice, contractor statement, permit (if applicable), and buyer re-inspection.
9) Natural hazards
The trap: “This area rarely floods,” or “Fire insurance shouldn’t be a problem.”
The fix: Never minimize hazard risk. Refer clients to the NHD and their insurance professional; keep your language document-based.
10) Minimizing defects
The trap: Seeing a crack and telling the buyer, “That’s just normal settling.”
The fix: Unless you’re a structural engineer, you don’t diagnose. Flag the observed condition and recommend evaluation.
The anti-misrepresentation system
You can eliminate a major share of your liability by adopting a “source and verify” habit.
1) Label fact vs. opinion
If you are sharing an opinion, label it. If you are sharing a fact, cite the source.
Instead of: “1,800 square feet.”
Write: “Approx. 1,800 sq ft per Assessor (buyer to verify).”
2) Verify before you amplify
Before you blast a feature in marketing, ask: “Do I have a document that proves this?” If not, tone it down or remove it.
3) The transaction checklist
Run this check at every stage:
Listing intake: Have the seller complete the TDS and SPQ completely; don’t let blanks slide.
Document handling: Treat client documents and sensitive details like controlled material—careless forwarding, oversharing, or casual disclosure can create liability and negotiation harm, which is exactly why disciplined workflows matter under Privacy Rules for Managing Client Information.
Marketing prep: Review MLS comments against disclosures—do they match?
Negotiation: Ensure counters and emails don’t imply promises that aren’t written.
Closing: Repairs and credits should have documentation attached and traceable.
Safe language toolkit: say this, not that
❌ Risky: “New roof”✅ Safe: “Seller states roof replaced in 2021; buyer to verify.”
❌ Risky: “Permitted guest house”✅ Safe: “Guest house present; buyer to verify permits with the city/county.”
❌ Risky: “Great rental potential”✅ Safe: “Buyer to verify rental restrictions and market rates.”
❌ Risky: “Quiet neighborhood”✅ Safe: “Located on a cul-de-sac” (stick to facts).
❌ Risky: “The plumbing is fine”✅ Safe: “No known plumbing issues per seller disclosures as of [date].”
❌ Risky: “I’m sure they’ll accept X”✅ Safe: “I will present your offer immediately and confirm receipt.”
Mini case studies: California scenarios
Scenario A: The “just cosmetic” crack
The situation: A seller points out a hairline crack and says it's from heavy rain. The agent markets “pristine condition.”
The outcome: A serious foundation issue appears after closing. The agent is sued for negligent misrepresentation.
What the agent should have done: Note the condition on the AVID, ensure disclosure is complete, and recommend specialist evaluation without diagnosing.
Scenario B: The dual agency disconnect
The situation: You represent both buyer and seller. The seller mentions divorce stress and urgency. You tell the buyer to help close the deal.
The outcome: Confidentiality and loyalty get questioned immediately, and parties often argue they relied on a misrepresented level of neutrality or advocacy. That’s why Dual Agency in California (Legal Guide) treats role clarity and confidentiality as non-negotiable.
What the agent should have done: Keep motivation confidential and stick to verifiable property facts and written terms.
Scenario C: The “updated” electrical
The situation: A flipper says the panel is “fully updated.” The agent writes “New Electrical Panel” in MLS.
The outcome: Inspector finds it’s old and painted. Buyer demands a credit and threatens claims for false advertising.
What the agent should have done: Require receipt/permit before using “new,” or describe only what you can prove.
Your license is worth more than one commission
Avoiding misrepresentation isn’t about being paranoid—it’s about being professional. It requires a shift from “selling” to “guiding.”
Your best defense is simple:
Verify what the seller tells you.
Disclose what you know.
Document where it came from.
If you don’t know the answer, “I don’t know, but let’s verify it” is one of the safest phrases in your vocabulary.
|
If you choose your first brokerage based on the commission split alone, you will lose money—probably a lot of it.
I have spent over 20 years watching new agents walk into a recruiter’s office, see Read more...
If you choose your first brokerage based on the commission split alone, you will lose money—probably a lot of it.
I have spent over 20 years watching new agents walk into a recruiter’s office, see a “90/10” split on a whiteboard, and start spending the money in their heads. Then reality hits. The "Smiling Recruiter" forgot to mention the $500 monthly desk fee, the transaction fees, and the fact that there is zero training to help you actually get a contract signed.
As you Start a Real Estate Career in California, your biggest risk isn't a low split; it's a high split that comes with no support, leaving you with 100% of zero.
TL;DR: The Bottom Line
Effective Split > Nominal Split: The "90/10" on the wall isn't what you take home.
Year 1 is Flight School: You are paying for supervision so you don't lose your license.
Fees are the "Silent Killer": Desk, franchise, and tech fees can eat 20% of your check before you see it.
Negotiability: By law, commissions and splits are negotiable; there is no "standard" rate.
The Goal: Choose the brokerage that gives you the highest probability of closing beyond Deal #1.
Decode the Pitch: The Real Vocabulary
To make a smart decision, you must stop using recruiter jargon and start using mine.
Gross Commission Income (GCI): This is the total pie. If you sell a $1.2M home at a 2.5% commission, the GCI is $30,000.
The Split: The first slice. If you are on a 70/30 split, the broker takes $9,000 and your "Initial Share" is $21,000.
Off-The-Top: Off the top fees are brokerage expenses deducted from a realtor's commission before they receive their share of the split.
Fees: The silent nibblers. They eat your slice from the edges after the split is taken.
Effective Split (The King Metric): The net percentage of the GCI that actually hits your bank account.
Kartik’s Rule of Thumb: The Effective Split Formula
To find the truth, use this calculation. "Your Share" is the dollar amount the broker hands you after their split but before they subtract desk fees, insurance, or transaction costs.
Takeaway: A "90% split" often results in a 65% effective split once the monthly "rent" is paid.
The Five Models: Who Are They Really For?
Model
The Pitch
The Reality
Choose This ONLY If...
The Apprenticeship
"We'll teach you everything."
50/50 or 60/40. High support.
You need a mentor to review every file.
The Ladder
"Earn more as you grow."
Graduated splits (e.g., 60% to 80% as you grow).
You have a clear 12-month lead-gen plan.
The Illusion
"Keep 100% of the cash."
You are a tenant, not a partner.
You have a massive, proven database.
The Gauntlet
"Cap your fees, then keep it all."
High pressure to hit the "cap" fast.
You have cash reserves.
The Safety Net
"We pay you a base salary."
Rare; heavy oversight/shackles.
You value stability over high upside.
Takeaway: Match the model to your current skill level, not your future ego.
The Fee Menu: What They Charge You For
I once reviewed a contract for a student who was promised an 80/20 split. After we calculated the "menu" below, their effective split was 52%. They walked away. Here is how those fees are usually grouped:
"The Rent" (Desk Fees): Monthly fees ranging from $50 to $1,000+.
Kartik’s Note: Paying over $200/month for a desk without a documented, daily training schedule is a major red flag when choosing a brokerage.
Errors & Omissions (E&O): Professional liability insurance. Some brokers charge this annually; others charge a flat fee per transaction.
"The Franchise Tax": Typically 5%–8%. As mentioned above, this may be deducted "off the top" before the split or calculated into your specific fee schedule.
Compliance/Risk Management Fee: A per-file fee charged for the broker's staff to review your disclosures and contracts for legal errors.
The Partnership Tax: If you join a team, expect them to also take a cut. See Should You Join a Team or Go Solo? for the math.
The War Game Scenarios
Scenario 1: The "High Split" vs. The Traditional Partner
Assumption: A $1M sale at 2.5% ($25,000 GCI).
Metric
85/15 "Cloud/Boutique"
60/40 Traditional
Initial Share
$21,250
$15,000
Monthly Desk Fee
–$500
$0
Franchise/Admin Fee
–$1,500
$0
Transaction Fee
–$500
–$250
NET TO AGENT
$18,750
$14,750
Effective Split
75%
59%
Support Provided
Software login + FAQ
Structured coaching & contract review
The Logic: If the 60/40 model provides the systems that help you close one deal a month, while the 85/15 model leaves you to figure out lead-gen alone (leading to zero deals), the "lower" split is more profitable over time.
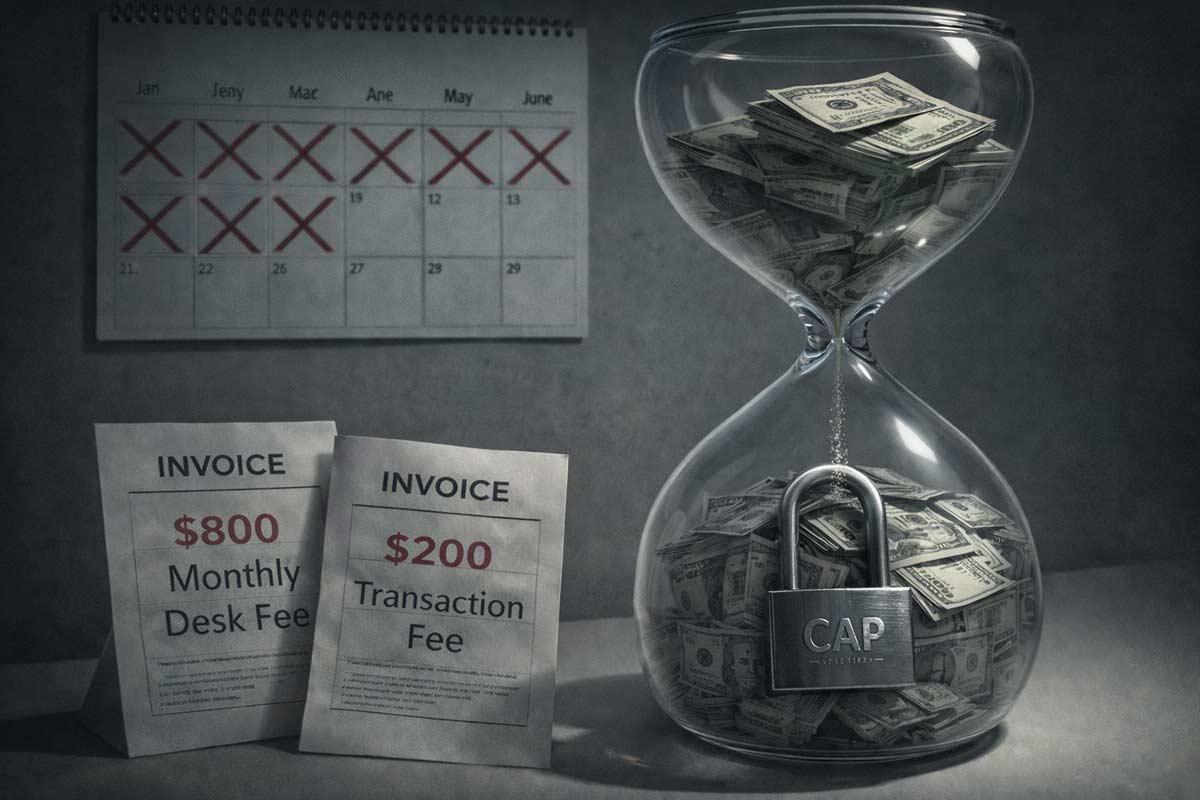
Scenario 2: The Cap Crusher (The Cash Flow Trap)
An agent joins a "Cap" brokerage with a $20,000 annual cap and $800/month in fixed fees.
The Math: If that agent goes 6 months without a deal, they have spent $4,800 out of pocket.
The Risk: Most new agents quit by month 7. The "Cap" only benefits you if you have the volume to hit it. For a rookie, a no-monthly-fee 50/50 split is safer than a "100%" model that drains your savings while you're learning.
Scenario 3: The Team Tango (The Double Split)
You join a team on an 80/20 brokerage split. The team takes a 50% split for providing the lead.
GCI: $10,000.
Brokerage takes 20%: $8,000 left.
Team takes 50%: $4,000 left.
Effective Split: 40%. Is this lead worth 60% of the commission? If they handle the TC, lead gen and the marketing, it often is.
Audit Checklist: Offer A vs. Offer B
Before signing, put both offers side-by-side:
Item to Audit
Brokerage A
Brokerage B
Nominal Split %
Monthly Fixed Costs ($)
Per-Transaction Fees ($)
Off-the-top Franchise %
Who pays for the CRM?
Documented Weekly Training?
The Interview Playbook: Scripts for the Audit
Don't ask "what is the split?" That's a rookie question. Use these scripts from our guide on How to Interview a Brokerage as a New Agent:
"Can you provide a written, all-in fee schedule and walk me through the net income on a $1.25M sale?"
"What is your documented process for a new agent to get an offer reviewed under time pressure on a Sunday night?"
"If I use a company-provided lead, what is the total effective split after referral fees are deducted?"
The Verdict: What a New Agent MUST Do (Year 1)
For 19 out of 20 new agents, the Apprenticeship/Traditional model is the only logical choice.
I’ve seen too many agents go for a 100% split only to miss a critical disclosure contingency because no one was available to review their file on a weekend. That "saved" commission disappears the moment you're hit with a legal claim.
Year one is about risk mitigation. You need a broker who is financially incentivized to make sure you don't crash. Once you've closed three deals, you have the leverage to look at the Best Brokerages for New Agents in California that offer higher splits for producers.
Takeaway: Buy the education in Year 1 so you can own the market in Year 5.
FAQ: The Blunt Truth
1. Can I negotiate my split?
Yes, but as a new agent, your leverage is low. Focus on negotiating for better tools or waived initial fees rather than the split.
2. What is a "Cap"?
A ceiling on what the broker takes. After you pay them a set amount (e.g., $20k), you keep 100% for the rest of the anniversary year.
3. What is a typical split for a new agent in CA?
Usually between 50/50 and 70/30. Anything higher often indicates a lack of provided leads or support.
4. Is 100% commission ever worth it?
Only if you are a "business in a box" with your own systems, leads, and staff. For a rookie, it's a liability.
5. Do teams take another split?
Yes. Team splits are separate from and usually in addition to brokerage splits.
6. What fees are "normal" in California?
A transaction fee ($250-$500) and E&O insurance are standard. Watch out for hidden "marketing" or "admin" fees.
7. What if the brokerage provides the leads?
Expect a referral fee (25-40%) to be taken before the split is calculated.
8. What is a transaction fee vs. a TC fee?
Transaction fees go to the broker. TC (Transaction Coordinator) fees go to the professional who manages your escrow paperwork.
9. How do splits work on leases?
Often a flat fee or a much higher split (e.g., 50/50) because the dollar amounts are lower.
10. Should I join a high-split brokerage if I'm part-time?
No. Part-time agents need more supervision because they aren't in the office daily to catch changes in law or contracts.
11. Does the split change if I represent the buyer vs. the seller?
Usually no, but check your independent contractor agreement.
12. How do I avoid Red Flags When Choosing Your First Brokerage?
If they talk about the "split" for 30 minutes but can't show you a training calendar, walk out.
The Call to Arms
Your goal is not to find the perfect split. Your goal is to find the first broker who will turn you from a liability into an asset.
The commission split is just one piece of your launch plan. To build your complete, step-by-step career blueprint and avoid the "learning tax" most rookies pay, start here: Start a Real Estate Career in California.
|
The Real Numbers for Year One.
Disclaimer: Real estate income is highly variable. There are no salary guarantees. Your earnings depend on market conditions, brokerage choice, and individual effort. Read more...
The Real Numbers for Year One.
Disclaimer: Real estate income is highly variable. There are no salary guarantees. Your earnings depend on market conditions, brokerage choice, and individual effort. All numbers provided are scenario-based assumptions used to illustrate business mechanics, not a promise of future earnings.
Why You Can’t Find a Straight Answer
Searching for a "California real estate agent salary" is a frustrating exercise. You'll find averages from $45,000 to six figures—a range so wide it's meaningless. Here’s why: those numbers lump together top-performing veterans with brand-new agents who may go months without a single check.
After 20+ years coaching professionals at ADHI Schools, I can tell you the real question isn't about averages. It's about your first-year reality. Let's replace the confusing hype with a clear, mechanics-based framework you can use to plan your survival and success.
The Framework (The Only Formula That Matters)
To understand your income, you must stop thinking about a "paycheck" and start thinking about "net profit."
The Core Formula:
What You Sold × What You Keep × - What It Costs = Actual Check
As an example, let’s say you sold a $800,000 house and you are on a 70% commission split at a 2% commission.
$800,000 x 2% (gross commission earned) x 70% (your commission split) = $11,200
Every number we discuss below is an attempt to solve for that final variable. If you don't track these levers, you aren't running a business; you're just hoping for a miracle.
Quick Answer: Realistic First-Year Income Ranges (Scenario Models)
The following tiers represent common outcomes we see in the California market based on an $800,000 sales price and a roughly 70% commission split. These are model outputs based on assumptions, not guarantees.
Scenario Profile
Est. Closed Deals
Gross Comm. (To Brokerage)
Net to Agent (Pre-Tax)
The Part-Time Learner
1–2
$20,000 – $40,000
$10,000 – $25,000
The Hustling Newcomer
4–7
$80,000 – $140,000
$50,000 – $90,000
The Team Player
8–12
$160,000 – $240,000
$60,000 – $100,000
Context for the Math:
Part-Time: 10–15 hours/week; primarily referral-based.
Hustling: 40+ hours/week; includes weekly open houses and daily lead generation.
Team: High volume via provided leads; typically involves a 50/50 split with the team leader.
Important: These figures are pre-tax; taxes and your personal burn rate determine what is "livable."
Volatility Note: A single cancelled escrow can wipe out weeks of income projections.
Commission Math Decoded (From Sale Price to Your Bank Account)
Many new agents assume a 3% commission is a fixed rule. In reality, commission rates and splits vary by market and brokerage. This is a simplified model to show the mechanics.
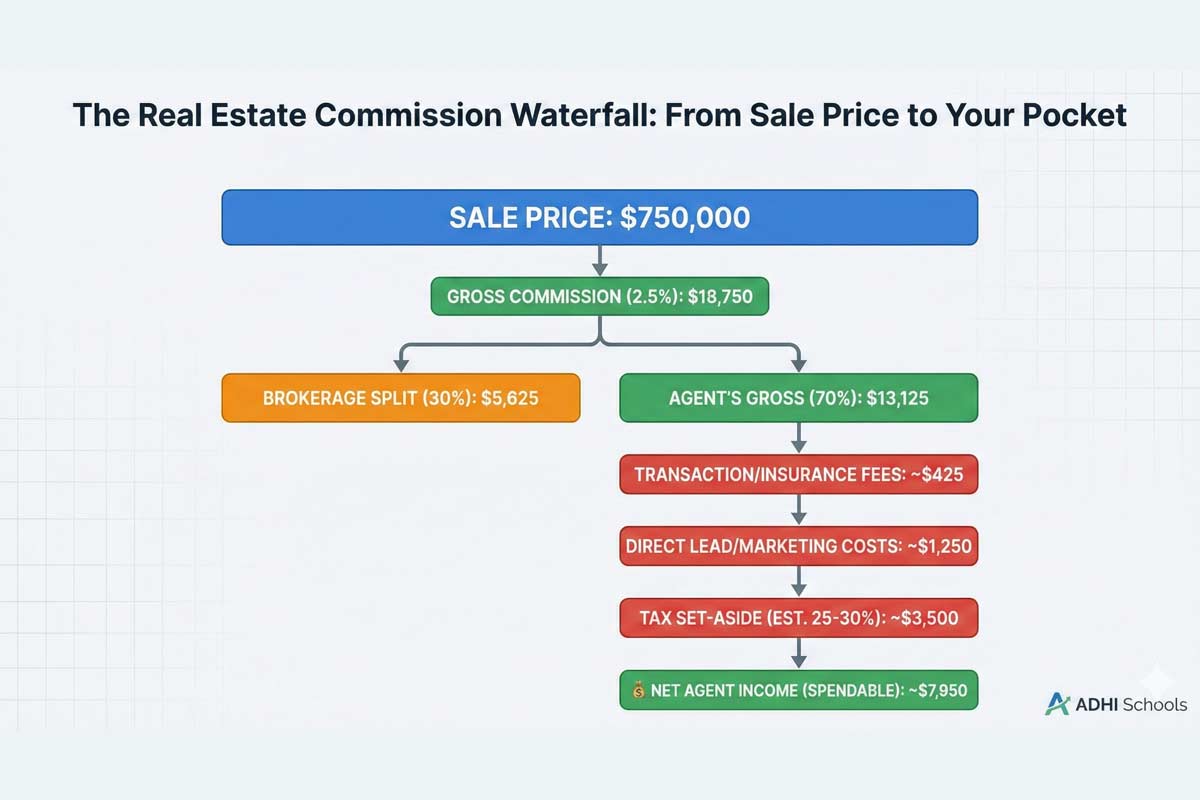
Example: The $750,000 Sale (Assumption Model)
Step
Assumption/Range
Remaining Balance
Sale Price
$750,000
—
Gross Commission to Broker (2.5%)
Model Assumption
$18,750
Brokerage Split (70/30)
Typical solo agent starting split
$13,125
Transaction/Insurance Fees
$250 – $600 (Per-deal variable)
$12,625
Direct Lead/Marketing Cost
$0 (Sphere) – $2,500 (Paid Leads)
$10,125
Tax Set-Aside
Varies by situation—confirm with CPA
Variable
The Takeaway: On a $750,000 sale, your actual spendable income is often less than half of the initial gross commission.
Timeline to Your First Commission Check (The Lag)
The biggest threat to a new agent isn't a lack of talent; it's a lack of capital during the "lag." Understanding how long it takes to start a real estate career is the first step in managing your cash flow, as the licensing process itself often takes a few months.
Once licensed, the wait for your first dollar of income is months, not weeks.
The Ramp: Active lead generation before an offer is accepted.
The Escrow: 30–45 days of waiting for the deal to fund and the check to clear.
Runway Reality: If you are going full-time, a 6–9 month cushion for living expenses is a common safety threshold.
What Slows You Down (Traps)
Administrative Perfectionism: Spending weeks on "branding" instead of talking to human beings.
Escrow Fallouts: In CA, inspections or loan issues can kill a deal late in the game, resetting your income timeline.
What Speeds It Up (Levers)
Focusing on Buyers: A motivated buyer can often be put into escrow faster than a listing can be prepped, staged, and marketed.
Open Houses: This is the fastest face-to-face way to meet unrepresented buyers without an upfront ad spend.
Hidden Expenses (Your First-Year “Cost of Existence”)
You are a business owner, and businesses have overhead. The "gotcha" is that expenses hit before income. You will be paying for access to the market while you are still trying to find your first client.
First-Year Expense Budget (Estimates)
Category
Item
Est. Annual Range
Fixed/Initial
Licensing, Exam, Fingerprints, Board Dues
$2,000 – $3,500
Operational
E&O Insurance, CRM, Signage
$1,500 – $4,000
Recurring Dues
Quarterly MLS Fees / Annual Association
$800 – $1,500
Transportation
Gas, vehicle maintenance, travel time
$1,500 – $4,000
Marketing
Mailers, Digital Ads, Lead Gen
$2,000 – $10,000+
TOTAL
$7,800 – $23,000+
Cash Flow Warning: Many board and MLS dues are due in full upon joining. Budget at least $2,000 for your "Day 1" operating costs.
Scenarios: Applying the Formula to Real Life
1. The Part-Time Learner
Assumptions: 2 deals/year ($800k avg), 70/30 split.
Math: ($40k Gross) x 0.70 = $28k. Minus $7k expenses.
Approx. Net Outcome: $21,000 (Pre-tax).
2. The Hustling Newcomer
Assumptions: 6 deals/year ($800k avg), 80/20 split (achieved via production or boutique brokerage; many start closer to 70/30).
Math: ($120k Gross) x 0.80 = $96k. Minus $15k expenses.
Approx. Net Outcome: $81,000 (Pre-tax).
Verdict: This is a common target for a dedicated full-time solo agent in their first year.
3. The Team Player
Assumptions: 10 deals/year ($800k avg), 50/50 team split.
Math: ($200k Gross) x 0.50 = $100k. Minus $8k expenses.
Approx. Net Outcome: $92,000 (Pre-tax).
What Moves the Needle Fastest (Highest-ROI Actions)
Lead Source Consistency: Pick two sources (e.g., Open Houses and Geographic Farming) and do them every week without fail.
Daily Lead Gen: A non-negotiable 3-hour block every morning dedicated to finding new business.
Database Mining: Your "Sphere of Influence" is your highest-ROI asset.
Common Mistakes That Keep New Agents Broke
Living on the Gross: Spending the full commission check and forgetting that a portion belongs to the IRS.
Compliance & Documentation: Missed signatures, missing disclosures, or late paperwork can delay funding and create liability.
Part-Time vs. Full-Time (The Financial Truth)
The reality of starting real estate part-time in CA is a common way to manage the financial gap while you learn the ropes. While your availability for mid-day tasks is limited—potentially extending your timeline—you bypass the immediate pressure of zero income during the ramp-up.
Fit Check (Should You Pursue This?)
Before diving in, ask yourself:
Runway: Do I have the cash to cover my life and my new business for several months?
Discipline: Can I work 40+ hours a week without a boss directing my daily tasks?
Risk: Am I comfortable with "lumpy" income where zero-dollar months are possible?
If you have the temperament, see if you align with the personality traits of successful California agents. If you're still on the fence, we have an honest assessment of whether you should become a real estate agent in California.
FAQs
“Do new agents really make $100,000 in their first year?”
It is possible, particularly in high-priced markets, but typically requires joining a high-volume team or having an existing, massive network.
“How many deals do I need to close to make $X in California?”
Don't use "rules of thumb." Use the formula: Calculate your local average price, subtract your broker's split, subtract your estimated expenses, and see how many deals it takes to reach your target.
“Is joining a team worth the split cut for a new agent?”
Usually. A 50/50 split of a closed deal is better than a 100% split of a deal that never happens. Teams offer immediate leads and coaching.
“What’s the fastest way to get my first commission check?”
Focusing on buyers is the most direct path to a contract, though "fast" in real estate still often means multiple weeks to months from meeting the client to getting paid.
“Can I survive on part-time real estate income in CA?”
Only if it is supplemental. Fixed costs remain the same whether you sell one house or twenty. You must close at least 1-2 deals a year just to cover your professional dues and expenses.
“What’s the biggest financial surprise for new agents?”
The self-employment tax and the fact that most business expenses hit your bank account before your first commission check does.
Key Takeaways + Your Next Step
You are a business: Gross commission is not your salary. Track your net income post-split and post-expense.
Mind the Lag: Budget for a multi-month ramp-up period.
Upfront Costs: Expect $2,000+ in startup fees before you can even begin marketing.
Now that you understand the math, the next variable is execution. If you want the step-by-step path from decision → licensing → first clients, the start a real estate career in California roadmap we use can help you build the right foundation.
TL;DR: * Gross vs. Spendable: You are a business owner. Your "take-home" is the remainder after brokerage splits, recurring dues, marketing costs, and tax obligations.
The Pipeline Lag: Due to licensing cycles and escrow, a common pattern we see is a multi-month wait for your first dollar of income.
Upfront Costs: Expect to pay $2,000–$4,000 in licensing and board fees before your first closing.
|

There is a massive gap between the "Instagram version" of California real estate and the actual mechanics of the business. On screen, the job looks like high-end luxury tours and effortless commission Read more...
There is a massive gap between the "Instagram version" of California real estate and the actual mechanics of the business. On screen, the job looks like high-end luxury tours and effortless commission checks. In reality, being a real estate agent is a rigorous exercise in small business management, psychological resilience, and relentless lead generation.
If you are researching this career, you probably aren’t looking for a sales pitch. You are looking for a framework to decide if this career is for you—not the "idea" of the career, but the actual day-to-day work.
This guide provides a clear-eyed assessment of the industry. We will look at the actual daily schedule, a scorecard to measure your personal fit, and the financial reality of starting out in the Golden State.
Quick Answer: Is Real Estate a Good Career in California?
Becoming a real estate agent in California is a high-potential path for those who are disciplined self-starters, have a financial cushion, and possess a high tolerance for rejection. While the income ceiling is high due to California’s property values, it is not a "steady job." If you want a steady paycheck, this is the wrong job. It is, however, a fit for those who can navigate the first several months without a closing to build a long-term business.
Your next step: Use the scorecard below and run the 14-day test to help make a decision.
The Unvarnished Snapshot: A Day in the Life
Most new agents fail because they reverse the ratio: they spend 90% of their time studying houses (or other non-lead-generating activities) and 10% of their time prospecting. This career operates on a simple, unforgiving law: no pipeline = no income.
The agents who build a career understand this and systemize lead generation, protecting daily time for outreach above all else.
Note: This is a typical structure, not a promise—some days blow up due to an emergency or a sudden listing opportunity.
Lead Generation (8:00 AM – 11:00 AM): The "non-negotiable" block. Calling your sphere of influence, following up on old leads, or door-knocking.
The Documentation Grind (11:00 AM – 1:00 PM): Handling required disclosure paperwork and following office compliance procedures to protect your client.
Follow-up & Admin (1:00 PM – 3:00 PM): Chasing lenders for pre-approval letters, checking on escrow progress, and managing client anxiety.
Field Work (3:00 PM – 5:30 PM): Driving to properties—battling California traffic—to preview homes, meet appraisers, or attend a home inspection.
The "Second Shift" (6:00 PM – 8:00 PM): Meeting with clients who work 9-to-5 jobs to sign offers or review listings.
Kartik’s Perspective: In real estate, your value is often tested during time-sensitive windows of a transaction—like during a contingency period. I’ve watched agents jeopardize significant deals by being unavailable when a pressing issue arose. It might not always be a 9 PM call, but if a client discovers a major repair issue and needs guidance, or an emotional buyer panics after an appraisal gap, your responsiveness can be what saves the transaction. You aren’t just selling houses; you’re managing high-stakes, time-sensitive problems. If you’re not reachable when critical questions come up, trust can erode and deals can fall apart.
Core Decision Tool: California Agent Fit Scorecard
Be honest. Score each statement: 0 (No), 1 (Somewhat), 2 (Yes).
Statement
Score (0-2)
I have 3–6 months of living expenses saved (or a part-time plan that covers my bills).
I am comfortable asking friends, family, and strangers for business.
I can stick to a self-imposed schedule without a boss watching me.
I view "No" as a data point, not a personal rejection.
I am willing to work Saturdays and Sundays on occassion.
I am naturally detail-oriented and don't mind repetitive paperwork.
I am comfortable with my income fluctuating month-to-month.
I enjoy the "hunt" for new clients more than the "task" of showing homes.
I can remain calm when a paycheck is at risk due to an appraisal gap.
I am committed to learning CA forms and local office procedures.
The "Kill Switch"
If you won't do outreach, don't do real estate. You are starting a lead-generation business. If the idea of asking for business makes you recoil and you are unwilling to push past it, think carefully before committing to a full-time real estate career.
Interpretation & Next Steps:
0–8 (Uphill Battle): High risk of burnout. Next Step: Do not quit your day job yet. Consider an "inside sales" or admin role within a brokerage to see the grind first-hand.
9–14 (Strategy Required): You have potential but need structure. Next Step: Maybe thinking about starting real estate part time before jumping in head first.
15–20 (Strong Alignment): You have the entrepreneurial mindset. Next Step: Use our Start a Real Estate Career in California guide as your execution roadmap.
California-Specific Realities: Pros & Cons
The Pros
High-Value Commissions: Higher median home prices in CA mean the "per-transaction" pay is exceptional compared to most of the country.
Niche Diversity: Opportunities abound in ADUs, coastal luxury, probate, and multi-family investments.
Compounding Referrals: A satisfied client in a high-turnover CA neighborhood can provide a decade of repeat business.
The Cons
Systems Over Speed: You’ll handle complex disclosure paperwork and strict office procedures; details matter. Your broker and Transaction Coordinator (TC) will have specific protocol—follow them to the letter.
Traffic & Geography: The "time cost" of a showing deep in Los Angeles or the Bay Area is an operational expense you must factor into your day.
Emotional Volatility: Rejection, client "ghosting," and the stress of high-stakes negotiations are part of the daily job.
The Money Talk: Realistic Expectations
New agents often suffer from "pipeline lag." You might find a client in month two, get an offer accepted in month three, and close in month four.
Kartik’s War Story: An agent once worked for four months on a $1.2M deal. It died at the finish line and because the agent had already mentally "spent" the money, they were devastated. In California, the deal isn't done until recorded and closed.
Your "Cost of Existence"
Before you earn a commission, you must pay to "exist" in the industry:
Pre-license education and state exam fees.
Realtor association dues (Local, State, and National).
MLS subscription and lockbox access fees.
Errors & Omissions (E&O) insurance.
Gas, travel, and the "time cost" of being in the field.
Marketing (CRM, business cards, and digital presence).
For a granular look at take-home pay after splits and taxes, read: How Much Do New Real Estate Agents Make in California?
The Timeline: Decision to First Client
Licensing is just the entry fee. The real estate exam requires significant memorization of CA-specific law; many people fail because they underestimate the academic prep.
Education & Exam: Complete the 135 hours of CA courses and pass the state exam.
Brokerage Onboarding: Joining a firm and getting access to the MLS.
The Pipeline Phase: Active lead generation until your first escrow opens.
For the week-by-week specifics on getting licensed, see: The How Long Does It Take to Start a Real Estate Career?
Personality Fit: Who Thrives vs. Who Wilts
Who Thrives: The "Relentless Follower-Up." They don't take "not right now" as a "no." They are comfortable with the detail-oriented parts of the contract.
Who Wilts: The "Order Taker." If you wait for the phone to ring or for a buyer to "fall in your lap," you will likely struggle. High attrition rates in the first two years are almost always due to a lack of proactive lead generation.
To see if you match the psychological profile of a top producer, read: Personality Traits of Successful California Agents.
Part-Time Path: Is It Viable?
Starting part-time is possible, but it requires extreme discipline.
Works for: Those with a flexible primary job and a strong local network who will trust them regardless of their "full-time" status.
Doesn't work for: Those with a rigid 9-to-5 who cannot answer their phone or attend a home inspection during business hours.
For strategies to bridge the gap, see: Should You Start Real Estate Part Time in CA?.
Myths vs. Reality
Myth
Reality
"I'll be my own boss and have tons of free time."
You are your own boss, which means you are also your own most demanding employee.
"The market will carry me."
You are starting a marketing business that happens to sell houses. Markets fluctuate; systems endure.
"Instagram is the fastest way to get clients."
Social media helps, but it rarely replaces direct outreach to your existing database in the first 12 months.
Fence-Sitters: 14-Day Low-Risk Experiments
The Agent Interview: Call three active agents or visit a random open house and ask the agent: "What was the most frustrating negotiation you had this month?" and "What did you do this week that directly created future business?"
The Schedule Simulation: For the next two Saturdays, block out 10:00 AM to 1:00 PM. Spend that time researching local market stats. If you resent giving up your weekends now, you’ll hate it later.
The Outreach Muscle Test: For 10 minutes a day, call someone you know just to catch up. See if you have the stamina for consistent daily conversation.
If you have completed the scorecard and the experiments, and you still feel the "pull," it’s time to move to the execution phase.
Your next step is to build a grounded, step-by-step plan. Here is how to Start a Real Estate Career in California.
Disclaimer: This article is for informational and educational purposes only. It is not legal, financial, or tax advice. Consult the appropriate professionals for your situation.
FAQ
How much money should I save before starting real estate?
We recommend having 3 to 6 months of living expenses saved. Full-time agents often need closer to 6 to 9 months of runway to account for the "pipeline lag" before their first commission check clears.
Is the California real estate exam hard?
With roughly half of candidates failing on their first attempt, it can be a significant hurdle. It is a test of your knowledge of state-specific law and ethics, not your sales ability.
What’s the fastest way to get your first client in CA?
Focus on your "Sphere of Influence"—people who already know and trust you. For the full roadmap, see our guide on how to Start a Real Estate Career in California.
Why do so many agents quit within the first two years?
Attrition is high because many underestimate the "cost of existence" fees and the emotional toll of inconsistent income and rejection during the first 12 months.
Do I need a college degree to be an agent in CA?
No. You must be 18, legally present in the US, and complete 135 hours of approved education.
|
If you are looking for a single, definitive number of days to become a real estate agent, you won’t find it here. Anyone offering one is oversimplifying a complex process.
After 20 years of helping Read more...
If you are looking for a single, definitive number of days to become a real estate agent, you won’t find it here. Anyone offering one is oversimplifying a complex process.
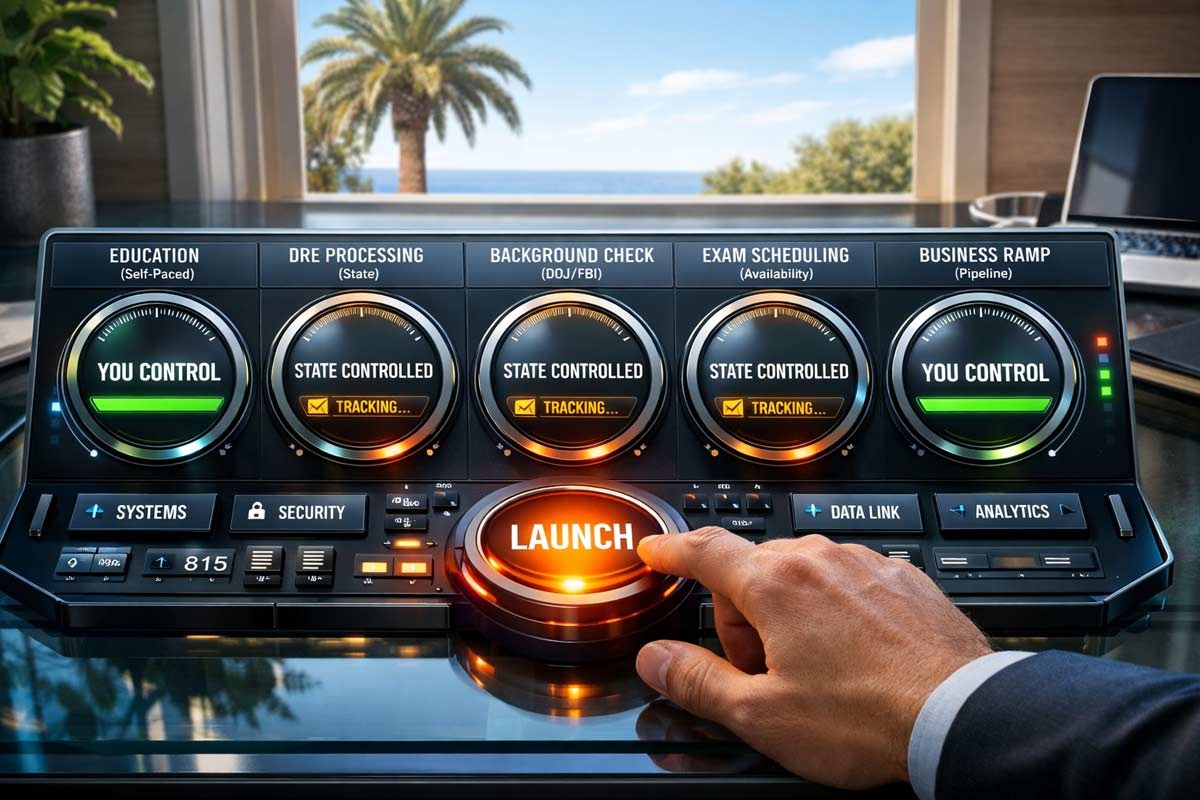
After 20 years of helping students navigate this transition, I’ve found that the total time is actually determined by five interconnected clocks. The timeline is a series of moving parts: your personal study pace, the Department of Real Estate (DRE) processing speed, your background check, the state exam scheduling backlog, and your "business ramp."
This guide replaces speculation with an operational roadmap. By understanding who "owns" the time in each of these five clocks, you can stop reacting to the process and start managing it.
Note on DRE Timing: Processing and scheduling windows fluctuate significantly based on application volume. For the most accurate, real-time data, always Check DRE’s Current Processing Timeframes.
TL;DR: The Realistic Outlook
The Fast Track (10–14 Weeks): Full-time focus, electronic applications, and aggressive scheduling.
The Typical Track (4–6 Months): Part-time study with standard DRE processing.
TThe Slow Track (8+ Months): Inconsistent study, paper application errors, or exam retakes.
The Business Ramp: Expect a 3–6 month gap between getting your license and receiving your first commission check.
The "Five Clocks" Framework
To manage your expectations and your budget, you must identify what moves each clock:
Clock #1: Education – Controlled by a combination of you and state rules. DRE-approved providers like ADHI Schools enforce a minimum access period (commonly 18 calendar days per 45-hour course), so the fastest practical completion is often ~54 days.
Clock #2: DRE Processing – Controlled by the State. This is the time it takes for the DRE to review your application and transcripts.
Clock #3: Background Check – Controlled by DOJ/FBI. Your license generally won't be issued until your Live Scan fingerprint results are received and processed by the DRE.
Clock #4: The Exam – Controlled by DRE availability. Once qualified, you must find an open seat at a testing center for the 150-question, 3-hour exam.
Clock #5: Business Ramp – Controlled by you and your broker. This includes selecting a firm, lead generation, and an escrow period.
The 3 Timelines: Which Track Are You On?
1. The Fast-Track (The Organized Hustler)
Range: 11–14 Weeks (Approx. 3 to 3.5 months).
The Profile: Treats licensing like a high-priority project.
Vignette: Jake, a former operations analyst, utilized the provider minimum-access periods to master the material. He submitted an electronic "Combo" application on Day 55. Because he had already completed his Live Scan, his license was activated shortly after passing his exam.
2. The Typical Track (The Balanced Achiever)
Range: 4–6 Months.
The Profile: Balances licensing with a 9-to-5 or family responsibilities.
Vignette: Matthew, a server transitioning careers, studied 10 hours a week between shifts. It took him 16 weeks to finish the education. He monitored the Check DRE’s Current Processing Timeframes page weekly to prepare for her test date.
3. The Slow-Track (The Reactive Planner)
Range: 8+ Months.
The Profile: Struggles with consistency or paperwork errors.
Vignette: Sam completed his courses in 3 months but mailed a paper application with an incorrect fee. Paper applications increase the odds of mail-back delays because corrections require a physical return, and he lost 4 weeks before he could resubmit.
Step-by-Step Operational Roadmap
Step
Clock #
What You Actually Do
Time Range
Action Owner
Clock Controller
Micro-Action (Pro Tip)
Pre-Clock
—
Audit your finances/goals.
1-3 Days
You
You
Read Should You Become a Real Estate Agent in California?
1. Education
#1
Complete 3 courses (135 hrs).
8–52 Weeks
You
School
Set calendar alerts for Day 18 of each course to take your finals.
2. App/Legal
#2
Submit Combo Exam/License App.
Varies (Check DRE)
You
DRE
Use eLicensing; ensure ID names match transcripts exactly.
3. Background
#3
Live Scan fingerprinting.
Varies
You
DOJ/FBI
Submit fingerprints the same week you apply.Use Form RE 237.
4. The Exam
#4
Pass the 150-question, 3-hour test.
3–8 Weeks
You
DRE
Check the eLicensing portal frequently for seat cancellations.
5. Brokerage
#5
Hang your license at a firm.
2–4 Weeks
You
You / Broker
Choose your broker before taking the exam
6. First Sale
#6
Close your first transaction.
3–6 Months
You
You / Market
Read How Much New Real Estate Agents Make in California.
Top 3 Delay Traps (Ranked by Impact)
The Paper Application Error (High Impact): Mailing a paper application (RE 435) is a common cause of avoidable delays because corrections require a physical mail-back from the state.
The Antidote: Use the eLicensing portal for electronic submission whenever possible.
The Post-Exam "Background Hold" (Medium Impact): Many wait until after they pass the exam to do their Live Scan. The DRE won't issue the license—even with a passing score—until the background check clears. Processing depends on the DOJ and delays can occur.
The Antidote: Complete your fingerprints before submitting your combo exam/license application.
The Education Procrastination (Medium Impact): Because pre-licensing is self-paced, many people let Clock #1 stretch from 2 months to 10 months.
The Antidote: Treat the provider minimum-access period as a deadline, not a suggestion.
Your 90-Minute Launch Plan: Start Today
To gain control over the five clocks, complete these steps in order:
Clock #1 (Education): Enroll in your pre-licensing courses. The provider minimum-access clock does not start until you are officially enrolled in the first course.
Clock #2 (Paperwork): Create an account on the DRE eLicensing portal 2. to familiarize yourself with the requirements.
Clock #3 (Background):Download Form RE 237 and find a local Live Scan vendor.
Clock #4 (Exam): Decide on your target exam month and identify the two nearest testing centers to increase your scheduling options.
Clock #5 (Business Ramp): Determine your starting commitment. If you are balancing this with another job, read Whether You Should Start Real Estate Part-Time in CA.
Self-Assessment: Successful agents often share specific grit and organizational traits. Review The Personality Traits of Successful California Agents to see where you align.
Frequently Asked Questions
What is the fastest I can legally get my license?
The best-case scenario is ~10–12 weeks depending on DRE's Current Processing Timeframes and exam availability.
Can I do this while working full-time?
Many people do. It generally extends the timeline to the 4–6 month range. Success depends on dedicating a consistent "study block" each day.
When should I interview brokers?
Interview brokers while you are waiting for the DRE to process your application (Clock #2). Do not wait until you pass the exam, or you will stall your business ramp (Clock #5).
How long after passing the exam can I start selling?
You can start as soon as your broker "adds" you to their license via eLicensing. However, the lag between starting and getting paid is usually several months.
What if I have a past criminal conviction?
A background issue may extend Clock #3, as the DRE performs a manual review. Transparency is vital; disclosure errors often cause longer delays than the convictions themselves.
Take Control of Your Clock
The timeline to start a real estate career in California is a test of your ability to manage administrative details and personal discipline. While you cannot control State processing speeds, you can control the quality of your application and the consistency of your study habits.
Managing these clocks is your first project as a professional. Once you master the timeline, you can shift your focus to the long-term growth of your business. For a comprehensive look at the entire journey, see our roadmap on how to start a real estate career in California.
|
The single biggest mistake I see agents make during renewal isn’t failing a test—it’s finishing 45 hours of education only to realize none of it counts.
Just because a class is about real estate Read more...
The single biggest mistake I see agents make during renewal isn’t failing a test—it’s finishing 45 hours of education only to realize none of it counts.
Just because a class is about real estate doesn’t mean the California Department of Real Estate (DRE) accepts it for your license renewal. Your office sales training? Probably doesn’t count. That motivating weekend seminar? Likely doesn’t count.
If you rely on unapproved courses, you risk a lapse in your license status where you cannot legally conduct business.
Here is the no-nonsense guide to exactly what counts, what doesn’t, and how to verify your courses before you spend a dime.
The Fast Answer: What You Need to Know
If you are in a rush, here is the bottom line on course eligibility:
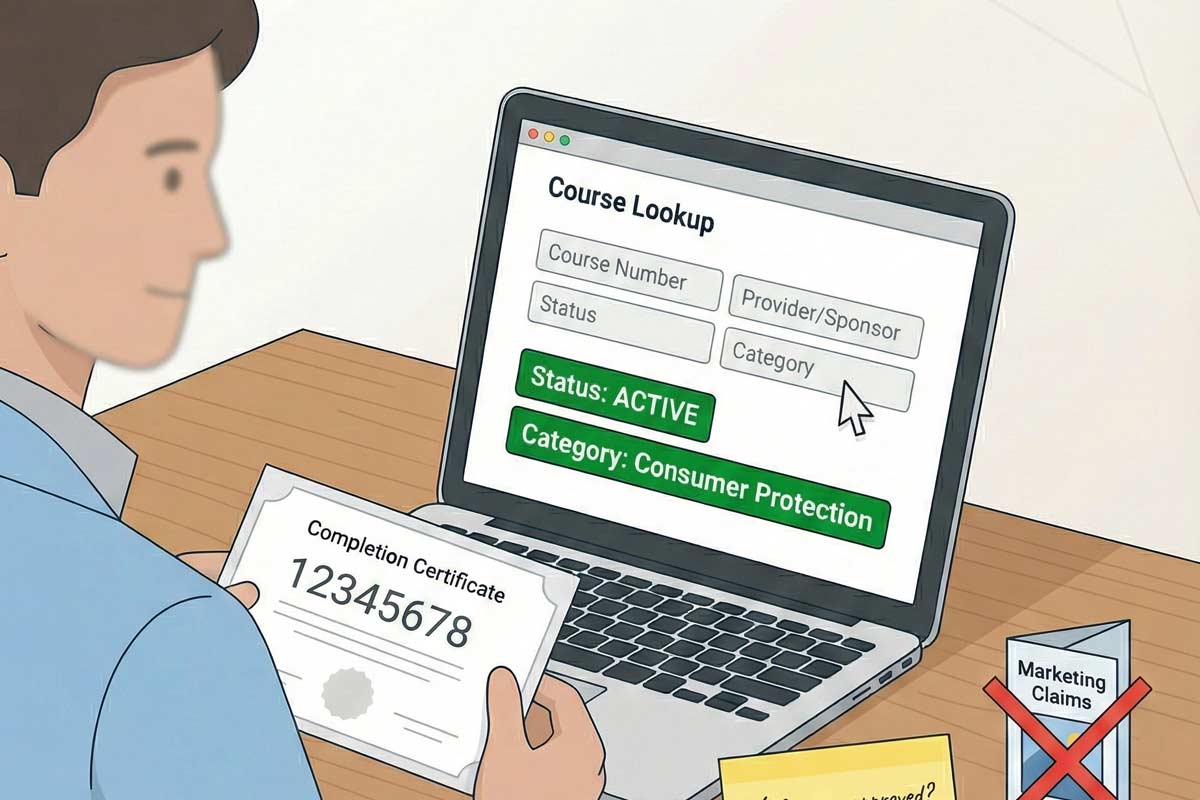
Only DRE-Approved Counts: If the provider doesn’t have a DRE Sponsor Number and the course doesn’t have a DRE Course Number, it does not exist in the eyes of the state.
The Math Matters: You must complete your Mandatory Subjects first, then a minimum of 18 hours of Consumer Protection. Only the remaining hours can be Consumer Service or Consumer Protection.
Interactive Rule: Your Fair Housing course must include an interactive participatory component where you role-play as both a consumer and a professional. A PDF-only read-through is not enough.
Implicit Bias is Mandatory: For licenses expiring on or after Jan 1, 2023, you must complete an Implicit Bias training course.
Verify First: Always check the course number in the DRE database before paying.
Start Here: If you are unsure about the big picture, bookmark our California Real Estate License Renewal Guide for the complete roadmap.
What Does “DRE-Approved” Actually Mean?
For a course to count toward your Continuing Education (CE), it must meet two criteria:
It is offered by a DRE-approved Sponsor (a school or provider).
The specific course has been reviewed and assigned a DRE Course Number.
The DRE measures education in “clock hours.” When we say you need 45 hours, we mean 45 credit hours approved by the state—not necessarily 45 hours of sitting in a chair if you are a fast reader, but the content must match that volume.
Crucial: You must receive an official Completion Certificate featuring an 8-digit certificate number. You should retain these certificates for four years after your renewal in case you are audited.
The 60-Second Decision Tree: What Counts for You?
What you need depends entirely on where you are in your career.
1. Are you a Salesperson renewing for the FIRST time?
What counts: You have a strict list. You need 5 separate three-hour courses in Ethics, Agency, Trust Funds, Fair Housing (with interactive role-play), and Risk Management.
Plus: You need a 2-hour Implicit Bias course and a minimum of 18 hours of Consumer Protection.
Warning: You cannot take the Survey Course yet. You must take separate, dedicated courses.
2. Are you a Broker renewing for the FIRST time?
What counts: Same as the salesperson list above, but you also need a course in Management & Supervision. For a deep dive on this, read Do Brokers Have Different CE Requirements in CA?
3. Is this your SECOND or SUBSEQUENT renewal (Broker or Salesperson)?
What counts: You have more flexibility. You can take a single Survey Course (which covers the mandatory subjects: Ethics, Agency, Trust Funds, Fair Housing, Risk Management, Management & Supervision, and Implicit Bias).
Plus: You need a minimum of 18 hours of Consumer Protection.
Remaining Hours: The rest of your 45 hours can be filled with either Consumer Protection or Consumer Service.
To check the exact math on totals, check out How Many CE Hours Are Required for CA License Renewal?
The Three Buckets: Mandatory, Consumer Protection, and Consumer Service
To build a valid 45-hour package, you need to prioritize the categories in this order:
1. Mandatory Subjects
These are the non-negotiables. The state requires you to stay updated on the laws that protect the public.
The List: Ethics, Agency, Fair Housing, Trust Fund Handling, Risk Management, Management & Supervision, and Implicit Bias.
The “Survey” Shortcut: If you are on a subsequent renewal, a 9-hour Survey Course counts as covering all these topics.
Note: Not sure if the new bias rules apply to you? Read Does California Require Implicit Bias Training for Renewal?
2. Consumer Protection (The "Primary" Elective)
This category is the gold standard for electives.
Requirement: You generally need a minimum of 18 hours in this category.
Definition: Courses that help you protect the client’s interest.
What Counts (Common Examples):
Real Estate Valuation/Appraisal
Property Management logic
Green Real Estate/Energy Efficiency
Real Estate Finance and Truth-in-Lending
Landlord/Tenant Relationships
3. Consumer Service (The "Leftover" Elective)
This is the most confusing category. These are courses that improve your skills but don't necessarily protect the public legally.
The Rule: Consumer Service hours only count after you have satisfied your Mandatory subjects and your 18 hours of Consumer Protection. You can fill the remaining gap with these.
What Counts (Common Examples):
Real Estate Marketing
Negotiation Skills
Computer Applications/Tech for Real Estate
General Sales Skills
My Advice: Stick to Mandatory + Consumer Protection. It’s the safest path to ensure you never accidentally short yourself on the required protection hours.
What Does NOT Count (Don’t Waste Your Money)
I have seen agents spend hundreds of dollars and weekends of time on things that count for zero hours toward renewal.
Training from your Broker: Unless your brokerage is an official DRE-approved CE sponsor and issued you a course number and certificate, that Tuesday morning sales training does not count.
Motivational Seminars: Tony Robbins is great, but the DRE doesn’t care. Personal development is not CE.
Pre-License Courses: You cannot retake “Real Estate Principles” and have it count for CE. Pre-license and Continuing Ed are two different legal buckets.
Out-of-State CE: Licensed in Nevada too? Your Nevada CE usually does not count for California unless that specific provider registered that specific course with the California DRE.
Expired Courses: If you took a CE course 5 years ago, you cannot use it for this renewal. It must be completed within your current four-year license term.
How to Verify a Course Counts (Step-by-Step)
Don’t trust the marketing on a website. Trust the database.
Get the Course Number: Ask the school for the 8-digit DRE course number.
Go to the Source: Visit the DRE’s Approved Continuing Education Courses lookup (on the DRE website).
Search: Enter the course number or the provider name.
Check the Status: Ensure the status is “Active.”
Check the Category: Make sure the category (e.g., Consumer Protection) matches what you need to fill your gap.
Verification Checklist:
Is the sponsor approved?
Is the course status "Active"?
Does the course category match my renewal requirements?
Will I receive a certificate with an 8-digit number immediately upon completion?
Real-World Scenarios: Where Agents Get Stuck
The “Cheap Bundle” Trap Agent Mark found a $30 renewal package online. He finished it in a weekend. When he uploaded it to eLicensing, he was rejected. Why? The bundle was old. The Fair Housing course lacked the required interactive participatory component (role-playing as both consumer and professional), and it was missing the Implicit Bias module entirely.
Lesson: Cheap often means outdated. Ensure the package is current for 2026 standards.
The “I Thought My Designation Counted” Trap Agent Sarah took a grueling 3-day course to get a luxury home designation. She assumed 24 hours of class time meant 24 hours of CE. It turned out the provider never registered the course with the California DRE. She got a nice pin for her lapel, but zero CE credits.
Lesson: Never assume. Check the DRE database.
Frequently Asked Questions
Do webinars count for CE? Yes, BUT only if the webinar provider is DRE-approved and they have a method to verify your attendance (like monitoring your login time or requiring exit quizzes). Live DRE-approved webinars are a valid way to knock out hours.
Can I repeat the same course every renewal? Generally, the DRE allows you to repeat courses in subsequent renewal cycles, provided the course material is still current and approved.
What is the difference between Consumer Protection and Consumer Service? Consumer Protection courses teach you how to protect the client (laws, disclosure, financing). Consumer Service courses teach you how to do your job better (marketing, computer skills). You must have at least 18 hours of Protection; Service hours only count toward the remaining balance.
How do I know if my Fair Housing course is “Interactive”? The course description should explicitly state it includes an "Interactive Participatory Component." The DRE requires this to include role-play as both a consumer and a real estate professional. If you just read a PDF and take a final exam, it likely does not meet the requirement.
What happens if my license expires before I renew? If you submit your renewal application and fees on time (before midnight of your expiration date), you can generally continue operating under B&P Code 10156.2 while the DRE processes it. However, if you are late, you enter a two-year grace period where you can still renew, but you cannot perform any licensed activity until your license is officially renewed.
What if I finish my CE early? That is great. You can upload your courses to the DRE eLicensing system up to 90 days before your expiration date. Do not wait until the last night.
Don’t Risk Your License
Renewing your license is not the time to experiment with unverified courses. The DRE audits renewals, and mistakes can delay your ability to work.
Make sure every hour counts. Stick to approved sponsors, verify your certificates, and get it done early so you can get back to selling.
Next Step: Ready to see the full roadmap? Go to our California Real Estate License Renewal Guide to get started.
|
Fast Answer: Your 2026 Renewal Snapshot
If you are staring at a real estate license renewal notice (or dreading its arrival), here is the bottom line. Most (there’s an exception I will discuss in Read more...
Fast Answer: Your 2026 Renewal Snapshot
If you are staring at a real estate license renewal notice (or dreading its arrival), here is the bottom line. Most (there’s an exception I will discuss in a bit) licensees cannot renew their California real estate license without checking these boxes.
Total CE Hours: 45 hours (generally required, unless you qualify for the 70/30 exemption).
Renewal Cycle: Typically every 4 years.
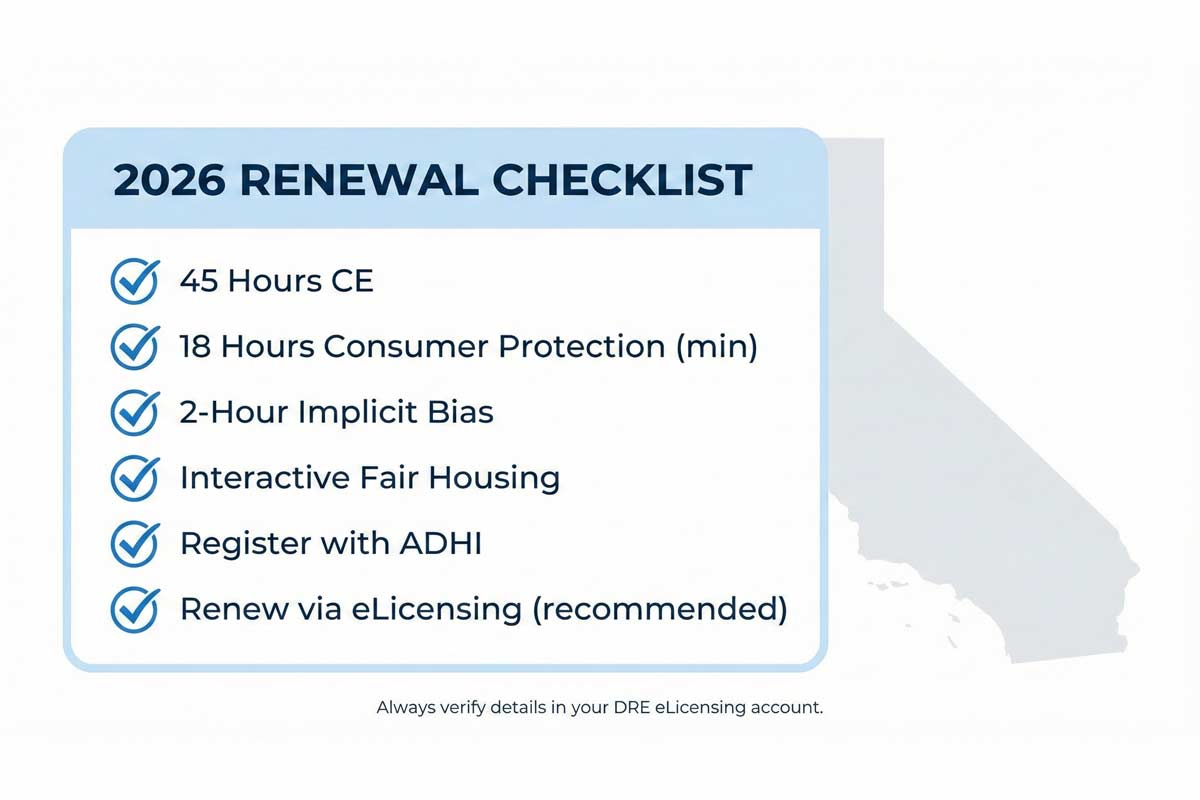
The "New" Standards: If your license expires on or after Jan 1, 2023, you must have the 2-hour Implicit Bias course and the Interactive Fair Housing course. (Older certificates without these specific components will not satisfy current renewal requirements).
Submission Method: DRE eLicensing system (recommended and fastest) or mail (slower).
Earliest You Can Renew: Often about 90 days before expiration (check your eLicensing account for your specific window).
Absolute Minimum Time to Complete CE: ADHI Schools’ renewal program can be completed in about 8 days from the time of registration to completion. CE providers enforce a limit of 15 credit hours per 24-hour period to prevent "speed clicking" under DRE rules. This means you cannot cram 45 hours of course completion into a single weekend.
Who This Applies To (Read This First)
Before you buy a package, verify your status. The California real estate license renewal requirements for 2026 differ depending on where you are in your career.
First-Time Renewal vs. Subsequent Renewal
First-Time Salesperson: You cannot take the shortcut "Survey" course. You must take five separate 3-hour courses (Agency, Ethics, Trust Fund Handling, Risk Management, Fair Housing) plus the 2-hour Implicit Bias course, and at least 18 hours of Consumer Protection.
Subsequent Renewal (2nd, 3rd, etc.): You are eligible for the 9-hour Survey Course. Per DRE rules, this single course covers all 7 mandatory topics (the five above, plus Implicit Bias and Management & Supervision). It is streamlined, but you still must enter the completion details for the remaining hours.
Broker vs. Salesperson
Brokers: You must include "Management & Supervision" in the required subject set on your first renewal.
Salespersons: For subsequent renewals, Management & Supervision is effectively required because it is included in the standard 9-hour Survey Course.
Kartik’s Insider Note: "I’ve seen veteran agents assume they know the rules because they’ve renewed five times. Then they get flagged because they missed the Implicit Bias requirement or took a Fair Housing course that lacked the 'interactive' component. Don't coast on autopilot."
For a complete breakdown of the entire process from start to finish, bookmark our master California Real Estate License Renewal Guide.
The 2026 Renewal Requirements (Detailed Breakdown)
The DRE (Department of Real Estate) is strict about course validity. If your course completion dates or course numbers don't match the current requirements, your renewal may be flagged.
1. The 45-Hour CE Requirement
Most licensees must complete 45 hours of DRE-approved Continuing Education. These hours are broken down into Mandatory Subjects and Consumer Protection (with a limit on Consumer Service hours).
How Many CE Hours Are Required for CA License Renewal?
First-Time Salespersons: 5 separate 3-hour courses (Ethics, Agency, Fair Housing, Trust Funds, Risk Management) + 2-hour Implicit Bias + 18 hours Consumer Protection + remaining hours (Consumer Service max 27 hrs).
First-Time Brokers: 6 separate 3-hour courses (Adds Management & Supervision) + 2-hour Implicit Bias + 18 hours Consumer Protection + remaining hours.
Subsequent Renewals (All): 9-hour Survey Course or individual courses (covering mandatory topics) + 18 hours Consumer Protection + remaining hours.
2. The "Must-Have" Courses (Current Standard)
Two specific requirements trip people up the most:
Implicit Bias Training (2 Hours): This is non-negotiable. Does California Require Implicit Bias Training for Renewal? Yes, effective Jan 1, 2023.
Interactive Fair Housing: You cannot just read a PDF. The course must include an "interactive participatory component." While DRE mandates role-play, in online on-demand courses, this is typically built in as scenario-based interactions (you generally aren't performing live, but you must actively engage with the module).
3. Broker-Specific Rules
If you hold a broker license, you must ensure you are covered on "Management & Supervision."
Do Brokers Have Different CE Requirements in CA? Yes, specifically on the first renewal. Brokers must take "Management & Supervision" as a standalone 3-hour course. (On subsequent renewals, it is included in the 9-hour survey for everyone).
Timeline: When to Start (Don't Ignore This)
Real estate is stressful enough without losing your license because you forgot a deadline.
60 Days Out: Check your eLicensing account. Is your email address current? Do you have any citation fines outstanding?
45 Days Out: Purchase your CE package. Give yourself a buffer.
14 Days Out (The "Safe Zone"): Finish your exams. DRE systems can go down for maintenance. Certificates can get misplaced. Do not be the person finishing their exam at 11:30 PM on your expiration date.
Expiration Date: If you submit your renewal on time (before midnight), you can typically continue operating even if the processing takes a few days (under B&P Code 10156.2). However, if you miss the deadline, you are late. Once late, you cannot legally perform licensed activities until the renewal is fully processed.
Common Mistakes That Delay Renewal
After helping thousands of students, here are the real-world scenarios where I see agents get stuck.
Scenario A: The "Fast Reader" Trap
The Situation: Agent Mike waits until 3 days before his license expires. He buys a 45-hour package and tries to power through it in one weekend.
The Result: The renewal will be late. DRE rules require CE platforms to enforce a limit of 15 credit hours per 24-hour period once the exams are unlocked to prevent "speed clicking." Mike’s license expired because the platform physically wouldn't let him take the final exam in time.
Scenario B: The "Wrong Course" Disaster
The Situation: Broker Sarah takes a generic "Fair Housing" course from a cheap provider that wasn't updated for California's interactive requirement.
The Result: She submits her renewal. A week later, the DRE flags it: "Missing Interactive Component." She has to find a new course, pay again, and re-submit. What Courses Count Toward CE in California? Only those with specific DRE approval numbers that meet current legislative standards.
Step-by-Step: How to Renew Without Drama
Verify Your Expiration Date: Log into DRE eLicensing.
Complete Your 45 Hours: Ensure your provider gives you course completion certificates for each course. You will need the 8-digit Course Number for the next step.
Log in to eLicensing: Select "Renew License."
Enter Course Numbers: Use the 8-digit number printed on your CE completion certificate (the one eLicensing asks for) and the completion date exactly as they appear on your documents. Don’t share these secret codes with anyone.
Pay the On-Time Fee:
Salesperson: Check DRE fee schedule (approx. $350).
Broker: Check DRE fee schedule (approx. $450).
Print Your Receipt: If your application is on time and clean (no background issues), your status should update to "Licensed" with a new 4-year expiration date often immediately.
FAQ: Quick Renewal Answers
Q: Can I renew my license after it expires? A: Yes. You have a two-year "grace period" (Late Renewal). You must pay a higher late fee and you cannot practice real estate during this gap until the renewal is fully processed and your status shows "Licensed" again.
Q: Do I need to submit my printed certificates to the DRE? A: Usually, no. You enter the course numbers into eLicensing under penalty of perjury. However, the DRE can audit you. Keep your PDF certificates for at least 4 years.
Q: I am over 70 years old. Do I still need CE? A: Maybe not. If you are 70+ and have been licensed in good standing for 30 continuous years, you can apply for the "70/30 Exemption."
Q: How much does the renewal cost in 2026? A: Fees are subject to change. Always check the DRE fee schedule directly before paying.
Q: What is the difference between Consumer Protection and Consumer Service? A: Consumer Protection courses cover topics that directly protect the public (like laws and disclosures). Consumer Service courses focus on professional skills (like marketing). You must have at least 18 hours of Consumer Protection, meaning you are limited to a maximum of 27 hours of Consumer Service.
Don't Let a Paperwork Error Cost You a Commission
Renewal shouldn't be a guessing game. If you are approaching your deadline, get your CE done with a trusted provider like ADHI Schools, and get your application in early.
Need a deeper dive on the forms, fees, and reinstating a lapsed license? Read the full California Real Estate License Renewal Guide next.
|
For many applicants, the most stressful part of getting a license isn’t the real estate license courses or the real estate exam—it’s the California real estate license background check.
The Department Read more...
For many applicants, the most stressful part of getting a license isn’t the real estate license courses or the real estate exam—it’s the California real estate license background check.
The Department of Real Estate (DRE) runs a fingerprint-based check on applicants as part of the licensing process. While many people with past infractions navigate this step successfully, others face delays or denials—often not because of the crime itself, but because of how they handled the application.
Disclaimer: I am a real estate educator, not an attorney. This article is for informational purposes only. If you have a complex criminal history, consider consulting a lawyer specializing in administrative law.
Quick Check: Where Do You Stand?
Before diving into the details, identify which "bucket" you likely fall into. This helps set your expectations.
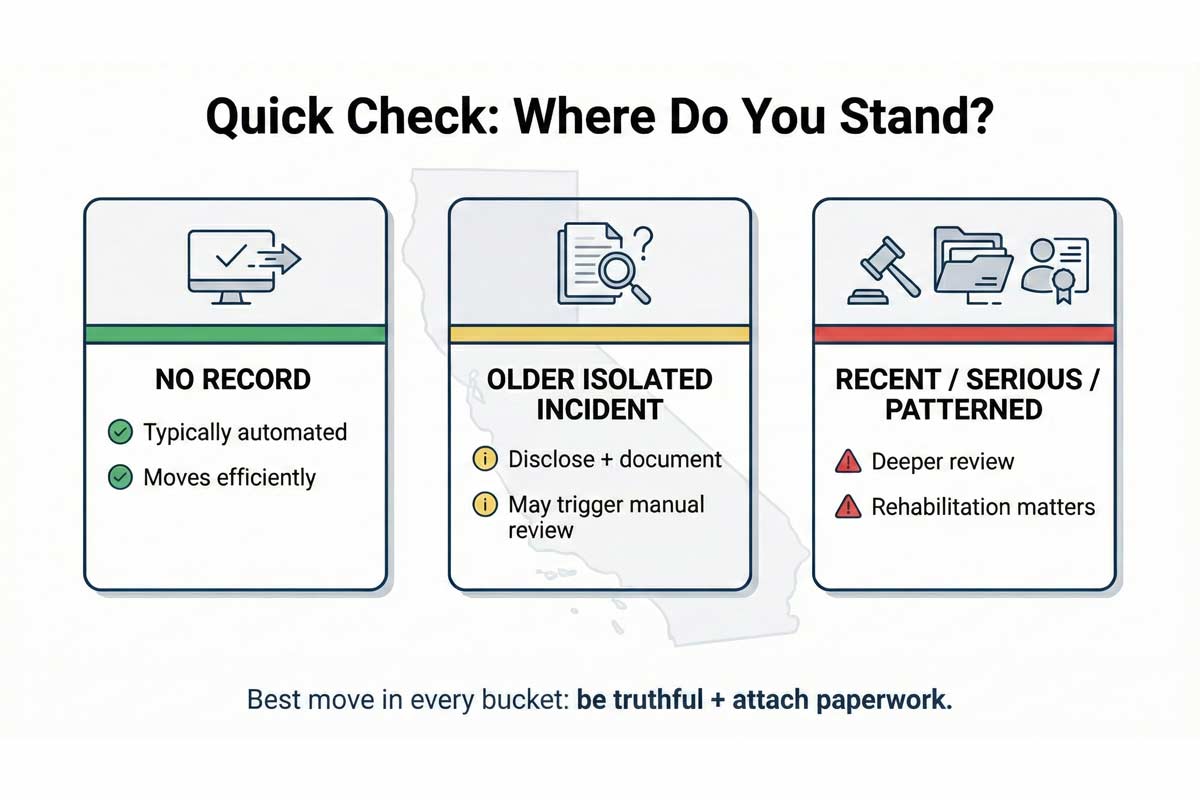
No Record: If you have no criminal history, the process is typically automated and moves efficiently.
Older Isolated Incident: An incident from years ago often requires disclosure and may trigger a manual review, but outcomes depend heavily on the specific facts and documentation provided.
Recent, Serious, or Patterned Record: Felonies, crimes involving money/theft, or a pattern of repeat offenses will generally trigger a deeper review. Approval is not guaranteed and requires strong evidence of rehabilitation.
What "Background Check" Actually Means
The DRE uses a "Live Scan" service request. This digital fingerprinting process checks your prints against California Department of Justice (DOJ) and FBI databases.
It can surface criminal history information; what appears depends on record reporting and the specific questions being asked. The Live Scan system simply reports data—it does not make the decision. The DRE's Licensing Section reviews the results to determine if you meet the requirements for licensure.
If you are trying to time your application, understanding the logistics matters. You can learn more about the timeline here: How Long Does the CA Real Estate Fingerprinting Process Take?
The Core Metric: "Substantial Relationship"
The DRE evaluates whether a crime or act has a "Substantial Relationship" to the duties of a real estate licensee.
Because agents handle client funds, enter private homes, and negotiate binding contracts, conduct in these areas tends to draw more scrutiny because it relates to trust, money, and consumer protection:
Dishonesty: Theft, fraud, embezzlement, forgery, or tax evasion.
Money Handling: Financial mismanagement or passing bad checks.
Safety & Trust: Conduct suggesting consumer risk, impaired judgment, or danger to others.
Beyond the Charge: Your "Risk Profile"
The DRE considers contextual factors to build a risk profile:
Recency: The more time since the incident, the more it may be mitigated—especially with a clean record since.
Pattern:Repeated behavior suggests a habit rather than an isolated mistake.
Harm: Acts that caused financial loss or physical harm typically draw higher scrutiny.
Compliance: Outstanding court obligations (probation, fines, restitution) are major red flags.
Rehabilitation: Evidence of positive change, such as education or steady employment, is critical.
The #1 Application Killer: Non-Disclosure
The fastest way to complicate your application is to hide your history. If the form asks a question, answer that question—don’t answer the version you wish it asked.
If you check "NO" on a criminal history question when the correct answer is "YES," the DRE may view it as a new act of dishonesty. This can be grounds for denial even if the original offense was minor.
Crucial Warning: Consistency Matters
Your written explanation must match the official court paperwork. If you say an incident happened in 2015 but the court docket says 2017, or you list a different charge than what is on the record, it triggers follow-up questions. Double-check your dates and charges against the actual documents before writing your statement.
Operational Checklist: What to Do BEFORE You Apply
Don’t wait until you are filling out the form to start digging.
Request Court Dispositions: Contact the court clerk for certified copies of the final disposition for any incident.
Gather Proof of Compliance: Get written proof (completion letter/receipt), not just verbal confirmation.
Draft Your Statement: Use the facts from your court documents to write a concise explanation.
Review the Application Line-by-Line: Read the disclosure questions on the DRE form carefully to ensure you truthfully answer exactly what is asked.
Micro-Template: Personal Statement
Keep your explanation factual, accountable, and brief. Attach this to your application if required.
Incident: Date / Charge / Disposition / Completion status
Accountability: One clear sentence taking responsibility for the actions.
Rehabilitation: List steady employment and/or education since the incident.
Current Standard: One sentence affirming commitment to professional ethics.
Note: Attach your court paperwork to back this up. Don’t rely on memory.
What Happens If You Are Flagged?
If the background check triggers a review, the process typically follows these steps:
Manual Review: An analyst examines your history and documents.
Inquiry: The DRE may request additional information or clarification. Respond immediately to avoid delays.
Decision: Clearance OR a formal denial notice/Statement of Issues with options described in writing.
How to Position Your Application
Your goal is to show stability and honesty.
DO THIS
DO NOT DO THIS
Be direct. State the charge and date clearly.
Be vague. "I had a run-in with the law."
Show stability. Provide proof of steady work history.
Overshare. Avoid emotional stories or excuses.
Take ownership. "I made a poor decision."
Blame others. "The system was unfair."
Provide paperwork. Certified court docs are essential.
Make them hunt. Don't force DRE to search for your files.
Real-World Scenario:
I recall a student with a theft conviction from her early 20s who disclosed it fully, attached court records, and provided a character letter from her employer. Submitting documentation upfront can reduce follow-up requests compared to leaving the reviewer guessing.
Frequently Asked Questions
Will a misdemeanor stop me from getting licensed?
Not necessarily. The DRE looks at the nature of the crime (Does it relate to real estate duties?) and how much time has passed. A misdemeanor involving dishonesty is viewed differently than one that does not.
What if it was a long time ago?
Time is often a mitigating factor. A clean record for a significant period helps demonstrate rehabilitation and reduces the "risk profile."
Do arrests matter or only convictions?
Answer exactly what the DRE application asks. If the question asks for convictions, disclose them. Pending matters (arrests awaiting trial) may delay review until resolved.
Does expungement mean I don't have to disclose?
Some licensing processes still require disclosure even after dismissal/expungement—follow the instructions on the specific DRE form.
What if I forgot to list something?
If you realize you made an error after submitting, contact the DRE immediately to amend your application. Self-correcting is always better than letting them discover the omission on their own.
The Bottom Line
A background check is a standard part of protecting the public. If you own your past, provide the right documentation, and focus on your current qualifications, you improve your odds of a smooth process
Ready to map out the rest of your journey? Check out our complete Check out our complete California Real Estate License Guide.
|
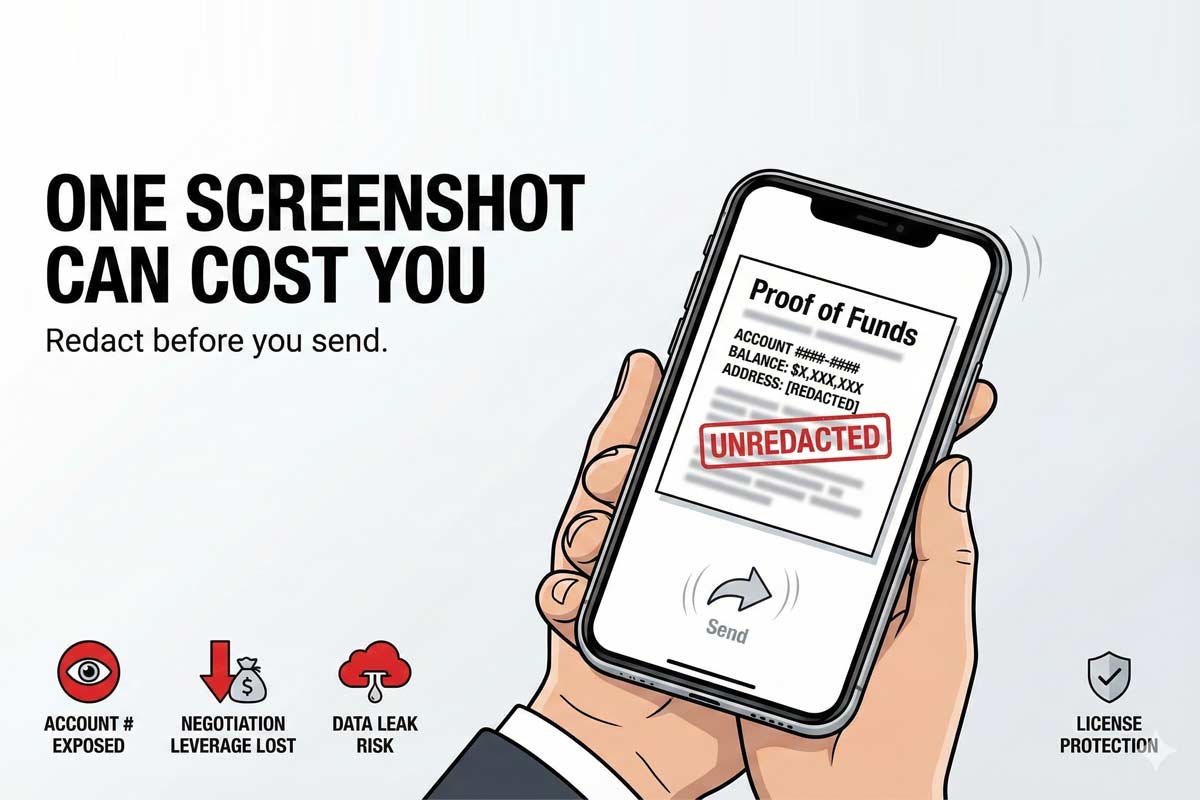
It happens in a split second.
You’re negotiating a deal at 9:45 PM. The listing agent says, “My seller is worried your buyers can’t close.” To prove them wrong, you pull up your client’s Proof Read more...
It happens in a split second.
You’re negotiating a deal at 9:45 PM. The listing agent says, “My seller is worried your buyers can’t close.” To prove them wrong, you pull up your client’s Proof of Funds (POF) on your phone, take a screenshot, and text it to the listing agent.
You just sent a text containing your client’s full account number, current balance (which is $300k higher than the offer price), and home address to a third party.
That single screenshot just violated your client’s financial privacy and compromised their negotiating leverage (now the seller knows they can pay more). If that image gets forwarded or saved to an unsecured cloud, you may be blamed for the leak and exposed to discipline or civil claims.
Privacy in real estate isn’t just about being polite. It is about protecting your license from the kinds of complaints that start with “My agent gave away my personal information.”
What Counts as Confidential Client Information in California Real Estate?
Many agents think “privacy” just means not giving out the gate code. In reality, the definition is much broader. As an agent, you routinely handle private identity, financial, and negotiation information that can harm a client if mishandled.
The Four Big Categories:
Identity & Contact Info: Names, personal email addresses, phone numbers, and current home addresses.
Financials: Bank statements, 401(k) balances, credit score screenshots, and pre-approval letters with specific conditions.
Negotiation Strategy: Motivation ("They have to move by June"), bottom line ("They'll take $850K"), or urgency ("They're divorcing").
Transaction Documents: The purchase agreement itself, counter-offers, and transfer disclosure statements (TDS).
Safeguarding this data is a critical part of real estate practice. Understand the statutory framework that governs these responsibilities. Review the California Real Estate Laws & Compliance Guide, which outlines the baseline for agency relationships and duty of care.
What Can I Share With the Listing Agent?
The guiding principle for privacy is "Minimum Necessary." Share only what’s necessary to move the transaction forward, only with parties who need it, and never share strategy or financial details without explicit client authorization.
Who is a "Need-to-Know" Party?
Client(s): The principal.
Broker / Office Compliance: For file review and oversight.
Escrow / Title: As needed to open orders and clear title.
Lender: As needed for funding conditions.
Appraiser / Inspector: Only access/property details required for their job.
Other Side’s Agent: Minimum necessary to close; never client strategy.
The Golden Rule: If it helps your client’s position and you have permission, share it. If it hurts them or they haven’t authorized it, keep it private.
DO
DON'T
DO share the pre-approval letter (after redacting sensitive info).
DON'T forward a raw bank statement showing account numbers.
DO redact account numbers and excess balances before sending.
DON'T send full bank statements or unedited screenshots.
DO use secure transaction management platforms (DocuSign, SkySlope).
DON'T leave physical files visible in your car or on a coffee shop table.
DO discuss material facts about the property condition.
DON'T discuss your client’s divorce or job transfer as “negotiating leverage” without written consent.
Strict adherence to these boundaries is not optional
It is rooted in your Ethical Duties Under the California Business & Professions Code, which mandates that agents treat all parties with honesty while maintaining loyalty to their principal.
Can I Share Proof of Funds With the Listing Agent?
Yes, but you must do it carefully to balance credibility with privacy.
When it’s appropriate: To prove your buyer has the ability to close, especially for cash offers or large down payments.
What to send: A redacted bank statement or a letter from the financial institution stating "verified funds in excess of purchase price."
What NOT to send: Unedited statements, screenshots from your phone, or documents showing the client’s total net worth far beyond the purchase price.
How to send: Upload to a secure transaction platform or send a password-protected PDF link; avoid standard email attachments if possible.
Proof of Funds: What to Redact (And What Not to Send)
Sending unredacted financial documents is one of the most common ways agents expose their clients to identity theft and negotiation loss.
Redaction Rules That Are Non-Negotiable:
Black out account numbers: Show the last 4 digits only.
Black out SSN/DOB: They should not be visible in anything you transmit to the other side.
Remove full balances: Show only the amount needed to support the offer’s funding story (cash to close or down payment + reserves), and redact excess.
Remove home address: Unless necessary for the lender, black it out.
Convert to PDF: Never send screenshots; they are unprofessional and harder to secure.
Rename the file: Add "REDACTED" to the filename so you know it’s the safe version.
The 5 Most Common Privacy Failures (And the Fix for Each)
In 20+ years of training California agents, I’ve seen that most privacy violations aren't malicious—they are sloppy.
1. The "Forward" Button Fiasco
What happens: You forward an email chain to the lender or other agent, forgetting that three emails down, your client vented about their bottom line.
Why it’s risky: You just handed the other side your playbook.
Do this instead: Never forward chains. Start a new email. Copy-paste only the relevant text.
2. The Unredacted Proof of Funds
What happens: You send a bank statement showing $1.2M in liquid cash when the offer is only $900k.
Why it’s risky: The seller now knows your buyer can pay full price, weakening your client’s bargaining position.
Do this instead: Redact strictly. Only show enough funds to cover the down payment and closing costs.
3. The Screenshot Camera Roll
What happens: You take photos of checks, IDs, or docs. They save to your personal camera roll, which backs up to your family iCloud.
Why it’s risky: Your client’s IDs, account numbers, and private financial info are now mixing with your vacation photos.
Do this instead: Use a scanning app that saves directly to a secure drive or your transaction platform (e.g., SkySlope) and does not save to the camera roll.
4. The Accidental Group Text
What happens: You start a group text with the lender, escrow, and buyer, then accidentally add the Listing Agent to discuss repairs.
Why it’s risky: You might accidentally reveal your client’s desperation or strategy to the opposing negotiator.
Do this instead: Avoid group texts for strategy. Keep sensitive discussions verbal or in one-on-one emails.
5. Sloppy Fact Transmission
What happens: You are managing five deals and accidentally send Client A’s counter-offer to Client B, or mix up their repair requests.
Why it’s risky: Failing to verify what you share is a primary way to learn How to Avoid Misrepresentation in CA Transactions the hard way.
Do this instead: Verify the source and accuracy of every fact before you hit send.
If You Already Messed Up: Containment Protocol
If you realize you sent sensitive info to the wrong person, act immediately.
Ask recipient to delete: Call immediately (don't text) and ask them to delete the email/text and confirm.
Notify broker: Inform your manager so they can prepare for any fallout. Do not try to "fix it quietly"—that's how small mistakes become disciplinary events.
Notify client: Be professional and brief. "I inadvertently sent X to Y. I have asked them to delete it."
Document it: Keep a log of what happened and who received it.
Change access: If you sent a link to a folder, rotate the link or revoke access immediately.
Dual Agency: Confidentiality Rules That Will Get You Disciplined
Privacy becomes mission-critical when you represent both the buyer and the seller. Dual agency is where confidentiality mistakes happen fastest.
The Sealed Envelope Rule
Treat confidential strategy like it’s in a sealed envelope. You don’t open it for the other side. Information about material facts (the roof leaks) must flow freely. Information about price, terms, and motivation must stay sealed.
Mini Scenario:
Your buyer asks, "Why are they selling?"
Risky Answer (reveals confidential motivation): "They are getting divorced and need cash fast."
Safe Answer: "I can’t discuss the seller’s personal motivations, but I can address objective terms: timing, possession, and contingencies."
For a deeper dive into the specific disclosures and boundaries required here, refer to our Dual Agency in California (Legal Guide).
The Paper Trail & Systems: Your Privacy Operating Procedure
You need a repeatable system so you don't have to think about privacy—you just execute it.
Privacy Checklist Before You Hit Send:
Redaction: Are account numbers and SSNs blacked out?
Relevance: Does the recipient actually need this document?
Format: Is it a secure PDF link, or a loose screenshot?
Recipient: Did I check the "CC" line for accidental additions?
Your SOP
Centralize Docs: All documents live in your transaction management platform.
Naming Conventions: Name files clearly (e.g., "123_Main_St_POF_REDACTED.pdf") so you don't attach the wrong version.
Device Security: Enable 2-Factor Authentication (MFA) on your email. Your email is the master key to your client’s data.
Privacy is License Protection
Privacy is not about secrecy; it is about security. When you treat your client’s information with care, you build trust and maintain a clean file.
Tighten your systems. Redact the account numbers. Follow your broker's policy.
Protect the file, and the file will protect you.
(Note: General education only; follow your broker’s policies and consult counsel for specific legal questions.)
|
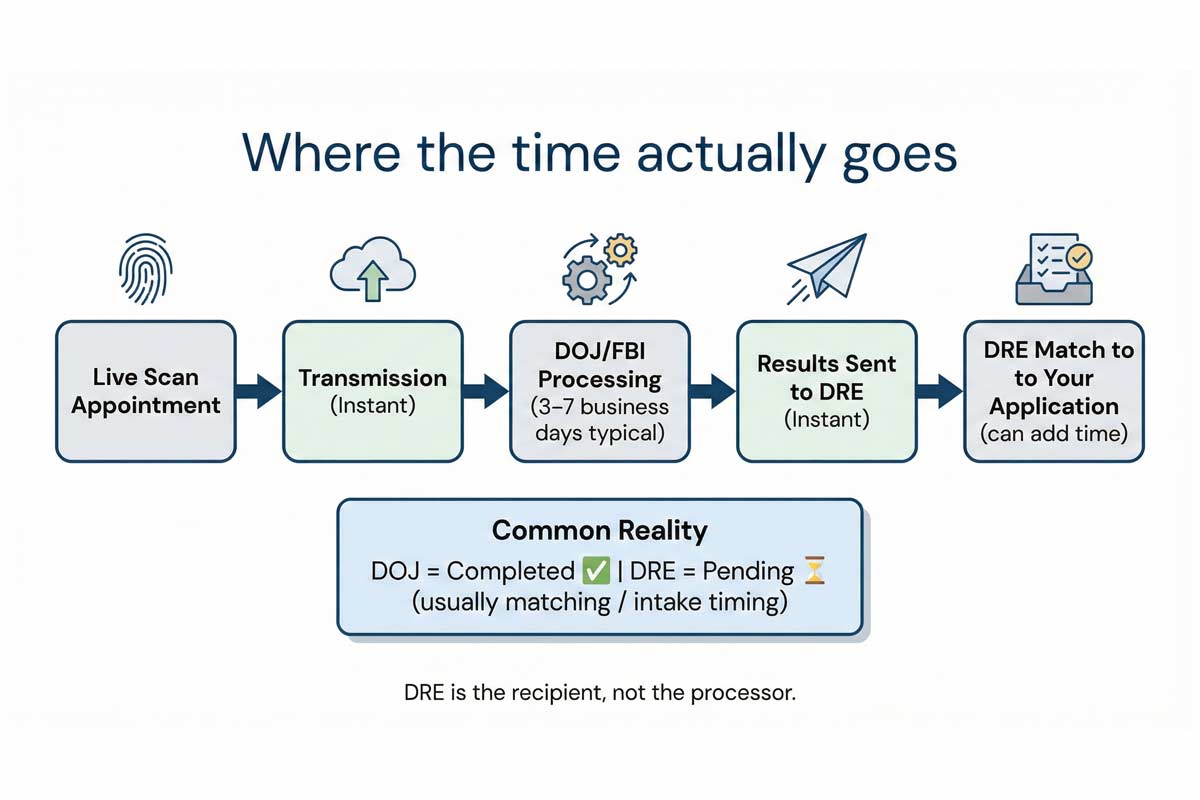
Key Takeaways
Common Live Scan Timing: DOJ often completes initial processing within 3–7 business days, though file matching at the DRE may add time.
The reader should treat all timelines as Read more...
Key Takeaways
Common Live Scan Timing: DOJ often completes initial processing within 3–7 business days, though file matching at the DRE may add time.
The reader should treat all timelines as highly variable: Estimates and always consult the DRE and DOJ websites for the most current official information.
Out-of-State Hard Cards: This process relies on mail and manual handling; plan for a timeline that can extend several weeks or longer.
Critical Dependency: The DRE cannot issue your license until they receive your fingerprint results and complete required review steps.
Common Delay Cause: Mismatched names (e.g., “Ben” vs. “Benjamin”) or using the wrong ORI code (A0075). The ORI code is input at the Livescan provider and must be input exactly as A0075 to ensure that the prints and background are transmitted to the DRE.
Waiting for your background check to clear can feel like the longest part of getting your real estate license. You’ve passed the real estate school exams, submitted your application, and now you’re stuck in limbo, wondering if something minor in your past is holding everything up.
Fingerprinting is a standard dependency step. While it can be nerve-wracking, delays are usually bureaucratic rather than catastrophic. For most applicants using Live Scan within California, the process is automated and relatively quick. For out-of-state applicants using physical fingerprint cards, a little more patience is required.
In my 20+ years of helping students navigate the California Department of Real Estate (DRE) system, we have found that most “stalled” applications aren’t actually stuck—they are simply moving through the standard queues. This guide breaks down exactly how long the process usually takes, why it might slow down, and how to keep it moving.
Disclaimer: This article is for informational purposes only and does not constitute legal advice. Processing times are estimates based on typical DRE and DOJ workflows. For individual eligibility questions, consult an attorney.
The 30-Second Answer: When Will My Fingerprints Be Processed?
If you are looking for a timeline to plan your career launch, here are the common benchmarks we see.
In-State (Live Scan): Often 3 to 7 business days.
Best case (sometimes): ~48 hours.
Standard: 1 week.
Buffer: It is wise to plan for 2 weeks to account for volume spikes or matching delays.
Out-of-State (Hard Cards): Can take several weeks to months.
Why: These often involve more manual handling and mailing time before they even reach the DRE.
The "Smart Applicant" Buffer: Do not schedule your “I’m a Realtor party!” until you have your license number in hand. Even after the DRE receives your results, they still need to process the file and complete issuance.
What "Fingerprinting" Actually Is
Many applicants think the DRE is scanning their prints personally. They don’t.
When you get fingerprinted, you are submitting your biometric data to the California Department of Justice (DOJ) (and, when applicable, FBI checks).
This is a "Live Scan." Your prints are digitized and cross-referenced against criminal records (arrests and convictions). The DOJ and FBI then generate a report—either "no record match" or a list of "Hits" (records found)—and transmit that report electronically to the DRE.
Important: The DRE is the recipient, not the processor. They are waiting on the DOJ just like you are.
Step-by-Step Timeline: From Scan to License
Understanding the invisible relay race helps you spot where things might be stuck.
Scheduling & Submission: You download Form RE 237(Live Scan Service Request) and visit a certified Live Scan provider (often a shipping center, notary, or law enforcement office). You pay the processing fee plus the operator’s rolling fee.
Transmission (Instant): The operator hits “send.” Your encrypted prints go directly to the DOJ and FBI.
Processing (Variable): The DOJ and FBI automated systems run the check (often within a few days, sometimes longer if a manual review is triggered).
Results Transmission (Instant): The system automatically sends the result code to the agency linked to the ORI code you used (specifically, the DRE).
DRE Match & Update (Variable): This is where delays often happen. Even if the DOJ status shows "Completed," the DRE’s system must receive that digital result and match it to your open license application.
Note on Delays: If DOJ shows "Completed" but DRE still says pending: it’s usually a matching or intake timing issue—not a denial.
The Biggest Reasons It Takes Longer (And How to Fix Them)
If it has been more than two weeks and you haven’t heard anything, one of these culprits is likely to blame.
1. The "Name Mismatch" Trap
Symptom: You passed your test and did Live Scan weeks ago, but the DRE still says "Pending."
Likely Cause: You applied for your license as "Michael Smith" but your driver's license (and thus your Live Scan) says "Mike Smith." The DRE’s computer system cannot automatically link the two files.
Fix: Ensure your name on Form RE 237 matches your DRE application character for character. If you suspect a mismatch, you may need to call the DRE to manually merge the files.
2. Wrong ORI Code
Symptom: Your results were sent to the wrong agency (like the Board of Nursing or a school district).
Likely Cause: The operator typed in a generic code or you used an old form.
Fix: Always use the pre-printed Form RE 237. The ORI Code for the CA DRE is A0075. If this was entered incorrectly, you may need to redo the Live Scan entirely to ensure the DRE receives the data.
3. Application Intake Volume
Symptom: DOJ completed days ago, but DRE status hasn't budged.
Likely Cause: Your application itself is still in the intake queue, or there is a backlog in manually associating results during peak seasons.
Fix: Call the DRE to confirm they have received the transmission and ask if your application is simply in the intake queue.
4. Poor Fingerprint Quality
Symptom: You receive a rejection notice or a request for a resubmission.
Likely Cause: Faint ridges due to manual labor, frequent hand-washing, or dry skin. The DOJ system couldn't read the prints.
Fix: Use a high-quality lotion for a few days before your rescan.
5. Manual Review (The "Hit" Delay)
Symptom: DOJ processing time drags on for 30+ days.
Likely Cause: A "Hit" (criminal record) or a name common enough to trigger a manual check against someone else's record. If you're worried about what a "hit" could mean for your license eligibility, this is a good read What the DRE Looks for in Your Background Check.
Fix: Patience is required here. The DOJ must manually verify that the record belongs to you (or clear you if it's a false match).
Live Scan vs. Out-of-State: Two Different Worlds
Track 1: Live Scan (California Residents)
This is the standard path. It is digital, efficient, and trackable. You walk into a participating Live Scan provider, put your hands on the glass, and you are done in 10 minutes. You get an ATI Number (Applicant Transaction Identifier) at the bottom of your form. Keep this number—it is your tracking ticket.
Track 2: Hard Cards (Out-of-State)
Live Scan is primarily available in California. Most out-of-state applicants must use physical fingerprint cards (FD-258) unless they travel to CA.
The Delay: The DRE has to physically receive the cards, process the payment, and then forward the cards to the DOJ. The DOJ then has to manually scan them. Hard-card timelines vary based on mail time, card quality, and backlog.
The Risk: Ink smudges easily. If your hard cards are rejected for quality after waiting several weeks, you often have to start over.
Pro Tip: If timing is critical, some applicants choose to travel to California to complete a Live Scan in person and reduce potential delays.
Delay-Proof Checklist
To minimize friction, treat the paperwork as seriously as the exam:
Download the correct form: Use the current RE 237 from the DRE website.
Verify the ORI: Check that Box 1 says A0075 and says "CA Department of Real Estate."
Match your ID: Ensure the name on the form matches your Driver's License and your exam application.
the receipt: Do not leave the operator without the ATI Number written on your copy.
Submit early: Do not wait until you pass the exam. You can (and should) submit fingerprints as soon as you apply for the exam to get the clock ticking.
If It’s Taking Too Long: Escalation Ladder
What to do today:
Check your ATI number.
Verify your name spelling on your receipt.
Check the online DOJ status tool.
If it has been longer than typical timeframes, follow this ladder:
Check the DOJ Status: Go to the California DOJ Background Check Status website. Enter your ATI Number and Date of Birth.
Note: This tool reflects DOJ processing status; it doesn’t guarantee the DRE has matched it to your application yet.
Status "In Process": The delay is at the DOJ/FBI level. The DRE cannot help you yet.
Status "Completed": The results were sent to the DRE. Now the ball is in their court.
Verify Your Info: Double-check your copy of the form. Did the operator transpose digits in your identifying information?
Contact the DRE: If the DOJ says "Completed" but the DRE status hasn't updated in 10 business days, call the DRE Licensing line. Have your ATI number ready and ask if there is a "matching issue" with your file.
Important Distinction: Processing vs. Evaluation
It is vital to understand that "processing" and "evaluation" are two different steps.
Processing is simply the DOJ confirming your identity and sending a list of records (if any) to the DRE.
Evaluation is the DRE reviewing those records to decide if you meet the standards of honesty and truthfulness required to hold a license. If you have a past conviction, the "processing" might finish quickly, but the "evaluation" could take weeks while a DRE review team examines your case.
Your Next Step
Fingerprinting is a hurdle, not a wall. While you wait for the results, focus on what you can control: preparing for your exam and interviewing brokerages.
Most delays are solvable, and the vast majority of applicants see their results clear without issue. If you are just starting your journey and want to ensure every step—from coursework to application—is handled correctly, check out our comprehensive California Real Estate License Guide.
|