
You’ve passed the real estate exam, joined a brokerage, and printed your business cards. Now comes the hard part: actually talking to people. Whether it’s fumbling with a lockbox while a client looks Read more...
You’ve passed the real estate exam, joined a brokerage, and printed your business cards. Now comes the hard part: actually talking to people. Whether it’s fumbling with a lockbox while a client looks over your shoulder, blanking on a disclosure requirement mid-conversation, or fearing a lead will ask a question you can’t answer, these moments can stall a career before it starts.
In my 20+ years coaching California agents through the high-pressure "first 90 days," I’ve seen that a lack of confidence as a new real estate agent is the single most common reason new licensees stall out. Most agents don't quit because they lack talent; they quit because they lack a system to handle the discomfort of being new.
Confidence is not a personality trait; it is a byproduct of competence and repetition. You don’t need more "motivation"; you need more reps.
Key Takeaways
Action Creates Feeling: You will never "feel ready" until you start doing the work.
The 14-Day Shift: In my experience, agents who follow a structured "rep" schedule report a significant drop in call anxiety within two weeks.
Competence = Trust: Clients don't need you to be a veteran; they need you to be a calm, prepared professional.
The ADHI Confidence Loop
Elite agents don't wing it. They train like athletes. This loop is specifically designed for solo agents who don't have an assistant or a team lead to lean on. It is a critical layer of the broader skill stack every California agent must build. To accelerate your growth, use the ADHI Confidence Loop for 20 minutes every morning:
Learn: Study one specific micro-topic (e.g., how to explain a "contingency").
Script: Write out a 3-sentence explanation in your own voice.
Rehearse: Say it out loud 10 times. Reading silently only trains your eyes; speaking out loud trains your brain and mouth to work together under pressure. If you skip this step, the loop breaks.
Execute: Use that term in a real conversation or social media video today.
Review: Briefly note what felt clunky and fix it for tomorrow.
7 Tactical Ways to Build Confidence Fast
Mastering California Real Estate Agent Skills isn't about knowing everything; it's about having a reliable process. Use these seven tactics to build your professional backbone:
1. Own Your "Newness" with Default Scripts
Confidence is knowing what to say when you don't know the answer.
The Move: If a client asks about a specific disclosure or a recent price adjustment on a neighboring property you haven't studied yet, don't guess.
The Line: "I want to make sure I give you the most accurate data on that specific property—let me verify the latest records and get back to you by 4:00 PM."
Do this today: Write down three questions you're afraid of and draft your "I'll find out" response.
2. Practice Out Loud (Vocal Muscle Memory)
In my experience, agents who rehearse out loud freeze far less on live calls than those who only study silently. Speaking your scripts builds the muscle memory required to stay calm when a client pushes back.
Do this today: Record yourself explaining the home-buying process on your phone. Listen back. It will be awkward—that's the feeling of growth.
3. Eliminate "Jargon Paralysis"
If you’re afraid of looking like an amateur, you need to master real estate terminology fast. When you speak the language of the industry fluently, your internal anxiety drops.
Do this today: Pick the three terms that confuse you most and explain them to a friend until they understand them.
4. Use a Physical Pre-Call Cue
Anxiety lives in the body. Before picking up the phone, fix your physiology.
The Move: Stand up or sit upright with your feet planted. Never call from your car while slouched or cramped; your posture directly affects your vocal tone and perceived authority.
5. Track Inputs, Not Outcomes
You can't control if a lead says "yes," but you can control that you made 10 calls.
Do this today: Redefine a "win" as completing your daily outreach. This builds new real estate agent confidence by removing the fear of rejection.
6. The Post-Conversation Debrief
After every client interaction, ask yourself: "At what exact moment did I feel my heart rate spike?"
The Example: If you felt awkward when they asked about commissions, that is your signal to roleplay that specific objection tomorrow. This prevents a single awkward moment from becoming a mental block and improves your emotional intelligence as a real estate agent.
7. Leverage Checklists
Confidence is the absence of the "did I forget something?" feeling.
The Move: Build a "Go Bag" for your car with the essentials: a flashlight, extra batteries for lockboxes, and a printed Buyer Consultation checklist.
Do this today: Create a step-by-step checklist for a property showing so you can focus on the client, not the keys.
Low-Pressure Scripts for New Agents
To build communication skills that separate top agents from the rest, you must be authentic. Use these verbatim at first. It may feel robotic—that's normal. Confidence comes only after you have the foundation of repetition.
Script 1: The "Sphere" Introduction
Target: People you already know.
Script: "Hi [Name], I’m officially moving my focus into the [Neighborhood] real estate market. I’m spending my first 90 days building a resource list for local homeowners. If you ever need real estate advice or just want to know what the house down the street sold for, I’m your person."
Script 2: The "Just Looking" Response
Target: Leads who are hesitant.
Script: "I completely understand—most of my clients start out 'just looking' for months. My job is to make sure you have the best data so that when you are ready, you feel 100% confident. Is it okay if I send you a quick weekly update on what's actually selling?"
Script 3: Handling the "We’re Not Ready" Objection
Target: Keeping the relationship alive.
Script: "No problem at all. Real estate is about timing, and only you know when that's right. I'll keep an eye on the market for you in the meantime. If you see something that catches your eye, just reach out."
Confidence Killers (and how to fix them)
Unidentified Knowledge Gaps: If you don't understand the RPA (Residential Purchase Agreement), you will be subconsciously terrified of a listing.
Fix: Identify the essential skills every new California agent must master and tackle one contract section per day.
Taking Rejection Personally: A "no" is usually about their timing, not your talent.
Fix: Treat every "no" as data. Your goal is to collect 10 "no's" a day to find the one "yes."
Productive Procrastination: Researching for 5 hours to avoid 5 minutes of calling is just a "fancy" way of being scared.
Fix: Cap your study time to 30 minutes. Real learning happens in the field.
Talking Too Much: Nerves lead to rambling.
Fix: Practice the "Power of the Pause." Ask a question and wait 3 seconds after they finish talking before you respond.
Trying to Sound "Fancy": Using complex jargon makes you sound insecure.
Fix: Speak like a human being. Clear is better than clever.
The 14-Day Confidence Plan
In my experience, agents who follow this plan report a significant drop in call anxiety by the final day. Once you finish this cycle, repeat it with new scripts and higher targets.
Day
Task 1: Vocal Reps (10 Min)
Task 2: Knowledge Gap
Task 3: The Action
1–3
Practice Intro Script out loud
Learn "Escrow" & "Earnest Money"
Call 5 people you know
4–6
Roleplay "Just Looking"
Learn "Contingency" periods
Text 10 "Resource" offers
7-9
Record your "Value Prop"
Learn "Title" & "Lien"
Visit 3 local Open Houses
10-12
Practice "Follow-up" scripts
Learn "Appraisal" vs "BPO"
Follow up with all leads
13-14
Review your progress
Final review of terms
Shadow a veteran agent's call
Success Metric: Success isn't a closed deal in 14 days; it's the ability to deliver your scripts without looking at a piece of paper.
FAQ
How long does it take to feel confident as a new agent?
Most agents find their "stride" after 20–30 real-world conversations. If you commit to 3 conversations a day, you will feel the shift within 10–14 days.
What if I’m naturally introverted?
Introversion can be an advantage in real estate because it usually comes with better listening skills. Confidence for introverts comes from being the most prepared person in the room. If you follow the scripts and checklists, you don't need to be "high energy" to be successful.
Confidence Compounds
Confidence is the glue that holds your business together. Without it, your knowledge stays trapped in your head.
But remember: if you skip building this skill stack now, your confidence problems will only resurface later when the stakes are higher and the commissions are larger.
Ready to move beyond the basics and master the full range of California Real Estate Agent Skills California? Confidence compounds—the sooner you build it, the cheaper the lessons are.
|
This isn't just about choosing a cool name for your Instagram bio. This is about staying compliant with the rules of the California Department of Real Estate.
In California, the line between "clever Read more...
This isn't just about choosing a cool name for your Instagram bio. This is about staying compliant with the rules of the California Department of Real Estate.
In California, the line between "clever marketing" and non-compliance is thinner than most agents realize. Get the compliance setup right from day one so you can focus on selling—not defending your license.
The "Oh No" Inquiry: A $2,500 Marketing Mistake
Imagine an agent—we’ll call her Sarah. Sarah is talented, hungry, and just launched "Elite SoCal Properties" on Instagram. It’s a great name. It sounds established and sounds like a powerhouse.
Three months later, she gets a formal inquiry from the DRE.
The issue?
"Elite SoCal Properties" sounds like a standalone brokerage. Sarah is a salesperson, but her branding suggests she’s the responsible broker or operating an independent brokerage.
By the time she pays the citation and rebrands everything—from signs to business cards—she’s out thousands of dollars and months of momentum.
A lot of these problems don’t start with the DRE "finding you"—they start with a competitor or unhappy party filing a complaint. If your branding is sloppy, you're giving your rivals a weapon to use against you.
The Foundational Mindset: Why the DRE Cares
The DRE has one primary mission: Consumer Protection. When a consumer sees your ad, they need to know exactly who the responsible broker is on that transaction. If your branding obscures that identity, you are creating consumer confusion, which is a fast track to a formal inquiry.
To build a truly bulletproof practice, you need to understand how branding fits into the bigger picture of professional responsibility. I’ve mapped the compliance hierarchy in our California Real Estate Laws & Compliance Guide—treat it as your home base for staying out of trouble and to help understand What the California DRE Actually Enforces.
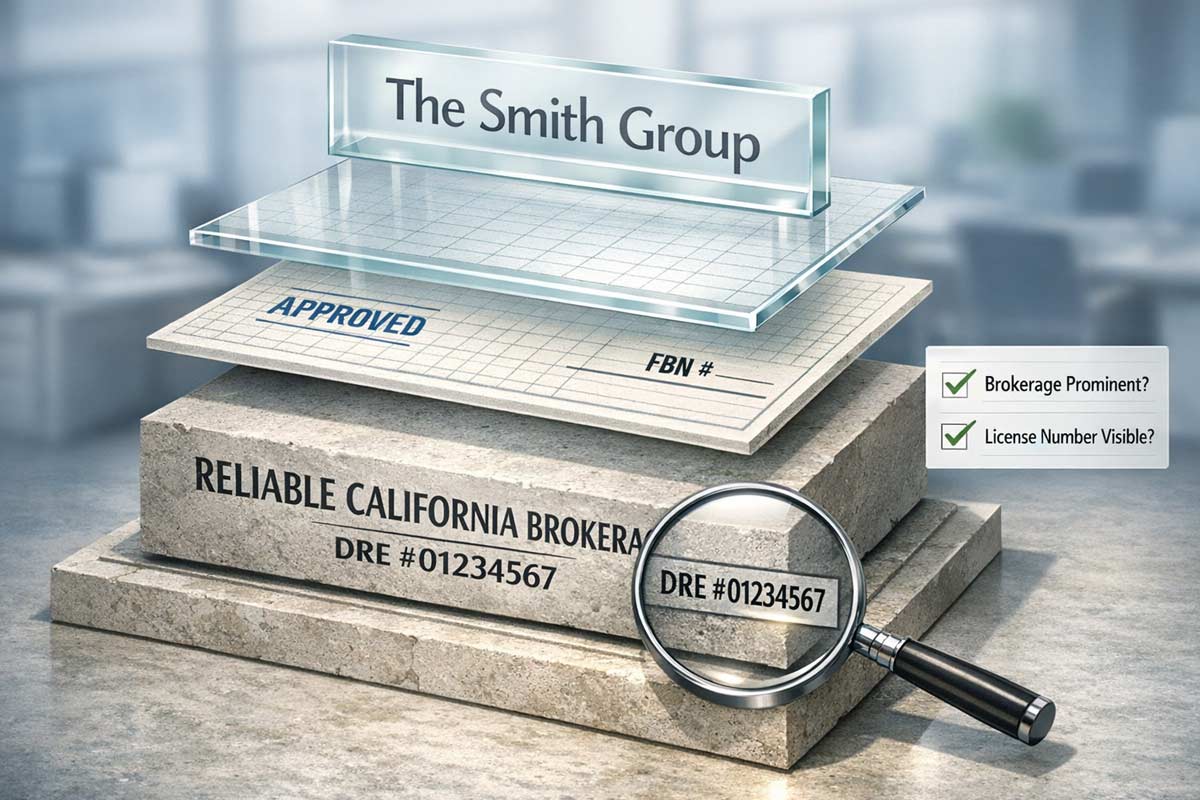
Team Name vs DBA vs Brokerage Name (California)
Before you print a single flyer, you need to understand the three layers of your professional identity. In California, the name that matters legally is the one tied to the broker’s license—which is why your broker must approve your entire setup.
Term
What it is
What can go wrong
Team Name
A marketing label for your group
Looks like an independent brokerage
DBA / FBN
Name used in advertising other than the broker's licensed name (handled through broker policy)
Used without approval / inconsistent disclosures
Brokerage Name
The responsible broker identity
Hidden or minimized on advertising
Your Team Name: This is your nickname. It identifies your specific group (e.g., "The Smith Group").
A DBA (Doing Business As): This is a legal alias. If the public-facing name is not your broker’s licensed name, your broker may need to treat it as a fictitious business name. Start with your broker's policy—don’t guess.
The Brokerage: Think of this as your “last name”. No matter how big your nickname gets, the responsible broker must always be visible and dominant.
60-Second Compliance Checklist
Brokerage name is clear and prominent on all media.
My name matches exactly what is on my DRE license.
My license number is on all "first point of contact" ads.
Team name does not imply an independent brokerage.
Broker approved the setup before I printed or posted anything.
If you can’t pass this checklist in 60 seconds, don’t print, don’t post and consult with your broker.
Screenshot this checklist. It's your Friday audit.
Walk-Thru Scenarios: Is Your Brand Compliant?
Scenario A: The "Pseudo-Brokerage" Team
The Name: "Golden State Realty Team."
Risk: High. Words like "Realty" can imply you are an independent firm, which is a major trigger for What the California DRE Actually Enforces.
Why it’s risky: It suggests the team is the licensed entity, not the broker.
Do this now:
Stop using this if the DRE hasn’t approved the DBA/Corporation.
Clear the name with your broker's compliance department first.
Scenario B: The Instagram "Solo-Preneur"
The Post: A "Just Listed" graphic with your phone number and "The Luxury Specialist." No license number. No broker logo.
Risk: High. It’s a technical violation that usually leads to a citation.
Why it’s risky: Every "first point of contact" material must disclose your license status. This is a core rule in Real Estate Advertising With Your License Number.
Do this now:
Place your DRE license number on all social media graphics.
Add your broker's name to your Instagram bio.
Audit your YouTube channel for the same info.
Scenario C: The Team Branding Confusion
The Setup: You’ve created a team and want to handle property management for your clients.
Risk: Critical. Confusing your branding with the entity authorized to handle money leads to Trust Fund Handling Rules for California Agents violations.
Why it’s risky: Only the broker (or an authorized escrow) can handle funds; your "team" is not a legal repository for client money.
Do this now:
Never imply your "team" is the escrow holder.
Ensure all contracts clearly state the licensed broker’s legal name.
Review all trust fund-handling procedures with your broker.
Team Name Words That Trigger DRE Scrutiny
These words aren’t automatically illegal—but they increase the odds your branding is interpreted as implying a brokerage, which triggers higher scrutiny:
Realty / Real Estate
Broker / Brokerage
Land Company
Associates (if it implies more than one licensee is the lead)
The Friday Afternoon Audit
I tell my students to take 15 minutes every Friday to audit their brand.
Here are the four questions that prevent most of the issues we see in Common DRE Violations and How to Avoid Them:
Is my broker’s name dominant? If I look at my business card, is the brokerage name clearly visible and correctly spelled?
Is my license number everywhere? Check your email signature, your Facebook "About" section, and your latest YouTube description.
Are my "first point of contact" materials compliant? This includes business cards, stationery, flyers, and even those magnetic car signs.
Is my name consistent? Does the name on my marketing match my legal name on my DRE license?
The Compliance Coach’s Corner (FAQ)
Q: Can I use ‘Realty’ in my team name if I’m a salesperson?
A: It’s high-risk. Words like "Realty" or "Real Estate" can make your team look like a standalone brokerage. If your broker allows it, your disclosures must be crystal clear and your broker’s identity must be dominant everywhere and the DBA approved.
Q: Can my team name include “Properties,” “Homes,” or “Estates”?
A: Usually, yes—but treat them like “Realty-lite.” If the name makes you look like the brokerage, your broker identity must be dominant and consistent everywhere and you likely need the DBA approved by the DRE.
Q: Does my team name have to appear on my business card or can it be social-only?
A: If you use it anywhere, it should be used consistently and always accompanied by your broker’s identity and your license number.
Q: If I change brokerages, can I keep my team name and handles?
A: Usually, yes—but you must update every single asset (bio, headers, thumbnails) to reflect your new broker immediately.
Q: What counts as ‘first point of contact’ advertising?
A: Business cards, stationery, websites, social media profiles, and any promotional flyers or signs. If it can generate a call, DM, or lead, treat it like advertising.
Q: Can our team have a separate website domain?
A: Yes, but the website itself must comply with all disclosure rules, prominently featuring the broker’s name and your license number on every page.
Q: If my broker has multiple DBAs, which one do I use?
A: Use the one that is officially tied to your license and the office where you are hung. When in doubt, ask your manager.
The Protected Path Forward
Compliance isn't a hurdle; it’s the foundation of a scalable career. When you set up your brand correctly, you’re telling your clients—and the DRE—that you are a professional.
Start with the full map: California Real Estate Laws & Compliance Guide
Then tighten your biggest public-facing exposure: Real Estate Advertising With Your License Number
Finally, run the ‘am I accidentally violating something?’ scan: Common DRE Violations and How to Avoid Them
The goal is simple: your brand should look professional without ever looking like an unlicensed brokerage.
|
Most new agents walk into their first listing appointment with a gut-level fear: “What if they ask how many homes I’ve sold?”
This fear stems from a misunderstanding of seller psychology. Sellers Read more...
Most new agents walk into their first listing appointment with a gut-level fear: “What if they ask how many homes I’ve sold?”
This fear stems from a misunderstanding of seller psychology. Sellers aren’t buying your resume. They are buying a process that protects their equity and reduces mistakes. They aren't looking for a "veteran" as much as they are looking for a professional with a predictable, low-risk system.
In my 20+ years of training thousands of California agents at ADHI Schools, I’ve seen rookies beat top producers because they prioritized clarity over charisma. If you try to wing it, you’ll feel it—and they’ll feel it.
Confidence doesn’t come from your track record—it comes from your sequence.
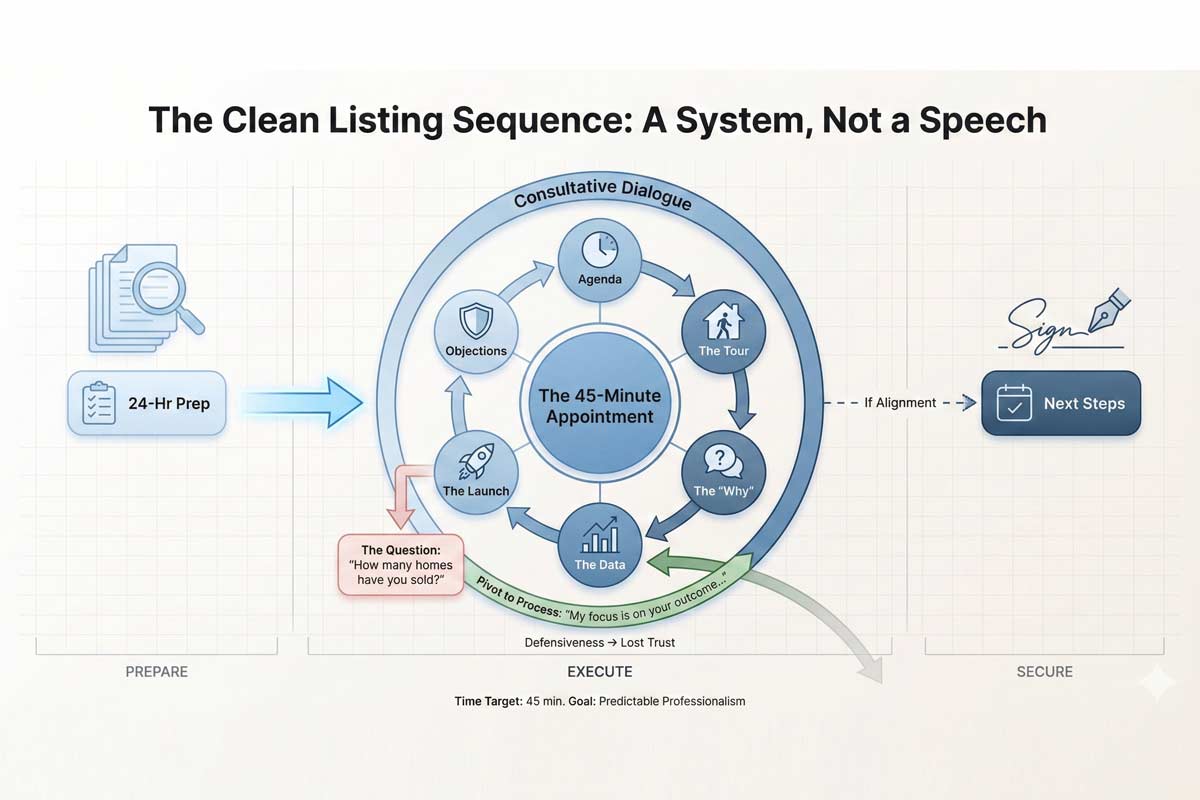
The 7-Step Clean Sequence (One-Page Summary)
Agenda Setting: Confirm the timeline and goal immediately.
The Tour: Walk the property with a consultant’s eye.
The "Why": Deep-dive into seller goals and timeline.
The Data: Review pricing using the three-bucket method.
The Launch: Explain the marketing and feedback loop.
Objection Handling: Resolve concerns using prepared scripts.
The Close: Confirm the decision and set next steps.
Time target: 45 minutes total (10 tour / 25 table / 10 close & next steps).
Pre-Appointment Prep: The 24-Hour Intel Phase
The appointment is won or lost before you ring the doorbell.
The Property Intel Checklist The "Big Three"
CMA: Prepare a Comparative Market Analysis with Actives (competition), Pendings (market direction), and Solds (the reality check).
Title Profile: Check for liens, multiple owners, or solar panel UCC filings.
The "Motivation" Call: 24 hours prior, call to confirm. Ask: "Aside from the price, what is the one thing that must happen for this move to be a success?"
The Minimalist Kit
Sellers can interpret overly flashy materials as in security. Data and a calm process read as competence. Bring an iPad or a neatly organized folder containing:
The CMA
A 1-page "Launch Plan"
The California Residential Listing Agreement (RLA)
A seller net sheet (to show their estimated proceeds at close)
First 5 Minutes: Setting the Frame
You’re the guide. Your job is to run a clean, low-drama decision meeting.
The "Agenda" Script
Warm Seller: "Thanks for having me over. My goal today is to see the home, hear your goals, and show you exactly how we’ll find the right buyer. Does that work for you?"
Skeptical Seller: "I know your time is valuable. I’ve set aside 45 minutes to go over the data and our strategy. At the end, we’ll both know if I’m the right fit to get this sold. Should we start with a quick tour?"
The Walkthrough: Tour Like a Consultant (Not a Compliment Machine)
The biggest mistake new agents make is acting like a guest. You’re there to audit the asset.
Ask, don’t tell: Instead of complimenting the kitchen, ask “When were these appliances last updated?” or “Any HVAC issues during peak summer?”
The “Stay or Go” list: Ask what’s staying vs. leaving (fixtures, appliances, smart devices). This prevents later disputes over chandeliers, Ring cameras, or mounted TVs.
What NOT to do:
Price during the tour: “I have some thoughts, but I want to sit down with the data first so I can give you an accurate range.”
Contractor cosplay: Don’t guess repair costs. Label it a point of inspection and move on.
Insult the house: Stay neutral. “This layout is unique” beats “This room is too small.”
If They Ask How Many Homes You’ve Sold (The Clean Answer)
Handle this moment with zero defensiveness.
The "High-Touch" Pivot
"Fair question. My model is high-touch: fewer clients at a time, tighter communication, and a very structured launch plan. You won’t be competing for my attention."
The "Team-Backed" Angle:
"Great question. I’m your point of contact, and I run the process. And I’m backed by my broker and transaction team on pricing, disclosures, and contract execution—so you get personal attention with professional oversight."
The Table Meeting: 3 Phases of Authority
Phase 1: Motivation Intake
Ask: "If this home doesn't sell for six months, how does that affect your plans?" If you don't know their "Why," you cannot handle their objections later.
Phase 2: Pricing Reality (The Three Buckets)
Show the data. "The market is telling us that homes like yours sell fast... or they start going stale and get negotiated down." We’ll define ‘stale’ using showing volume, online saves, and buyer feedback—not vibes. Understanding negotiation basics for new California agents is critical here—you aren't negotiating against the seller; you are negotiating with the market.
Phase 3: Strategy & Execution
Show them your Launch Plan. This includes professional media, reverse prospecting, and the "Feedback Loop" (your scheduled weekly update).
Objection Handling: Consultative Scripts
If you have practiced how to practice real estate scripts effectively, you will stay calm here.
Objection Handling: The Consultative Response
Objection
Consultative Response
"Another agent said it's worth more."
"Interesting. When they gave you that number, did they anchor it to sold comps, or was it more of a 'marketing price'? I’m not here to win the listing—I’m here to protect your outcome."
"We want to try a higher price."
"If we start too high, we'll miss our best buyers right out of the gate. Then, if we have to lower the price later, we're dealing with buyers who know we couldn't sell it—and that weakens our position."
"Will you cut your commission?"
"I’m happy to talk commission. The real issue is net outcome. My job is to protect your equity and reduce risk. If we cut the steps that produce the result, the price reduction usually costs more than the commission ever would."
"We’re interviewing others."
"I respect that. Professionalism is about finding the right fit. What are you looking for in an agent that we haven't covered yet?"
The Close: Moving to Signature
The Direct Close: "I’m confident we can hit your timeline. Are you ready to get the paperwork started so we can get the photographers out here Monday?"
The "Think About It" Close: "I understand. Usually, when people want to think about it, it’s because I haven't clarified something. Which part of the plan are you still weighing?"
New Agent Mistakes That Kill Listings
Talking Too Much: If you talk more than 30% of the time, you aren't listening.
Ignoring the "Quiet" Owner: The person asking the fewest questions often holds the veto power.
Defending the Price: Never "defend" a price. Let the data do the talking.
No Time Boundary: If you stay for 3 hours, you look desperate.
Tech-Dependency: Always have a paper backup of your presentation.
Over-Promising: Don't promise daily calls if you can't sustain them.
Hiding Your Status: Don't lie about being new; lean on your broker's track record.
Vague Next Steps: Never leave without a clear follow-up date and time.8.. Avoiding these new agent mistakes that hurt credibility is your fastest path to a "Yes."
FAQ: The First Listing Appointment
Q: Should I bring the listing agreement to the first meeting?
A: Bring it every time—even if you don’t pull it out. It signals preparedness and lets you move forward immediately if they are ready.
Q: What if they ask about my experience?
A: Pivot to your process. Experience is just a proxy for "Will you mess this up?" Prove you won't by being the most organized person they meet.
Q: How does this differ from working with buyers?
A: Listings are about asset management; buyers are about search and discovery. You should prepare for a first buyer consultation with the same level of systematic rigor.
Your Professional Foundation
The listing appointment for new agents is a test of your business operating system. You do not need to be the most famous agent in California to win; you just need to be the most prepared.
Read more to see how this fits into our broader California real estate career guide, continue building your library of systems.
Your next step: practice these scripts out loud until they feel natural.
|
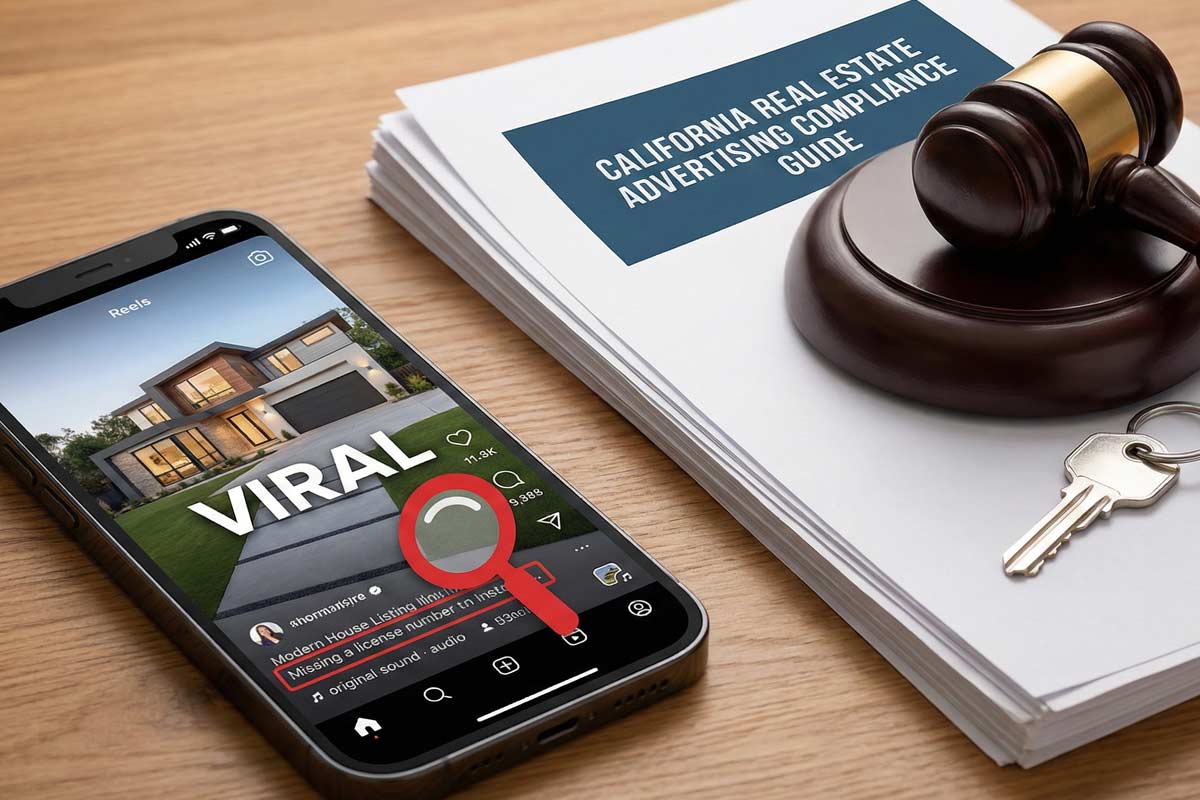
Your Real Estate License Number and Advertising
Imagine this: You’ve just spent $2,000 on a high-end video shoot for a new listing. The Reel goes viral—DMs, likes, and shares are pouring in. Then, Read more...
Your Real Estate License Number and Advertising
Imagine this: You’ve just spent $2,000 on a high-end video shoot for a new listing. The Reel goes viral—DMs, likes, and shares are pouring in. Then, you get a different kind of notification: a formal letter from the California Department of Real Estate (DRE).
A competitor noticed your license identification number was missing from the video. They filed a complaint through the DRE’s online portal in minutes. Now, instead of prepping for your open house, you’re prepping a response to a DRE investigator.
At ADHI Schools, I’ve spent over 20 years training agents to comply with the California Real Estate Laws.
If there is one thing I’ve learned, it’s this:
The DRE doesn't care how "aesthetic" your feed is; they care about consumer protection.
In California, your license identification number isn’t a suggestion—it’s a non-negotiable anchor for every piece of solicitation you put into the world.
TL;DR: Compliance at a Glance
Placement
Requirement Status
Bio / Profile
Required (If used for solicitation/first contact)
Individual Posts
Best Practice (Strongly recommended)
Website Pages
Required (On all pages you "own, control, and/or maintain")
Branded Signs
Required (If it identifies any individual licensee)
The Non-Negotiables: You must disclose your eight-digit license identification number AND your responsible broker’s licensed name. (Note: The broker's license number is generally optional if their name/logo appears).
Consequences:A DRE citation can include an administrative fine plus corrective actions.
The Core Rule: What Counts as "Advertising"?
Under Business and Professions Code and Commissioner’s Regulation 2773, any "solicitation materials intended to be the first point of contact with consumers" must include your license identification number. The DRE calls these "first point of contact" solicitation materials.
The Non-Negotiable Box
Licensee Name + License Identification Number.
Responsible Broker Identity: This must be the brokerage name as currently licensed with the DRE, not a nickname or team handle.
NMLS ID: Must also be included if you are performing mortgage-related acts.
The Operational Test: Content vs. Advertising
In practice, the DRE treats many consumer-inviting posts as solicitation.
Use this 3-part test: If a post contains
(1) your identity as an agent/broker,
(2) a specific property or service, and
(3) any invitation to contact, treat it as solicitation.
If the post has branding and services, even without an explicit CTA, it can still be construed as solicitation designed to incentivize a professional relationship.
Where Your License Number MUST Appear (Channel-by-Channel)
Instagram & TikTok
Required: Your license identification number must be in your Bio/Profile description if the profile is used for business.
Best Practice: Put “DRE #xxxxxxx” in your bio and on any post that could be screenshotted and shared. Legal standards focus on "first point of contact," but any single post can become that first interaction.
Common Mistake: Assuming a link aggregator (like LinkTree) counts as disclosure. The DRE expects disclosure on the solicitation surface itself, not hidden behind clicks.
YouTube & Shorts
Required: In the "About" section and the opening section of video descriptions.
Best Practice: For Shorts, where descriptions are often hidden, use an on-screen text overlay. Ensure it is legible on mobile and stays on screen long enough to be read.
Website (Agent & Team Pages)
Required: On all websites you own, control, and/or maintain. This includes agent bio pages, landing pages, valuation pages, and contact pages.
Note: This also applies to IDX or property search subdomains you control.
Placement: The footer works, but only if it’s present on every relevant page and not reduced to unreadable microtype. The type size must be no smaller than the smallest size type used elsewhere in the solicitation. ( 10 CCR § 2773)
Print & Digital Cards
Requirement: Mandatory for business cards, stationery, flyers, and mailers.
Digital Analog: Digital business cards and email signatures are explicitly viewed as "first point of contact" materials.
Yard Signs & Open House Signs
Branded Signs: If the sign displays the name of a licensee, disclosure rules trigger (§ 2773).
Unbranded Signs: A "For Sale" sign with no name, trademark, or branding (or only the responsible broker's licensed identity) is generally exempt.
The Reality of DRE Enforcement
Most complaints come with a single asset screenshot—one Reel frame or one flyer image. In practice, "it’s elsewhere on my site" is rarely a strong defense. If you’re wondering what actually gets the Department’s attention in the field, check out our report on What the California DRE Actually Enforces.
A pattern of sloppiness in your public-facing materials often signals deeper systemic issues to an investigator, which can lead to a wider review of Common DRE Violations and How to Avoid Them.
Traps: Common Compliance Misses
Collab Posts / "Featuring": If an ad names multiple licensees, you must include each individual license identification number.
Team Handle vs. Broker Name: A classic miss is a team page that shows a team name (e.g., "The Smith Group") but omits the responsible broker’s licensed name. Ensure your branding doesn't blur this line by reviewing the Team Name & DBA Rules for California Agents.
The 60-Second Compliance System
As a broker, here is exactly how I would protect your license: Systematize the boring stuff so you can focus on the selling.
The Locked Template: Create a "Footer Block" in Canva that includes your Name | DRE # | Responsible Broker's Licensed Name. Lock this as a template for all graphics.
The Bio Lock: Put your DRE# and responsible broker's licensed name in every social bio today.
The Monthly Audit: Set a recurring calendar invite to check (1) your last 5 posts, (2) your website footer, (3) your email signature, and (4) your top 2 directory profiles and team pages.
The same systems discipline required for advertising also applies to your backend operations, such as Trust Fund Handling Rules for California Agents.
FAQ: Real-World Advertising Questions
Do I need my license number on every Instagram post?
If it functions as first point-of-contact solicitation, disclosure is required. Since any "real estate" post can become someone’s first contact via a share or search, the safest system is to include it by default.
Does a real estate team page need license numbers?
Yes. Every licensee featured on the page must have their license number displayed next to their name.
What if I’m just posting market updates?
If you are presenting yourself as a professional to attract clients, it’s solicitation. The DRE is very broad in its interpretation of "incentivizing" a consumer to contact you.
If you want the full compliance map for your career, start with our California Real Estate Laws & Compliance Guide. If you’re wondering what actually gets the Department's attention in the field, check out our report on What the California DRE Actually Enforces.
|
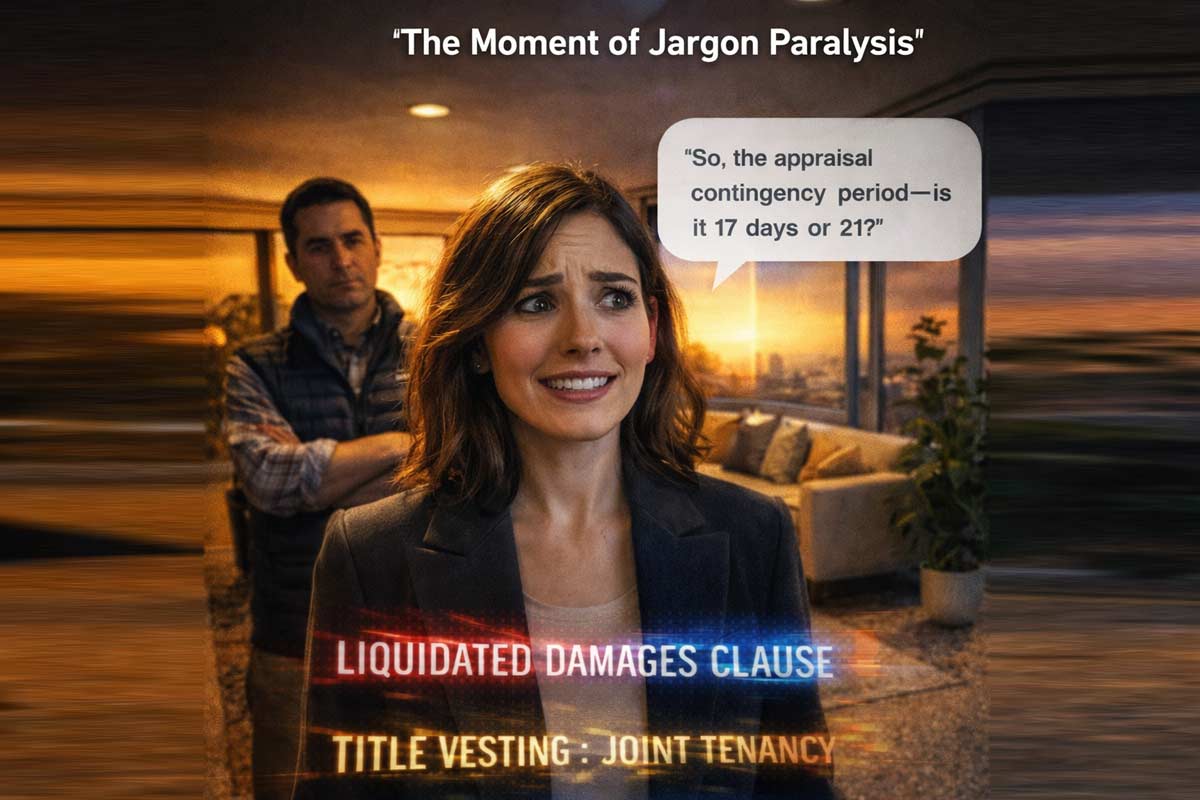
Jargon Paralysis Is Real
Every new agent fears the "Smartest in the Room"—that prospective buyer who walks into an open house with a question that rattles the rookie.
Their favorite weapon?
Technical Read more...
Jargon Paralysis Is Real
Every new agent fears the "Smartest in the Room"—that prospective buyer who walks into an open house with a question that rattles the rookie.
Their favorite weapon?
Technical jargon used in the wrong place. Imagine a visitor asking you about the status of contingencies and EMD increases before they’ve even toured the master bedroom.
The catch? There are no contingencies yet because there is no contract.
The truth is, terminology isn’t a measure of your intelligence; it’s simply a product of exposure, repetition, and usage. After 20+ years of coaching California agents at ADHI Schools, I’ve seen a consistent pattern: agents don’t fail because they lack ambition; they fail because they lack a system. To succeed, you must develop the Real Estate Agent Skills California agents need to handle contracts and conversations with poise. Mastering the language is the first step toward professional authority.
The Fastest Way to Learn Terms: “Definition → Context → Script”
Rote memorization is for passing the exam. Usage is for building a career. To master real estate terminology fast, stop reading a dry glossary and start using this 3-step framework:
Definition (Simple): What does it mean in plain English?
Context (Real Life): Where does this actually show up in a transaction?
Script (The "Say It Out Loud" Test): How do you explain it to a human being?
The 10-Second Rule
If you can’t explain a term in 10 seconds to a non-agent, you don’t “know” it yet. Your job isn’t to sound smart; your job is to help your clients understand.
The “Minimum Viable Vocabulary” (The 80/20 List)
You need to master the 20% of real estate vocabulary for beginners that drives 80% of real agent conversations. Focus on these clusters first:
1. Offers & Negotiation
Counteroffer: A rejection of the original offer with new proposed terms.
Liquidated Damages: A pre-agreed cap on how much of the buyer’s deposit the seller may retain if the buyer defaults.
Escalation Clause: A tool used in multiple-offer situations to automatically outbid competitors.
Client-safe sentence: : “Liquidated damages limit the seller’s claim on your deposit, even if a dispute arises, providing a layer of protection for both parties.”
2. Money & Financing
Pre-approval vs. Pre-qualification: Pre-approval is a verified commitment; pre-qual is often just a surface-level estimate.
Earnest Money Deposit (EMD): The "good faith" money a buyer puts down.
Points: Fees paid to the lender to "buy down" the interest rate. One point is one percent of the loan amount.
Client-safe sentence: “The earnest money deposit is your way of showing the seller you have skin in the game while we perform our due diligence.”
3. Escrow & Title (The California Reality)
In California, you’ll hear the phrase “opened escrow” constantly. In most California transactions, escrow, title, and recording are tightly sequenced, which is why agents who misuse these terms accidentally create false expectations around closing dates.
Escrow: A party holding funds and documents.
Preliminary Title Report: A report showing ownership history and liens.
Vesting: How the buyer legally holds ownership.
Client-safe sentence: “Escrow is the process that coordinates the paperwork and money until everything is ready to record with the county.”
4. Property & Valuation
Comps (Comparables): Recently sold homes used to determine value.
CMA: The report you create using those comps.
Appraisal: An official valuation required by the lender.
Client-safe sentence: “We look at 'comps'—homes similar to yours that sold recently—to ensure we're pricing your home to attract the best offers.”
Use-Case Learning: Stop Studying Terms Alone
Context is the ultimate teacher. If you want to learn the essential skills every new California agent must master, stop looking at terms in a vacuum.
The “Reading a Listing” Method: Pull terms from MLS remarks. If you see "as-is" or "probate," script an explanation for them immediately.
The “Offer Review” Method: Terms like "liquidated damages" appear in every negotiation. Practice explaining them before you ever open a contract with a client.
The “Escrow Timeline” Method: Map out a 30-day window. Which terms appear in Week 1 vs. Week 4?
Rapid Memorization Tools (No Corny Stuff)
Use these high-performance tactics to build your confidence as a new agent:
Digital Flashcards: Create your own deck using your "Definition → Context → Script" format.
The “Teach It Back” Method: Explain "Dual Agency" to a friend. If they look confused, your understanding isn't sharp enough.
“Term of the Day” Micro-habit: Pick one term from this real estate terms cheat sheet and use it in a conversation today.
The 7-Day Terminology Sprint
Day
Task
Day 1
Master 5 "Offer" terms + write scripts for each.
Day 2
Call a lender and ask them to explain "Points" and "Rate Locks."
Day 3
Read a full California Residential Purchase Agreement (RPA). Highlight unknowns.
Day 4
Focus on Escrow. Watch a video on the CA escrow process.
Day 5
"Teach it Back" day. Explain 10 terms to a non-agent.
Day 6
Practice the "Common Mistakes" section below. Say the fixes out loud.
Day 7
Review your personal glossary and add 3 new terms from local MLS listings.
Scripts: Sound Competent Without Faking It
Mastering the language is a core part of the communication skills that separate top agents from the rest.
When asked a definition: “The short version is [Definition]. The practical impact for you is [Context].”
When explaining a contract point: “Here is where that shows up in the contract. It’s a safeguard for your deposit.”
When you need to verify: “That’s an excellent technical question. Let me verify the latest escrow guidelines so I give you the most accurate answer.”
Common Terminology Mistakes New Agents Make
Even prepared agents trip up. High emotional intelligence for real estate agents means knowing when to slow down and clarify.
"Pre-qualified" vs. "Pre-approved": Never tell a seller your buyer is "pre-approved" if they only have a "pre-qual." It kills your credibility when the lender's deep dive finds an issue.
Misusing "Contingency": Don't say "the house is in contingency." Say "the contract is contingent upon [Inspection/Appraisal]."
Over-explaining: Don't give a 10-minute lecture. If they understand the term, move to the next step.
Master the Language, Master the Career
Terminology is the foundation of your professional house. Once you learn real estate terms quickly, you stop worrying about "sounding like a newbie" and start focusing on what matters: your clients.
FAQ
What are the most common real estate terms for new agents?
The most common terms revolve around the "Big Three": Financing (Pre-approval, EMD), Negotiation (Contingencies, Counters), and Closing (Escrow, Title).
How do I learn real estate terms fast?
Use the "Definition → Context → Script" method. Don't just memorize what a word means; practice how you will explain it to a client in 10 seconds or less.
What does ‘opening escrow’ mean in California?
In California, opening escrow means a neutral third party has received the signed purchase agreement and the buyer’s initial deposit, officially starting the closing process.
Pre-approval vs. pre-qualification—what’s the difference?
A pre-qualification is a surface-level estimate of what you might afford. A pre-approval is a formal commitment from a lender after they have verified your income, credit, and assets.
|

New agents sometimes wake up with a knot in their stomach. It isn’t the paperwork or the math; it’s the fear of the "awkward" conversation.
You worry about sounding like you don’t know what you’re Read more...
New agents sometimes wake up with a knot in their stomach. It isn’t the paperwork or the math; it’s the fear of the "awkward" conversation.
You worry about sounding like you don’t know what you’re doing. You fear a client asking a question you can’t answer, or worse, losing control at a $1.2 million listing appointment because you didn’t know how to pivot the conversation.
What are real estate communication skills?
Real estate communication skills are the ability to ask the right questions, explain complex information clearly, control conversations under pressure, and guide clients toward confident decisions. Top agents treat communication as a trainable skill—not a personality trait.
After 20+ years of coaching California agents at ADHI Schools, I’ve seen that the "Top 1%" aren't always more charismatic than you. They simply use repeatable communication frameworks. They don't wing it; they follow a system that builds trust and projects authority.
Communication is the multiplier. You can have all the essential skills every new California agent must master, but if you can't communicate your value, those skills stay hidden.
The 4 Communication Modes Top Agents Switch Between
Elite agents don't have one "personality." They toggle between four specific modes depending on what the client needs at the moment.
1. The Guide (Authority)
The Guide provides calm, structured direction when the client feels overwhelmed.
When to use: During the first consultation or when explaining the escrow process.
What it sounds like: "Here is exactly what happens next so there are no surprises."
2. The Detective (Discovery)
The Detective asks deep questions to find the "why" behind the "what."
When to use: During the initial needs analysis or when a client suddenly changes their mind.
What it sounds like: "Help me understand—what changed between yesterday's showing and today's decision?"
3. The Translator (Clarity)
The Translator takes complex legal or financial jargon and makes it simple. This is where you must master real estate terminology fast so you can explain it in plain English.
When to use: Explaining disclosures, interest rates, or contingencies.
What it sounds like: "In short, this contingency means you have a 'safety hatch' to back out if the inspection shows major issues."
4. The Closer (Action)
The Closer focuses on the next logical step without being "salesy."
When to use: At the end of every call, showing, or meeting.
What it sounds like: "Based on what we discussed, the next step is to sign the offer so we can beat the 5:00 PM deadline. Are you ready to move forward?"
Skill #1: Ask Better Questions (The Discovery Stack)
The agent who talks the most usually loses. On the other hand, the agent who asks the best questions wins. Use these high-quality questions to uncover the truth:
Category
Better Question (The "Detective" Mode)
Motivation
"If you don't find a home in the next 90 days, what is your Plan B?"
Timing
"On a scale of 1–10, how much of a 'must' is moving by summer?"
Decision Makers
"Besides yourself, who else needs to see the property before we make an offer?"
Financing
"When you spoke with your lender, what was the monthly payment range you felt most comfortable with?"
Risk
"What is the one thing that would make you walk away from a deal, no matter how much you liked the house?"
Skill #2: Control the Conversation Without Being Controlling
I’ve seen many deals die because an agent let a client "run" the process. To maintain control, use the Acknowledge → Label → Redirect → Confirm framework.
As a real estate agent developing emotional intelligence allows you to stay calm when a client gets aggressive or emotional, keeping the focus on the goal.
Scenario: A client wants to see 10 houses in one day without a pre-approval.
Acknowledge: "I completely understand wanting to see those homes; they look incredible online."
Label: "It seems like you're excited to get started, but you're worried about missing out on the right one."
Redirect: "To make sure your offer is actually considered by these sellers, we need that pre-approval letter in hand first."
Confirm: "Does it make sense to spend 20 minutes with my lender today so we can go see those houses tomorrow with a winning hand?"
When Communication Fails, Deals Don’t “Slow”—They Die
In California's high-stakes market, poor communication isn't just a minor mistake; it's a liability. I’ve seen promising careers stalled by these three avoidable outcomes:
Lost Listings: An agent loses a $1.5M listing because they rambled for 20 minutes on their background instead of asking the seller what their needs were.
Buyer Distrust: A buyer walks away from a deal because the agent gave a vague, non-committal answer about a property disclosure rather than being transparent.
Complaint Risk: Expectation gaps caused by poor communication lead to problems when a client feels "surprised" by a standard part of the escrow process.
Skill #3: Speak With Clarity Under Pressure (The Anti-Ramble)
When agents get nervous, they ramble. To stop this, use the Bottom Line First (BLF) system.
The Structure:
Bottom line: Give the direct answer immediately.
One reason: Provide the context.
Next step: Move the ball forward.
Confirm:Check for understanding.
Example: "Is now a good time to buy?"
Bottom line: "It depends entirely on your timeline and your budget."
One reason: "Rates are fluctuating, but inventory is finally opening up, giving you more leverage than buyers had last year."
Next step: "Let’s look at the numbers for the specific neighborhood you like."
Confirm: "Does that help clarify things?"
Pro Tip: : If communication feels like your weak point, start by mastering one skill at a time. Most agents begin by building confidence and learning terminology before tackling advanced objection handling.
The “Reading a Listing” Method: Pull terms from MLS remarks. If you see "as-is" or "probate," script an explanation for them immediately.
The “Offer Review” Method: Terms like "liquidated damages" appear in every negotiation. Practice explaining them before you ever open a contract with a client.
The “Escrow Timeline” Method: Map out a 30-day window. Which terms appear in Week 1 vs. Week 4?
Skill #4: Objection Handling That Sounds Human
Top agents don't "overcome" objections; they "solve" them.
"We're just looking." → "That’s the best way to start! Most of my clients 'just look' for a few weeks to get a feel for the market. What's one thing you've seen that you definitely DON'T want?"
"We want to think about it." → "I appreciate that. It's a big decision. Usually, when people want to think about it, it’s because of the price or the house itself. Which one is it for you?"
"Can you cut your commission?" "I understand you want to net the most money possible. If I can't even defend my own value for 10 minutes, how effective do you think I'll be when I'm defending your home price against a tough buyer's agent?"
Skill #5: The Follow-Up That Builds Trust
Follow-up isn't "checking in." It's providing value.
The "After-Showing" SMS Template:
"Hey [Name], thanks for touring that property on Main St today. I just found out the seller received two offers this afternoon. Based on what we saw, do you want to be the third, or should we move on to the listing on Oak St tomorrow?"
What NOT to do:
"Just checking in to see if you're ready." (Needy)
"Did you get my last three emails?" (Guilt-based)
"Any updates?" (Vague)
Practice Plan: 15 Minutes a Day for 14 Days
You cannot "think" your way into confidence. You have to "rep" your way there. As you build confidence as a new real estate agent, your speech will naturally become more fluid.
Days 1–3: Record yourself reading the 10 discovery questions. Listen back and fix your tone.
Days 4–7: Role-play the "Commission Cut" and "Think About It" objections with a peer or in the mirror.
Days 8–11: Practice the "Bottom Line First" structure on friends or family when they ask simple questions.
Days 12–14: Audit your past emails. Rewrite three of them to be shorter and more action-oriented.
Communication Is the Skill Multiplier
You can have the best marketing and the best local knowledge, but if you can't articulate your value, you'll always struggle to close. Master these frameworks, and you will stop feeling like a "salesperson" and start feeling like a consultant.
Developing your Real Estate Agent Skills California is a lifelong journey—and communication is the skill that makes every other skill visible to clients. Start with how you talk, and the results will follow.
Printable Communication Checklist
Did I ask at least three "Detective" questions today?
Did I use "Bottom Line First" in my last three emails?
Did I provide a clear "Next Step" on every phone call?
Did I follow up with a specific piece of value rather than "checking in"?
FAQ:Real Estate Communication
1. How do I avoid sounding like a "pushy" salesperson?
Focus on the "Detective" mode. If you ask enough questions to truly understand the client's goals, your advice will feel like help rather than a sales pitch. Always prioritize their "why" over your "close."
2. What should I do if a client asks a question I don't know the answer to?
Never guess.
Say: "That’s a great question, and I want to make sure I give you the exact data on that. Let me verify that with my broker/title officer and get back to you by 3:00 PM." This builds more trust than a fake answer.
3. How do I handle a client who won't stop talking?
Use the "Redirect" framework. Wait for a natural breath, acknowledge their point briefly, and say, "That’s a great point—to make sure we stay on track for your 2:00 PM appointment, let's pivot quickly to the closing costs."
4. Is texting clients better than calling?
It depends on the urgency. If allowed, use text for quick updates and logistics. Use phone or Zoom for negotiations, bad news, or complex explanations where tone of voice is necessary to prevent misunderstandings.
5. How can I sound more confident when I'm brand new?
Confidence comes from having a "Next Step" ready. Even if you don't know the whole process, you should always know the very next thing that needs to happen. Leading the client to the next step makes you the authority.
10 Micro-Scripts for Daily Practice
"I don't know the answer to that yet, but I will find out and let you know by [Time]."
"The bottom line is [Answer]. The reason is [Reason]. The next step is [Action]."
"It sounds like you’re feeling frustrated with the lack of inventory. Is that right?"
"What would happen if you stayed in your current home for another year?"
"My goal is to make sure you have all the facts so you can make a decision you're comfortable with."
"Based on the data, this offer is aggressive but fair. Do you want to send it?"
"I’ve noticed that when buyers wait for 'the perfect moment,' they often end up paying more later. What's your biggest concern about moving now?"
"To be respectful of your time, let's focus on these three priorities we discussed."
"Help me understand—is the price the issue, or is it the house itself?"
"If we can get the seller to cover the closing costs, would you be ready to sign today?"
|
Most agents believe their license status is in jeopardy the second their printed expiration date passes. In reality, California Business and Professions Code §10156.2 provides a vital safety net: if Read more...
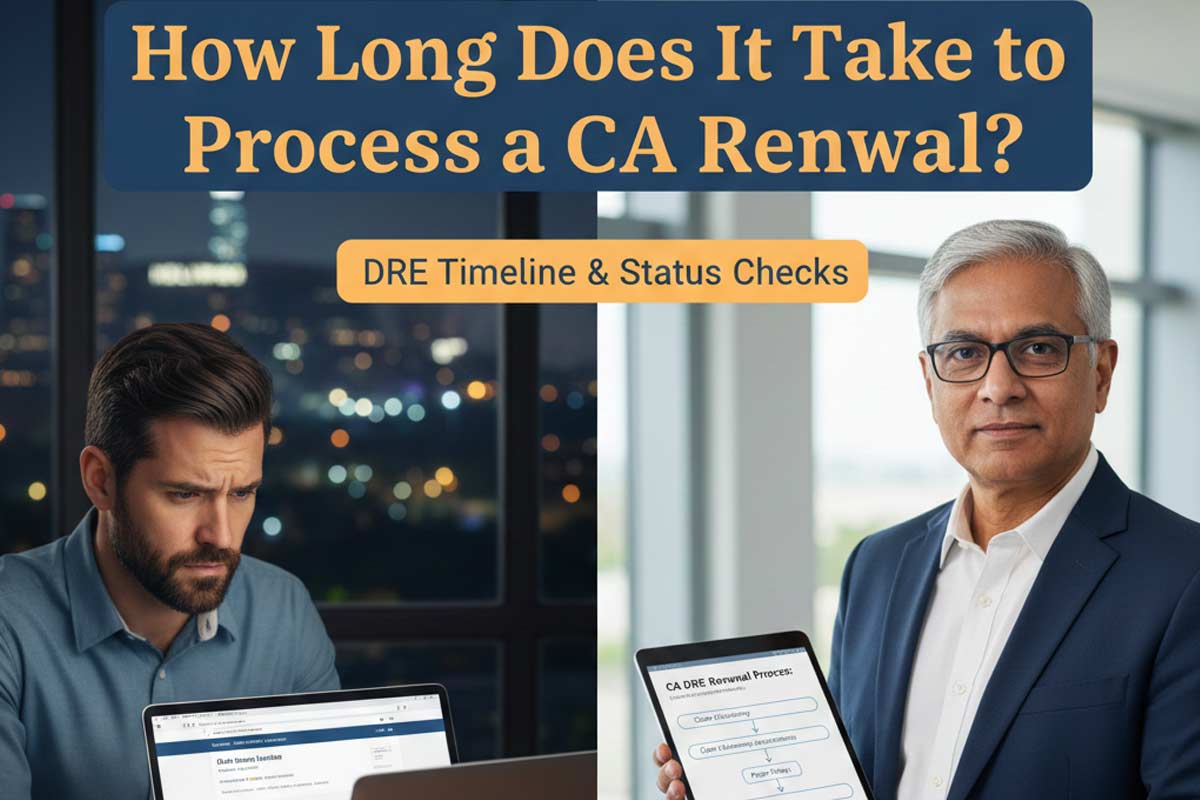
Most agents believe their license status is in jeopardy the second their printed expiration date passes. In reality, California Business and Professions Code §10156.2 provides a vital safety net: if you submitted a complete renewal on time, you are legally authorized to continue operating, regardless of administrative backlogs.
The real challenge isn't the expiration date—it’s the transparency of the process. How long does the DRE actually take to move your file from "received" to "renewed"? By anchoring your expectations to the DRE’s official "date received" backlog, you can replace anxiety with a predictable timeline.
Here is how to track your status like a pro.
Quick Answer: The only “real” processing timeline is whatever date the DRE is currently working.
The Backlog Rule: DRE publishes a rolling backlog (“Currently processing applications received: ___”). That date—not a guess—is your best estimate of where you are in line. Mailed in renewals are processed in date received order - this is why renewing through eLicensing is so much more reliable and easier.
The Safety Rule: If you renew on time and all renewal requirements are properly submitted, Business and Professions Code §10156.2 allows continued operations under the existing license after expiration unless notified otherwise by the DRE. Keep your eLicensing Transaction ID/receipt as your proof.
eLicensing vs. Paper: Paper renewals move much slower because they must be opened and keyed manually. DRE recommends eLicensing for faster service, though there is no true "expedited" lane.
Pro Tip: Search “DRE current processing timeframes renewals” to find the official page. If the DRE is processing dates before yours, you’re still in the queue.
For a comprehensive look at the entire cycle, see our California Real Estate License Renewal Guide.
The Fastest Way to Estimate Your Renewal Date
To get a realistic answer to "how long will this take," follow this two-step method:
Find your submission date: Look at your eLicensing receipt or check your bank statement to see when your fee was processed (DRE notes this as a primary confirmation of receipt).
Compare to the Backlog: Check the DRE’s "Current Processing Timeframes" page. Use the backlog date as your best directional estimate and re-check it every few days. This is less relevant if you submit online through eLicensing.
Many agents confuse submission with approval. While eLicensing is faster, your Public License Lookup won't update until the system verifies your Continuing Education (CE). This is why we recommend checking the Checklist for Renewing a California Real Estate License before you start.
What Affects DRE Renewal Processing Time?
Clean Submission vs. Deficiency Notice: A "clean" app goes through faster. A "deficient" app (missing info or wrong CE numbers) gets kicked to a manual reviewer.
CE Completion Timing: You may use eLicensing or submit your renewal application 90 days prior to your license expiration date. If you wait until the last minute, you lose your buffer for system syncs.
Mismatched Personal Info: Using a nickname on your CE certificate that doesn't match your DRE record can trigger a manual review delay.
Payment Issues: Check the cost to renew a CA real estate license to ensure your fees are exact. Incorrect fees on paper applications will stop the process entirely.
The Renewal Timeline: Managing Expectations
Scenario
What you should expect
Action Item
Clean eLicensing renewal
After your broker certifies your application, your license should show renewed online quickly.
Save Transaction ID + receipt. Check Lookup every 2–3 days.
CE reporting mismatch
Renewal may stall until course info is recognized/verified.
Re-check eight digit course numbers and confirm CE requirements are satisfied.
Deficiency Notice
Longer + unpredictable until the error is corrected.
Respond immediately; delays are fixable but can stop your ability to work.
Paper renewal
Not recommended as is typically slower due to mail + manual handling.
Avoid if timing is tight; eLicensing is recommended for faster service.
Visualizing the Flow:
Step 1: Submit via eLicensing 60–90 days early.
Step 2: Save your Transaction ID (this is your legal "Safety Rule" proof).
Step 3: System cross-references CE numbers.
Step 4: Public License Lookup updates after the renewal is processed.
What to Do If Processing is Taking Too Long
IF you submitted on time and have a receipt: B&P Code §10156.2 protects you as long as all requirements were properly submitted. You may continue in business without a renewed license until you are notified of a deficiency.
IF you are within 1 week of expiration and the status hasn't changed: Re-verify your CE certificates. Ensure the course numbers you entered into eLicensing are 100% accurate.
IF you receive a "Deficiency Notice": Respond immediately. You may be instructed to cease operations if the renewal is deficient.
IF you made a mistake on the form: Review our list of common renewal mistakes agents make to see if you need to contact the DRE with a correction.
If you are unsure how to navigate the portal, follow our guide on how to submit your CA license renewal application.
The “Delay Prevention” Checklist
Finish CE 30+ days before your expiration.
Use eLicensing (DRE recommends it for faster service—there’s no true ‘expedite’ lane).
Submit within the 90-day window.
Confirm your CE requirements are satisfied for your specific cycle.
Save your Transaction ID and check your bank statement for fee processing.
Double-check name formatting (e.g., "Jon" vs "Jonathan").
Renewal timing becomes predictable when you follow the full system. By submitting early and monitoring the DRE backlog, you protect your "Active" status and your commissions.
Ready to get started?
Visit our California Real Estate License Renewal Guide to map out your 90-day plan.
FAQ
Can I still work while my renewal is "Pending"?
Yes, per B&P Code §10156.2, if you renewed on time and submitted all requirements, you can continue operating unless notified otherwise by the DRE.
How do I know the DRE received my application?
Check for an eLicensing Transaction ID or verify that the fee has been processed on your bank/credit card statement.
What is the current DRE backlog?
As of January 5, 2026, the DRE is processing salesperson renewals (on time) received on November 26, 2025.
How long do paper renewals take?
Paper applications are manually processed and typically take several weeks longer than eLicensing submissions.
What happens if I receive a deficiency notice?
You must correct the error immediately. These notices take effect five days after mailing, and you may be instructed to cease operations until corrected.
|
Renewing your California real estate license is a high-stakes administrative task. A single oversight—a mismatched name, an incomplete CE certificate, or a missed deadline—can trigger a deficiency Read more...
Renewing your California real estate license is a high-stakes administrative task. A single oversight—a mismatched name, an incomplete CE certificate, or a missed deadline—can trigger a deficiency notice or halt your ability to work legally. Your goal isn’t just to submit; it’s to achieve a clean, provable, and on-time renewal that avoids manual review and a potential late fee.
This checklist distills decades of experience into a direct, phase-by-step action plan. It is designed to steer you clear of the common data and documentation errors that cause renewal problems, helping to ensure that your submission is seamless from the moment you start your continuing education to the final confirmation.
The 30-Second "If You Do Nothing Else" Checklist
Verify expiration date via the DRE Public License Lookup today.
Finish CE early (target at least 15–30 days before your deadline).
Confirm CE requirements for your specific cycle (First-time vs. Subsequent).
Submit via eLicensing (renewals open 90 days before expiration).
Save proof immediately: Transaction ID + confirmation page PDF + timestamped screenshot.
The Phased Renewal Checklist
Phase 1: Prep (90–60 Days Out)
Audit Your DRE Profile
Why it matters: Your name should match across elicensing and CE records closely enough to avoid a manual review (same first/last; consistent format).
Common mistake: An old mailing address means you’ll miss critical DRE deficiency notices in the event you get mailed a letter.
Proof to save: Screenshot of your current “Licensee Information” page.
Verify CE Mix & Exemptions
Why it matters: Ensure your CE includes the required topic mix for your renewal cycle (mandated topics include agency, ethics, fair housing, implicit bias and others). Some licensees may qualify for a 70/30 exemption (age 70+ and 30 years in good standing) if applicable to you.
Common mistake: Taking a package that misses required topic coverage for your cycle.
Phase 2: Execution (60–30 Days Out)
Complete DRE-Approved CE
Why it matters: Only courses with valid DRE approval/provider info count. Finishing early gives you a buffer for provider or portal issues.
Common mistake: Assuming a course is DRE-approved without verifying the current approval status and provider number at the time of your completion.
What to check: Before you enroll or start a course, verify it is currently approved using the DRE’s Approved Courses Lookup.
Budget for Fees
Why it matters: Know your on-time vs late fee and keep your payment method ready.
(On-time renewal fees: $350 salesperson / $450 broker; late renewal within 2 years: $525 salesperson / $675 broker.)
Common mistake: Using a debit/credit card that is near its limit, has expired, or has new billing information the bank’s fraud filter flags, causing the transaction to fail.
How to fix: 2-3 days before submitting: confirm it’s not expired, has sufficient available credit, and its billing address matches your bank’s record.
Phase 3: Submission (30–10 Days Out)
Enter CE Details in eLicensing
Why it matters: Accurate entry of CE details prevents delays. Use the DRE-approved course/provider 8-digit identifiers exactly as shown on your certificate—don’t guess, don’t retype from memory if you can copy/paste.
Common mistake: Inverting digits in course approval numbers.
Proof to save: Screenshot of the “Review Information” page before you click submit.
Refer to: How to Submit Your CA License Renewal Application
Capture Submission Proof
Why it matters: I’ve seen agents see a “spinning wheel” and close the tab. Without a Transaction ID, you have no proof of filing if the system crashes.
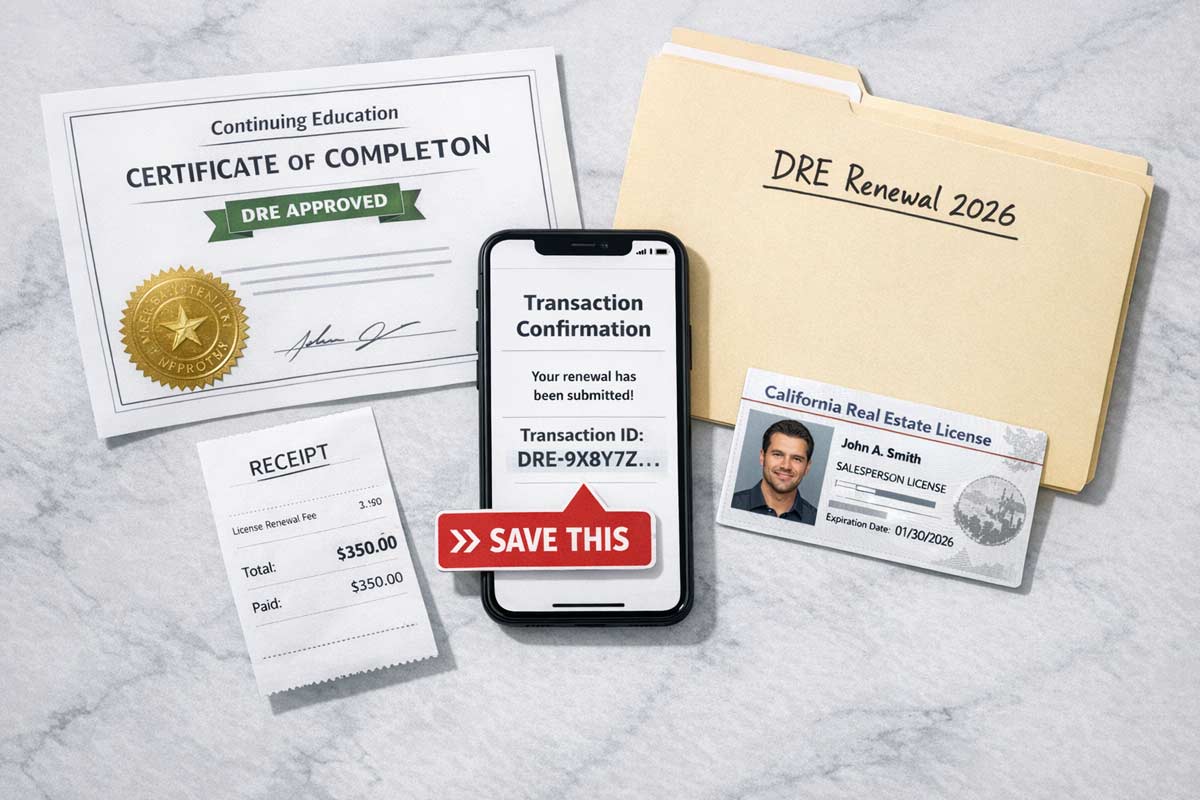
Common mistake: Closing the browser before the “Success” page loads.
Proof to save (all three): Transaction ID, PDF of the confirmation page, and the confirmation email.
🚩 RED FLAG: PAUSE SUBMISSION IF...
You have new criminal charges or convictions since your last renewal (may require disclosure/review).
Your CE certificates haven’t been issued yet.
Submitting with these issues often triggers a deficiency notice. Review Common Renewal Mistakes Agents Make before you hit submit.
Phase 4: Monitoring & Escalation
Verify Status & Track Timeframes
Why it matters: Check the Public License Lookup after 24–48 hours to confirm the record is moving the right direction. These time frames are important so you are aware how long it takes to process a California real estate license renewal.
Escalation Protocol: If it doesn’t update, compare against published DRE renewal processing timeframes; if you’re beyond published dates, contact the DRE with your Transaction ID ready.
Proof to save: PDF printout/screenshot of your updated license record once it updates.
Handle Deficiency Notices (Don’t Panic-Resubmit)
Why it matters: When you get a deficiency notice, sloppy “resubmits” can create duplicate transactions and confusion.
Do this instead:
Match the deficiency line-item to your proof (certificates, receipt, Transaction ID).
Respond using the method the notice specifies.
Save a copy of everything you send + the date sent.
STEP 1 — VERIFY
Confirm your facts before you do anything else
Check license expiration date
Confirm renewal window is open (90 days before expiration)
Verify name + address match across DRE & CE records
Goal: No profile mismatches → no manual review
STEP 2 — COMPLETE
Finish the right CE, early
Complete DRE-approved CE for your renewal cycle
Confirm required topics are included (Agency, Ethics, Fair Housing, Implicit Bias, etc.)
Download final CE certificates (with provider + course numbers)
Goal: CE finished 15–30 days early
STEP 3 — SUBMIT
Enter data once, carefully
Enter CE details into eLicensing (copy/paste — don’t retype)
Submit renewal application + fee
Wait for the success confirmation screen
Goal: One clean submission, no errors
STEP 4 — PROVE
Lock in your paper trail immediately
Save Transaction ID
Download confirmation PDF
Take a timestamped screenshot of success page
Save confirmation email
Goal: You can prove on-time filing instantly
(Optional but Recommended)
STEP 5 — MONITOR
Verify it actually moved
Check license status after 24–48 hours
Save screenshot once status updates
Respond carefully if a deficiency notice appears
Goal: Catch problems early, avoid downtime
FAQ
How early can I renew?
You can renew via eLicensing starting 90 days before your expiration date.
Can I practice while my renewal is “Pending”?
If you renew on time, California law may allow continued operations after expiration unless the DRE notifies you of a deficiency. Practically: confirm your transaction is complete, watch for deficiency notices, and follow your broker’s compliance policy.
What if I miss the deadline?
Your license becomes expired and you cannot practice while expired. California generally allows late renewal for up to two years after expiration, but you’ll pay the late renewal fee (e.g., $525 vs $350 for salesperson; $675 vs $450 for broker).
Does my broker get notified?
Often, brokers monitor status through internal systems—but don’t rely on it. You are responsible for your own status.
This checklist ensures you don’t miss a step. For the full deep dive on requirements, fee schedules, and legal updates, visit our California Real Estate License Renewal Guide.
|

An expired real estate license is a total freeze on your ability to earn commissions.
If your license isn’t active, you can’t represent clients—period.
The goal of this guide is to move you Read more...
An expired real estate license is a total freeze on your ability to earn commissions.
If your license isn’t active, you can’t represent clients—period.
The goal of this guide is to move you from "almost expired" to "renewed" with the cleanest submission possible. This is your operational roadmap.
Before You Hit Submit: The 4 Gatekeepers
Do not start your application for license renewal on eLicensing until these four things are true. Most renewal delays happen because agents submit before their records or documents are actually ready.
Confirm Your Eligibility Window: The DRE opens renewal only within an eligible window (typically 90 days before expiration). The eLicensing portal is the source of truth—if the "Renew" option isn't available in your profile, you aren't eligible to submit yet. Keep in mind that you can complete the CE courses anytime in the four years preceding expiration, but the application can’t be submitted until at least 90 days prior to expiration.
CE Proof in Hand: Have your Continuing Education (CE) completion certificates ready. You must verify that the provider numbers, course identifiers, and completion dates match exactly what you will enter. When you take the courses through ADHI Schools, the course completion certificates will start with 6404 for each CE course. For a full list of required courses, refer to our Checklist for Renewing a California Real Estate License.
Record Alignment: Ensure your legal name and contact details on file match your current identification. Even small mismatches (name formatting, address changes, or a stale email) can slow the file and trigger a manual review.
Broker Readiness (Salespersons Only): Confirm your broker or office manager knows they must approve the renewal inside their own portal. Your application is not considered "complete" by the DRE until your broker takes this step.
At-a-Glance Submission Checklist
✅ Eligible window visible in eLicensing
✅ CE completion certificates (PDFs) open on screen
✅ Name and contact details match your DRE record
✅ Salespersons: Broker notified and ready to approve
Takeaway: If any of these are off, fix them first. Submitting incorrect data is the fastest way to get your license stuck in the DRE’s manual review pile. See our guide on California Renewal Mistakes to avoid common "stuck points."
The Clean Submission Sequence
Step 1: Gather Your Renewal Packet
Organize these inputs before opening the eLicensing portal:
Your CA license number: Use the number exactly as shown in your DRE profile.
CE Certificates: Specifically the provider numbers and course identifiers exactly as shown on your certificates.
Payment Method: A valid credit or debit card. (To plan your budget, see How Much Does It Cost to Renew a CA Real Estate License?).
Broker Info (Salespersons): Your responsible broker’s license number and email.
Step 2: Choose Your Channel
Online (eLicensing): The standard path. Provides the fastest processing and immediate confirmation.
Mail Submission: Use only when the portal requires supporting documentation or your situation is not supported online. If you mail it, use a trackable service (USPS Tracking, FedEx, or equivalent).
Step 3: The Portal Walkthrough
Access: Log into eLicensing.
Data Entry: Do not retype from memory. Copy the identifiers and provider numbers directly from your PDF certificates. Even a minor typo in a course ID can stall verification and trigger a deficiency or manual review.
Validation: Review the summary page carefully before clicking through to payment.
Salesperson Alert: Your renewal is NOT complete until your broker signs in to their own portal and approves your application. Confirm with your broker or office manager that this step is finished immediately after you submit.
Step 4: Payment and Recovery
The DRE portal can be temperamental. To avoid double charges:
Click "Submit" only once.
If the screen freezes, wait a couple of minutes before refreshing.
Recovery Step: If you are unsure if it went through, log out, log back in, and check for a confirmation or receipt before attempting a second payment.
Step 5: Your Paper Trail (Non-Negotiable)
Portals glitch and emails disappear. Your paper trail is your insurance policy if there’s ever a question about what you submitted and when.
Screenshot the final confirmation page with the transaction ID.
Download the PDF summary of the application you just filed.
Archive the email receipt. You may need these while waiting for the record to update. See How Long Does It Take to Process a CA Renewal? for typical wait times.
What Happens After You Submit
Tracking Status: Use eLicensing as your primary status tracker to see if the application is "Pending" or "Processed."
Downstream Confirmation: Use the Public License Lookup as the final confirmation once the record officially updates with your new expiration date.
Your goal state is a "renewed/processed" status in eLicensing and an updated expiration date on the public lookup.
When to Escalate
If you are >14 days from expiration: Check eLicensing every 48 hours. It is normal for the update to take a week or more.
If you are
|

A $10,000 deposit from a client sits in your center console. You’re headed to a listing appointment, then a kid's soccer game, and you figure you’ll drop the check at the escrow office tomorrow morning. Read more...
A $10,000 deposit from a client sits in your center console. You’re headed to a listing appointment, then a kid's soccer game, and you figure you’ll drop the check at the escrow office tomorrow morning. It’s just 12 hours, right?
Many trust fund cases begin with a dispute—a deal falls apart, a buyer wants their EMD back, or an escrow officer denies receiving a check on time. When the finger-pointing starts, the DRE looks at the custody trail, not your "intent."
Do this now: In modern times, it’s true that agents are less likely to take checks directly, remember if you have client funds in your possession, call the escrow officer immediately to confirm their intake hours, document the receipt in the transaction file (send a timestamped email to escrow and your broker confirming you have it), and deliver the funds today.
Trust Fund Handling: The 2-Minute Summary
The Destination: Place funds in a neutral escrow depository or the broker’s trust account according to legally imposed timeframes.
The Risk Window: Brokers treat custody as starting the second you take possession of client money.
The Safest Practice: Maintain consistent, high-standard documentation for every cent received.
The Top Risks: Commingling and Conversion are the primary causes of disciplinary actions.
What Actually Counts as “Trust Funds”?
The most common trust funds agents handle are Earnest Money Deposits (EMD), Rents, and Security Deposits. While other items like advance fees can technically be trust funds, treat these as edge cases—never touch them without the broker’s written instruction.
From an operational standpoint, your safest practice is to maintain robust documentation across all price points. If a DRE auditor sees a gap in a small transaction, they can infer there are systemic failures in your system.
Where Trust Funds Go in a Clean File
Operationally, there are two standard paths used in California real estate to handle client money.
Neutral Escrow Depository: The safest and most common path. You deliver funds directly to the escrow company named in the contract.
Broker’s Trust Account: A specifically designated account maintained by the broker, titled as a trust account.
The 4 Violations That Actually Get People Disciplined
The DRE is surgical about auditing money. To audit-proof your career, you must understand the concrete actions that trigger an investigation.
1. Commingling (Mixing Funds)
Audit Trigger: An auditor finds client funds deposited into a broker’s operating account or an agent’s personal account.
Hard Control: Safest practice: All trust fund checks go unendorsed directly to escrow or the broker’s trust account.
Refuse physical cash: Direct the client to obtain a cashier's check instead.
Depository compliance: If your broker forbids mobile deposit (many do), deliver the physical instrument directly to the designated depository.
2. Conversion (Using Funds)
Audit Trigger: A trust account balance drops below the total amount owed to all beneficiaries, often discovered after a client complaint.
Hard Control: Never "borrow": : Never use a deposit for unauthorized purposes, even if you plan to reimburse it later. Totally illegal.
Build a "defense file": Create documentation in real time (not after the fact) that explains every dollar with matching receipts and the trust account should be reconciled monthly.
3. Failure to Account (Sloppy Records)
Audit Trigger: A broker or agent cannot provide a clear paper trail for a specific deposit during a routine file review.
Hard Control: Retain proof: Keep copies of every deposit confirmation, receipt, or proof of delivery.
Cross-reference: Identify every deposit with the specific property address and client name according to DRE rules.
4. Delay / Failure to Deposit
Audit Trigger: An auditor cross-references the date on the EMD check with the date on the Escrow Receipt.
Hard Control: Timestamped communication: Document the moment you receive funds.
Exposure limit: If the timeline exceeds 3 business days, your exposure spikes.
For more on how the state monitors these audit trails, see our guide on what the California DRE actually enforces.
The Clean Trust-Fund Handling Sequence
Follow this sequence to ensure your file is defensible from the moment you take custody:
Verify Payee: Confirm the payee is the correct legal entity before you accept custody.
Secure Receipt: Document receipt of check.
No Endorsement: Never sign the back of a client's deposit check.
Approved Custody: Do not hand checks to unapproved third parties (unlicensed assistants, TCs, etc.).
Physical Storage: Store checks in a locked, designated place in your office. Never leave trust funds in your car.
Deliver & Confirm: Deliver the funds same day whenever possible and obtain a signed receipt.
Chain-of-Custody Email: Send the timestamped email to your broker and escrow. This is a core professional standard in our California Real Estate Laws & Compliance Guide.
FAQ: High-Intent Questions
Can I hold the deposit check overnight?" Generally, yes, but the risk of loss or theft makes this a failure in most brokerage policies. Deliver it immediately.
Does my Transaction Coordinator (TC) count as me?" Yes. Delegation does not transfer responsibility. If your TC or assistant mishandles a check, the DRE holds you and your broker accountable for the lack of supervision.
What if the buyer gives me the check on a Friday night?" Document the receipt Friday night, store the check in a locked location (not your car), and deliver it per your broker's Monday morning intake process.
What about wire instructions and wire fraud?" Always verify wire instructions via a phone call to a known, verified number. Never accept last-minute changes via email.
The Clean File Standard
Trust fund handling is about creating a defensible file. By following these hard controls and maintaining a strict chain of custody, you ensure that even a surprise investigation results in a clean file. Understanding these operational rules is the first step in avoiding common DRE violations and how to avoid them.
For more on state requirements, return to our California Real Estate Laws & Compliance Guide.
Disclaimer: This article provides general best practices and does not constitute legal advice. Always confirm your broker’s written policy.
|