You’ve passed the real estate exam, joined a brokerage, and printed your business cards. Now comes the hard part: actually talking to people. Whether it’s fumbling with a lockbox while a client looks Read more...
You’ve passed the real estate exam, joined a brokerage, and printed your business cards. Now comes the hard part: actually talking to people. Whether it’s fumbling with a lockbox while a client looks over your shoulder, blanking on a disclosure requirement mid-conversation, or fearing a lead will ask a question you can’t answer, these moments can stall a career before it starts.
In my 20+ years coaching California agents through the high-pressure "first 90 days," I’ve seen that a lack of confidence as a new real estate agent is the single most common reason new licensees stall out. Most agents don't quit because they lack talent; they quit because they lack a system to handle the discomfort of being new.
Confidence is not a personality trait; it is a byproduct of competence and repetition. You don’t need more "motivation"; you need more reps.
Key Takeaways
Action Creates Feeling: You will never "feel ready" until you start doing the work.
The 14-Day Shift: In my experience, agents who follow a structured "rep" schedule report a significant drop in call anxiety within two weeks.
Competence = Trust: Clients don't need you to be a veteran; they need you to be a calm, prepared professional.
The ADHI Confidence Loop
Elite agents don't wing it. They train like athletes. This loop is specifically designed for solo agents who don't have an assistant or a team lead to lean on. It is a critical layer of the broader skill stack every California agent must build. To accelerate your growth, use the ADHI Confidence Loop for 20 minutes every morning:
Learn: Study one specific micro-topic (e.g., how to explain a "contingency").
Script: Write out a 3-sentence explanation in your own voice.
Rehearse: Say it out loud 10 times. Reading silently only trains your eyes; speaking out loud trains your brain and mouth to work together under pressure. If you skip this step, the loop breaks.
Execute: Use that term in a real conversation or social media video today.
Review: Briefly note what felt clunky and fix it for tomorrow.
7 Tactical Ways to Build Confidence Fast
Mastering California Real Estate Agent Skills isn't about knowing everything; it's about having a reliable process. Use these seven tactics to build your professional backbone:
1. Own Your "Newness" with Default Scripts
Confidence is knowing what to say when you don't know the answer.
The Move: If a client asks about a specific disclosure or a recent price adjustment on a neighboring property you haven't studied yet, don't guess.
The Line: "I want to make sure I give you the most accurate data on that specific property—let me verify the latest records and get back to you by 4:00 PM."
Do this today: Write down three questions you're afraid of and draft your "I'll find out" response.
2. Practice Out Loud (Vocal Muscle Memory)
In my experience, agents who rehearse out loud freeze far less on live calls than those who only study silently. Speaking your scripts builds the muscle memory required to stay calm when a client pushes back.
Do this today: Record yourself explaining the home-buying process on your phone. Listen back. It will be awkward—that's the feeling of growth.
3. Eliminate "Jargon Paralysis"
If you’re afraid of looking like an amateur, you need to master real estate terminology fast. When you speak the language of the industry fluently, your internal anxiety drops.
Do this today: Pick the three terms that confuse you most and explain them to a friend until they understand them.
4. Use a Physical Pre-Call Cue
Anxiety lives in the body. Before picking up the phone, fix your physiology.
The Move: Stand up or sit upright with your feet planted. Never call from your car while slouched or cramped; your posture directly affects your vocal tone and perceived authority.
5. Track Inputs, Not Outcomes
You can't control if a lead says "yes," but you can control that you made 10 calls.
Do this today: Redefine a "win" as completing your daily outreach. This builds new real estate agent confidence by removing the fear of rejection.
6. The Post-Conversation Debrief
After every client interaction, ask yourself: "At what exact moment did I feel my heart rate spike?"
The Example: If you felt awkward when they asked about commissions, that is your signal to roleplay that specific objection tomorrow. This prevents a single awkward moment from becoming a mental block and improves your emotional intelligence as a real estate agent.
7. Leverage Checklists
Confidence is the absence of the "did I forget something?" feeling.
The Move: Build a "Go Bag" for your car with the essentials: a flashlight, extra batteries for lockboxes, and a printed Buyer Consultation checklist.
Do this today: Create a step-by-step checklist for a property showing so you can focus on the client, not the keys.
Low-Pressure Scripts for New Agents
To build communication skills that separate top agents from the rest, you must be authentic. Use these verbatim at first. It may feel robotic—that's normal. Confidence comes only after you have the foundation of repetition.
Script 1: The "Sphere" Introduction
Target: People you already know.
Script: "Hi [Name], I’m officially moving my focus into the [Neighborhood] real estate market. I’m spending my first 90 days building a resource list for local homeowners. If you ever need real estate advice or just want to know what the house down the street sold for, I’m your person."
Script 2: The "Just Looking" Response
Target: Leads who are hesitant.
Script: "I completely understand—most of my clients start out 'just looking' for months. My job is to make sure you have the best data so that when you are ready, you feel 100% confident. Is it okay if I send you a quick weekly update on what's actually selling?"
Script 3: Handling the "We’re Not Ready" Objection
Target: Keeping the relationship alive.
Script: "No problem at all. Real estate is about timing, and only you know when that's right. I'll keep an eye on the market for you in the meantime. If you see something that catches your eye, just reach out."
Confidence Killers (and how to fix them)
Unidentified Knowledge Gaps: If you don't understand the RPA (Residential Purchase Agreement), you will be subconsciously terrified of a listing.
Fix: Identify the essential skills every new California agent must master and tackle one contract section per day.
Taking Rejection Personally: A "no" is usually about their timing, not your talent.
Fix: Treat every "no" as data. Your goal is to collect 10 "no's" a day to find the one "yes."
Productive Procrastination: Researching for 5 hours to avoid 5 minutes of calling is just a "fancy" way of being scared.
Fix: Cap your study time to 30 minutes. Real learning happens in the field.
Talking Too Much: Nerves lead to rambling.
Fix: Practice the "Power of the Pause." Ask a question and wait 3 seconds after they finish talking before you respond.
Trying to Sound "Fancy": Using complex jargon makes you sound insecure.
Fix: Speak like a human being. Clear is better than clever.
The 14-Day Confidence Plan
In my experience, agents who follow this plan report a significant drop in call anxiety by the final day. Once you finish this cycle, repeat it with new scripts and higher targets.
Day
Task 1: Vocal Reps (10 Min)
Task 2: Knowledge Gap
Task 3: The Action
1–3
Practice Intro Script out loud
Learn "Escrow" & "Earnest Money"
Call 5 people you know
4–6
Roleplay "Just Looking"
Learn "Contingency" periods
Text 10 "Resource" offers
7-9
Record your "Value Prop"
Learn "Title" & "Lien"
Visit 3 local Open Houses
10-12
Practice "Follow-up" scripts
Learn "Appraisal" vs "BPO"
Follow up with all leads
13-14
Review your progress
Final review of terms
Shadow a veteran agent's call
Success Metric: Success isn't a closed deal in 14 days; it's the ability to deliver your scripts without looking at a piece of paper.
FAQ
How long does it take to feel confident as a new agent?
Most agents find their "stride" after 20–30 real-world conversations. If you commit to 3 conversations a day, you will feel the shift within 10–14 days.
What if I’m naturally introverted?
Introversion can be an advantage in real estate because it usually comes with better listening skills. Confidence for introverts comes from being the most prepared person in the room. If you follow the scripts and checklists, you don't need to be "high energy" to be successful.
Confidence Compounds
Confidence is the glue that holds your business together. Without it, your knowledge stays trapped in your head.
But remember: if you skip building this skill stack now, your confidence problems will only resurface later when the stakes are higher and the commissions are larger.
Ready to move beyond the basics and master the full range of California Real Estate Agent Skills California? Confidence compounds—the sooner you build it, the cheaper the lessons are.
|
Most new agents walk into their first listing appointment with a gut-level fear: “What if they ask how many homes I’ve sold?”
This fear stems from a misunderstanding of seller psychology. Sellers Read more...
Most new agents walk into their first listing appointment with a gut-level fear: “What if they ask how many homes I’ve sold?”
This fear stems from a misunderstanding of seller psychology. Sellers aren’t buying your resume. They are buying a process that protects their equity and reduces mistakes. They aren't looking for a "veteran" as much as they are looking for a professional with a predictable, low-risk system.
In my 20+ years of training thousands of California agents at ADHI Schools, I’ve seen rookies beat top producers because they prioritized clarity over charisma. If you try to wing it, you’ll feel it—and they’ll feel it.
Confidence doesn’t come from your track record—it comes from your sequence.
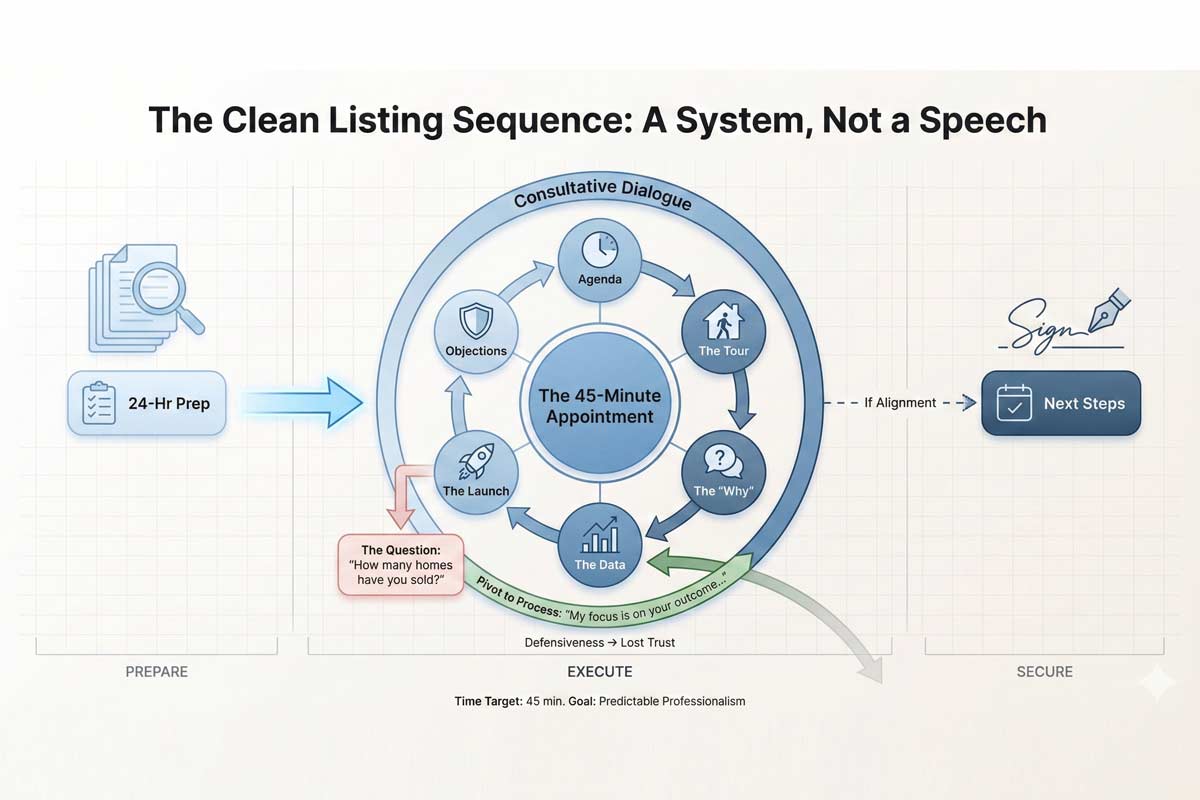
The 7-Step Clean Sequence (One-Page Summary)
Agenda Setting: Confirm the timeline and goal immediately.
The Tour: Walk the property with a consultant’s eye.
The "Why": Deep-dive into seller goals and timeline.
The Data: Review pricing using the three-bucket method.
The Launch: Explain the marketing and feedback loop.
Objection Handling: Resolve concerns using prepared scripts.
The Close: Confirm the decision and set next steps.
Time target: 45 minutes total (10 tour / 25 table / 10 close & next steps).
Pre-Appointment Prep: The 24-Hour Intel Phase
The appointment is won or lost before you ring the doorbell.
The Property Intel Checklist The "Big Three"
CMA: Prepare a Comparative Market Analysis with Actives (competition), Pendings (market direction), and Solds (the reality check).
Title Profile: Check for liens, multiple owners, or solar panel UCC filings.
The "Motivation" Call: 24 hours prior, call to confirm. Ask: "Aside from the price, what is the one thing that must happen for this move to be a success?"
The Minimalist Kit
Sellers can interpret overly flashy materials as in security. Data and a calm process read as competence. Bring an iPad or a neatly organized folder containing:
The CMA
A 1-page "Launch Plan"
The California Residential Listing Agreement (RLA)
A seller net sheet (to show their estimated proceeds at close)
First 5 Minutes: Setting the Frame
You’re the guide. Your job is to run a clean, low-drama decision meeting.
The "Agenda" Script
Warm Seller: "Thanks for having me over. My goal today is to see the home, hear your goals, and show you exactly how we’ll find the right buyer. Does that work for you?"
Skeptical Seller: "I know your time is valuable. I’ve set aside 45 minutes to go over the data and our strategy. At the end, we’ll both know if I’m the right fit to get this sold. Should we start with a quick tour?"
The Walkthrough: Tour Like a Consultant (Not a Compliment Machine)
The biggest mistake new agents make is acting like a guest. You’re there to audit the asset.
Ask, don’t tell: Instead of complimenting the kitchen, ask “When were these appliances last updated?” or “Any HVAC issues during peak summer?”
The “Stay or Go” list: Ask what’s staying vs. leaving (fixtures, appliances, smart devices). This prevents later disputes over chandeliers, Ring cameras, or mounted TVs.
What NOT to do:
Price during the tour: “I have some thoughts, but I want to sit down with the data first so I can give you an accurate range.”
Contractor cosplay: Don’t guess repair costs. Label it a point of inspection and move on.
Insult the house: Stay neutral. “This layout is unique” beats “This room is too small.”
If They Ask How Many Homes You’ve Sold (The Clean Answer)
Handle this moment with zero defensiveness.
The "High-Touch" Pivot
"Fair question. My model is high-touch: fewer clients at a time, tighter communication, and a very structured launch plan. You won’t be competing for my attention."
The "Team-Backed" Angle:
"Great question. I’m your point of contact, and I run the process. And I’m backed by my broker and transaction team on pricing, disclosures, and contract execution—so you get personal attention with professional oversight."
The Table Meeting: 3 Phases of Authority
Phase 1: Motivation Intake
Ask: "If this home doesn't sell for six months, how does that affect your plans?" If you don't know their "Why," you cannot handle their objections later.
Phase 2: Pricing Reality (The Three Buckets)
Show the data. "The market is telling us that homes like yours sell fast... or they start going stale and get negotiated down." We’ll define ‘stale’ using showing volume, online saves, and buyer feedback—not vibes. Understanding negotiation basics for new California agents is critical here—you aren't negotiating against the seller; you are negotiating with the market.
Phase 3: Strategy & Execution
Show them your Launch Plan. This includes professional media, reverse prospecting, and the "Feedback Loop" (your scheduled weekly update).
Objection Handling: Consultative Scripts
If you have practiced how to practice real estate scripts effectively, you will stay calm here.
Objection Handling: The Consultative Response
Objection
Consultative Response
"Another agent said it's worth more."
"Interesting. When they gave you that number, did they anchor it to sold comps, or was it more of a 'marketing price'? I’m not here to win the listing—I’m here to protect your outcome."
"We want to try a higher price."
"If we start too high, we'll miss our best buyers right out of the gate. Then, if we have to lower the price later, we're dealing with buyers who know we couldn't sell it—and that weakens our position."
"Will you cut your commission?"
"I’m happy to talk commission. The real issue is net outcome. My job is to protect your equity and reduce risk. If we cut the steps that produce the result, the price reduction usually costs more than the commission ever would."
"We’re interviewing others."
"I respect that. Professionalism is about finding the right fit. What are you looking for in an agent that we haven't covered yet?"
The Close: Moving to Signature
The Direct Close: "I’m confident we can hit your timeline. Are you ready to get the paperwork started so we can get the photographers out here Monday?"
The "Think About It" Close: "I understand. Usually, when people want to think about it, it’s because I haven't clarified something. Which part of the plan are you still weighing?"
New Agent Mistakes That Kill Listings
Talking Too Much: If you talk more than 30% of the time, you aren't listening.
Ignoring the "Quiet" Owner: The person asking the fewest questions often holds the veto power.
Defending the Price: Never "defend" a price. Let the data do the talking.
No Time Boundary: If you stay for 3 hours, you look desperate.
Tech-Dependency: Always have a paper backup of your presentation.
Over-Promising: Don't promise daily calls if you can't sustain them.
Hiding Your Status: Don't lie about being new; lean on your broker's track record.
Vague Next Steps: Never leave without a clear follow-up date and time.8.. Avoiding these new agent mistakes that hurt credibility is your fastest path to a "Yes."
FAQ: The First Listing Appointment
Q: Should I bring the listing agreement to the first meeting?
A: Bring it every time—even if you don’t pull it out. It signals preparedness and lets you move forward immediately if they are ready.
Q: What if they ask about my experience?
A: Pivot to your process. Experience is just a proxy for "Will you mess this up?" Prove you won't by being the most organized person they meet.
Q: How does this differ from working with buyers?
A: Listings are about asset management; buyers are about search and discovery. You should prepare for a first buyer consultation with the same level of systematic rigor.
Your Professional Foundation
The listing appointment for new agents is a test of your business operating system. You do not need to be the most famous agent in California to win; you just need to be the most prepared.
Read more to see how this fits into our broader California real estate career guide, continue building your library of systems.
Your next step: practice these scripts out loud until they feel natural.
|

New agents sometimes wake up with a knot in their stomach. It isn’t the paperwork or the math; it’s the fear of the "awkward" conversation.
You worry about sounding like you don’t know what you’re Read more...
New agents sometimes wake up with a knot in their stomach. It isn’t the paperwork or the math; it’s the fear of the "awkward" conversation.
You worry about sounding like you don’t know what you’re doing. You fear a client asking a question you can’t answer, or worse, losing control at a $1.2 million listing appointment because you didn’t know how to pivot the conversation.
What are real estate communication skills?
Real estate communication skills are the ability to ask the right questions, explain complex information clearly, control conversations under pressure, and guide clients toward confident decisions. Top agents treat communication as a trainable skill—not a personality trait.
After 20+ years of coaching California agents at ADHI Schools, I’ve seen that the "Top 1%" aren't always more charismatic than you. They simply use repeatable communication frameworks. They don't wing it; they follow a system that builds trust and projects authority.
Communication is the multiplier. You can have all the essential skills every new California agent must master, but if you can't communicate your value, those skills stay hidden.
The 4 Communication Modes Top Agents Switch Between
Elite agents don't have one "personality." They toggle between four specific modes depending on what the client needs at the moment.
1. The Guide (Authority)
The Guide provides calm, structured direction when the client feels overwhelmed.
When to use: During the first consultation or when explaining the escrow process.
What it sounds like: "Here is exactly what happens next so there are no surprises."
2. The Detective (Discovery)
The Detective asks deep questions to find the "why" behind the "what."
When to use: During the initial needs analysis or when a client suddenly changes their mind.
What it sounds like: "Help me understand—what changed between yesterday's showing and today's decision?"
3. The Translator (Clarity)
The Translator takes complex legal or financial jargon and makes it simple. This is where you must master real estate terminology fast so you can explain it in plain English.
When to use: Explaining disclosures, interest rates, or contingencies.
What it sounds like: "In short, this contingency means you have a 'safety hatch' to back out if the inspection shows major issues."
4. The Closer (Action)
The Closer focuses on the next logical step without being "salesy."
When to use: At the end of every call, showing, or meeting.
What it sounds like: "Based on what we discussed, the next step is to sign the offer so we can beat the 5:00 PM deadline. Are you ready to move forward?"
Skill #1: Ask Better Questions (The Discovery Stack)
The agent who talks the most usually loses. On the other hand, the agent who asks the best questions wins. Use these high-quality questions to uncover the truth:
Category
Better Question (The "Detective" Mode)
Motivation
"If you don't find a home in the next 90 days, what is your Plan B?"
Timing
"On a scale of 1–10, how much of a 'must' is moving by summer?"
Decision Makers
"Besides yourself, who else needs to see the property before we make an offer?"
Financing
"When you spoke with your lender, what was the monthly payment range you felt most comfortable with?"
Risk
"What is the one thing that would make you walk away from a deal, no matter how much you liked the house?"
Skill #2: Control the Conversation Without Being Controlling
I’ve seen many deals die because an agent let a client "run" the process. To maintain control, use the Acknowledge → Label → Redirect → Confirm framework.
As a real estate agent developing emotional intelligence allows you to stay calm when a client gets aggressive or emotional, keeping the focus on the goal.
Scenario: A client wants to see 10 houses in one day without a pre-approval.
Acknowledge: "I completely understand wanting to see those homes; they look incredible online."
Label: "It seems like you're excited to get started, but you're worried about missing out on the right one."
Redirect: "To make sure your offer is actually considered by these sellers, we need that pre-approval letter in hand first."
Confirm: "Does it make sense to spend 20 minutes with my lender today so we can go see those houses tomorrow with a winning hand?"
When Communication Fails, Deals Don’t “Slow”—They Die
In California's high-stakes market, poor communication isn't just a minor mistake; it's a liability. I’ve seen promising careers stalled by these three avoidable outcomes:
Lost Listings: An agent loses a $1.5M listing because they rambled for 20 minutes on their background instead of asking the seller what their needs were.
Buyer Distrust: A buyer walks away from a deal because the agent gave a vague, non-committal answer about a property disclosure rather than being transparent.
Complaint Risk: Expectation gaps caused by poor communication lead to problems when a client feels "surprised" by a standard part of the escrow process.
Skill #3: Speak With Clarity Under Pressure (The Anti-Ramble)
When agents get nervous, they ramble. To stop this, use the Bottom Line First (BLF) system.
The Structure:
Bottom line: Give the direct answer immediately.
One reason: Provide the context.
Next step: Move the ball forward.
Confirm:Check for understanding.
Example: "Is now a good time to buy?"
Bottom line: "It depends entirely on your timeline and your budget."
One reason: "Rates are fluctuating, but inventory is finally opening up, giving you more leverage than buyers had last year."
Next step: "Let’s look at the numbers for the specific neighborhood you like."
Confirm: "Does that help clarify things?"
Pro Tip: : If communication feels like your weak point, start by mastering one skill at a time. Most agents begin by building confidence and learning terminology before tackling advanced objection handling.
The “Reading a Listing” Method: Pull terms from MLS remarks. If you see "as-is" or "probate," script an explanation for them immediately.
The “Offer Review” Method: Terms like "liquidated damages" appear in every negotiation. Practice explaining them before you ever open a contract with a client.
The “Escrow Timeline” Method: Map out a 30-day window. Which terms appear in Week 1 vs. Week 4?
Skill #4: Objection Handling That Sounds Human
Top agents don't "overcome" objections; they "solve" them.
"We're just looking." → "That’s the best way to start! Most of my clients 'just look' for a few weeks to get a feel for the market. What's one thing you've seen that you definitely DON'T want?"
"We want to think about it." → "I appreciate that. It's a big decision. Usually, when people want to think about it, it’s because of the price or the house itself. Which one is it for you?"
"Can you cut your commission?" "I understand you want to net the most money possible. If I can't even defend my own value for 10 minutes, how effective do you think I'll be when I'm defending your home price against a tough buyer's agent?"
Skill #5: The Follow-Up That Builds Trust
Follow-up isn't "checking in." It's providing value.
The "After-Showing" SMS Template:
"Hey [Name], thanks for touring that property on Main St today. I just found out the seller received two offers this afternoon. Based on what we saw, do you want to be the third, or should we move on to the listing on Oak St tomorrow?"
What NOT to do:
"Just checking in to see if you're ready." (Needy)
"Did you get my last three emails?" (Guilt-based)
"Any updates?" (Vague)
Practice Plan: 15 Minutes a Day for 14 Days
You cannot "think" your way into confidence. You have to "rep" your way there. As you build confidence as a new real estate agent, your speech will naturally become more fluid.
Days 1–3: Record yourself reading the 10 discovery questions. Listen back and fix your tone.
Days 4–7: Role-play the "Commission Cut" and "Think About It" objections with a peer or in the mirror.
Days 8–11: Practice the "Bottom Line First" structure on friends or family when they ask simple questions.
Days 12–14: Audit your past emails. Rewrite three of them to be shorter and more action-oriented.
Communication Is the Skill Multiplier
You can have the best marketing and the best local knowledge, but if you can't articulate your value, you'll always struggle to close. Master these frameworks, and you will stop feeling like a "salesperson" and start feeling like a consultant.
Developing your Real Estate Agent Skills California is a lifelong journey—and communication is the skill that makes every other skill visible to clients. Start with how you talk, and the results will follow.
Printable Communication Checklist
Did I ask at least three "Detective" questions today?
Did I use "Bottom Line First" in my last three emails?
Did I provide a clear "Next Step" on every phone call?
Did I follow up with a specific piece of value rather than "checking in"?
FAQ:Real Estate Communication
1. How do I avoid sounding like a "pushy" salesperson?
Focus on the "Detective" mode. If you ask enough questions to truly understand the client's goals, your advice will feel like help rather than a sales pitch. Always prioritize their "why" over your "close."
2. What should I do if a client asks a question I don't know the answer to?
Never guess.
Say: "That’s a great question, and I want to make sure I give you the exact data on that. Let me verify that with my broker/title officer and get back to you by 3:00 PM." This builds more trust than a fake answer.
3. How do I handle a client who won't stop talking?
Use the "Redirect" framework. Wait for a natural breath, acknowledge their point briefly, and say, "That’s a great point—to make sure we stay on track for your 2:00 PM appointment, let's pivot quickly to the closing costs."
4. Is texting clients better than calling?
It depends on the urgency. If allowed, use text for quick updates and logistics. Use phone or Zoom for negotiations, bad news, or complex explanations where tone of voice is necessary to prevent misunderstandings.
5. How can I sound more confident when I'm brand new?
Confidence comes from having a "Next Step" ready. Even if you don't know the whole process, you should always know the very next thing that needs to happen. Leading the client to the next step makes you the authority.
10 Micro-Scripts for Daily Practice
"I don't know the answer to that yet, but I will find out and let you know by [Time]."
"The bottom line is [Answer]. The reason is [Reason]. The next step is [Action]."
"It sounds like you’re feeling frustrated with the lack of inventory. Is that right?"
"What would happen if you stayed in your current home for another year?"
"My goal is to make sure you have all the facts so you can make a decision you're comfortable with."
"Based on the data, this offer is aggressive but fair. Do you want to send it?"
"I’ve noticed that when buyers wait for 'the perfect moment,' they often end up paying more later. What's your biggest concern about moving now?"
"To be respectful of your time, let's focus on these three priorities we discussed."
"Help me understand—is the price the issue, or is it the house itself?"
"If we can get the seller to cover the closing costs, would you be ready to sign today?"
|
The phrase “135 hours” sounds simple enough—until you realize that doing it wrong can cost you months of delays and hundreds of dollars in wasted fees.
Many aspiring agents assume the California Read more...
The phrase “135 hours” sounds simple enough—until you realize that doing it wrong can cost you months of delays and hundreds of dollars in wasted fees.
Many aspiring agents assume the California 135-hour real estate course requirement is a single marathon class or a weekend workshop. Others worry that if they choose the wrong elective or an unapproved provider, the Department of Real Estate (DRE) will reject their application entirely.
I have spent over 20 years helping students navigate these exact hurdles. Whether you are a busy parent, working a 9-to-5, or moving from out of state, the mission is the same: get your hours done right the first time so you can get to the exam.
Key Takeaways
The Magic Number: You must complete three 45-hour college-level courses with an approved course provider like ADHI Schools.
The Lineup: Real Estate Principles, Real Estate Practice, and one elective.
The Requirement: All courses must be completed through a DRE-approved provider.
The Goal: These hours are the mandatory prerequisite for your salesperson application.
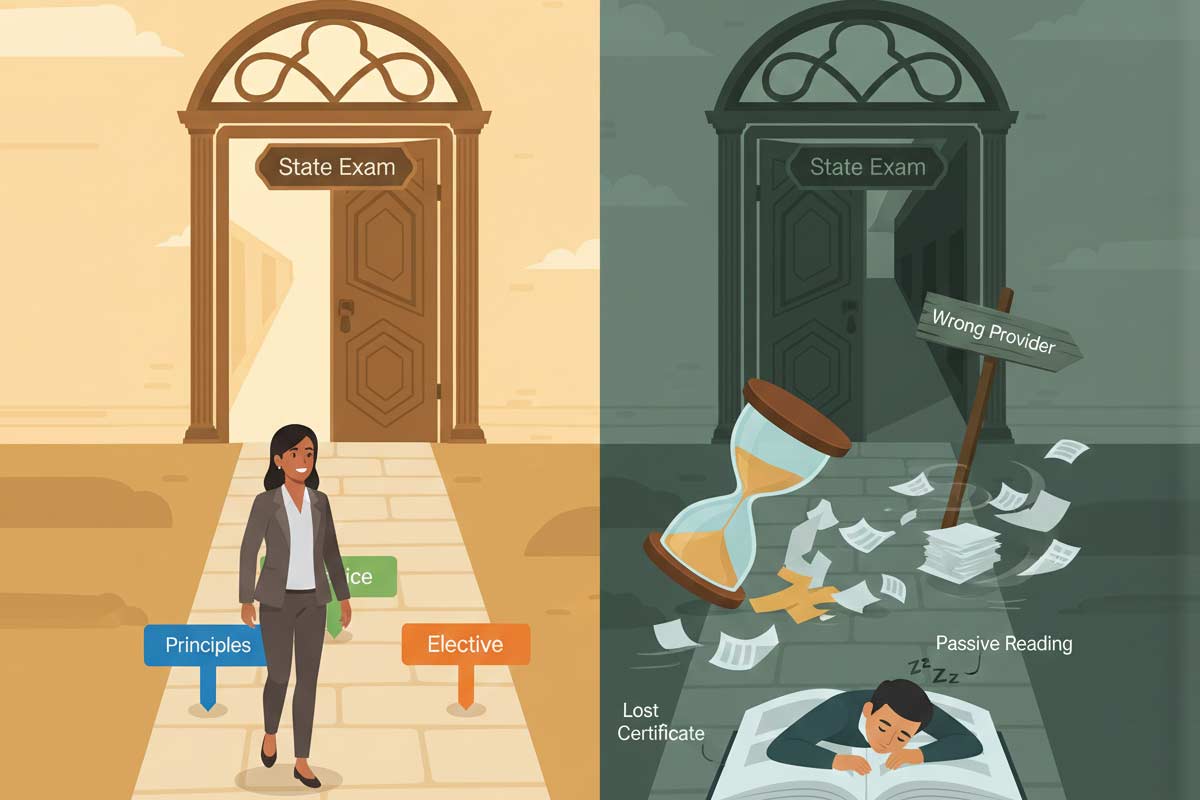
Definition: The California 135-hour real estate course consists of three 45-hour, DRE-approved pre-licensing classes: Real Estate Principles, Real Estate Practice, and one elective.
The Quick Breakdown: What Makes Up the 135 Hours?
To qualify for a salesperson license in California, the DRE requires 135 hours of pre-licensing education.This is strictly divided into three specific buckets:
Real Estate Principles (45 Hours)
Real Estate Practice (45 Hours)
One Approved Elective (45 Hours)
You don’t just "sit in a room" for 135 hours straight. You complete these three distinct courses, pass a final exam for each, and receive a course completion certificate for your records.
Why California Requires 135 Hours
This isn't just "busywork" or a regulatory hurdle. The 135-hour requirement serves several critical purposes:
Baseline Competency: It ensures every agent understands the legal and ethical framework of the industry.
Consumer Protection: It teaches the complex disclosure laws designed to protect California homeowners.
Exam Readiness: Each course domain maps directly to sections of the State Exam. If you skip the depth here, the exam will likely find your weak spots.
What Exactly Counts Toward the 135 Hours?
In the eyes of the DRE, "hours" are a measure of curriculum coverage. To ensure your education counts, follow this checklist:
DRE-Approved Provider: Check the school’s DRE statutory sponsor ID number before enrolling. For context the ADHI Schools sponsor ID is S0348.
Course Completion: You must complete the required material and pass a school-level final exam for each 45-hour course.
Digital Records: Keep your completion certificates saved as PDFs; you will need to upload (preferred) or mail these with your exam and license application.
Deep Dive: The 3 Course Requirements
1. Real Estate Principles (45 Hours)
This is your foundation. It covers the "language" of the industry—titles, deeds, encumbrances, and financing. This isn't just about passing a test; it’s about understanding the legal framework of every transaction.
2. Real Estate Practice (45 Hours)
If Principles is the "what," Practice is the "how." This course covers agency relationships, disclosures, and the actual mechanics of a real estate transaction. This is where most students realize real estate is about lead generation, contracts and consumer protection.
3. The Elective (45 Hours)
You must choose one additional 45-hour course from a DRE-approved list. Here is how to choose:
If you want to learn about loans → Choose Real Estate Finance.
If you want to learn about loans → Choose Legal Aspects of Real Estate.
If you want to learn about loans → Choose Real Estate Appraisal.
ADHI Schools offers a wide variety of elective courses.
Common Mistakes That Trigger Delays
Don't let a simple clerical error or a lapse in planning stall your career. While speed is a priority for most, you should focus on the fastest way to complete the 135-hour CA real estate course without taking shortcuts that lead to rejection. Avoid these common "landmines":
Common Pitfalls to Avoid:
The "Cram" Trap: Trying to rush the last 45 hours in a weekend. Most DRE-approved programs have pacing controls and required unit progression, so rushing usually backfires. Remember that the state requires 18 days per course before you can take the final exam and obtain the certificates of completion.
Using Non-Approved Providers: Ensure the school is licensed for pre-licensing specifically.
Passive Reading: Treating the course like "background noise." If you don't engage, you'll finish the hours but will have a tough time with the state exam.
Missing Documentation: Not having your three certificates organized when you are ready to apply for the exam.
Setting Realistic Expectations: Timelines and Formats
Understanding the curriculum is only half the battle; you also need to know how long it takes to finish CA real estate classes based on your current lifestyle. Highly disciplined students might finish in under two months, while students with less urgency often take four to six.
Your pace is often dictated by the medium you choose. When deciding between online vs. in-person CA real estate classes: pros & cons, consider whether you need the structure of a classroom or the 24/7 flexibility of a digital portal. Both can satisfy the online 135-hour real estate course California standards, provided the school maintains its DRE approval.
Avoiding the Risk of Failure
Is it actually difficult to pass these initial hurdles? Many students ask, "can you fail California real estate school?" While the school-level exams are manageable, failing to respect the 135-hour requirement can lead to "timing out" of your enrollment (all courses must be finished within one year) or failing to retain enough information to pass the state exam on your first try.
Mini FAQ
Do I need to finish all 135 hours before applying for the exam?
Yes, the California Department of Real Estate requires that all 135 hours are complete before applying for the real estate exam.
Is the 135-hour requirement the same for a Broker's license?
No. Broker applicants generally need eight college-level courses. The 135-hour (3-course) requirement is specifically for the Salesperson license.
Can I take the three courses in any order?
While you technically can, we strongly suggest starting with Practice. Taking them out of order can lead to confusion when you hit advanced topics in Legal Aspects of Real Estate or other Electives.
Do my course hours expire?
Under the current regulations of the Real Estate Commissioner the certificates never expire.
Your Next Steps
Understanding the 135-hour real estate course requirements California mandates is just the first hurdle. Once you’ve started your classes, you need to know how they fit into the larger picture of fingerprints, background checks, and the state exam itself.
To ensure you don't miss a single detail in the process, follow our comprehensive California Real Estate License Guide to take your career from the classroom to the closing table.
|
The "License Cliff": Why Agents Can Stall in the First 30 Days
You pass the state exam, celebrate, and then the email arrives from the DRE: "Your license is active." Suddenly, the guided path of mandatory Read more...
The "License Cliff": Why Agents Can Stall in the First 30 Days
You pass the state exam, celebrate, and then the email arrives from the DRE: "Your license is active." Suddenly, the guided path of mandatory courses and proctored exams ends. You are no longer a student with a syllabus; you are a business owner with a blank canvas.
If you aren’t careful, you can end up on the wrong side of what we call the “License Cliff”.
Without guidance or deadlines, new agents can drift into "luxury cosplay"—spending weeks on logos and business cards while their momentum evaporates. Here’s what to do after you get your California real estate license in the first 30 days to move from "licensed" to "in business."
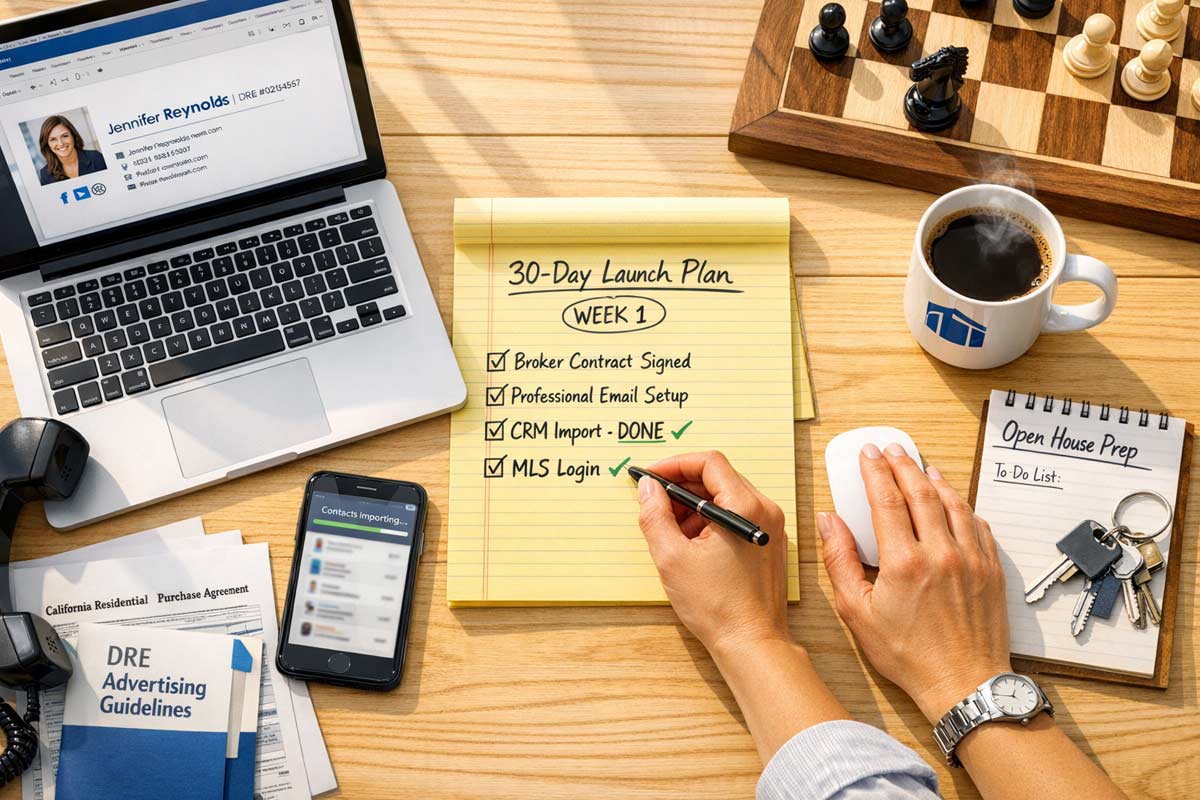
The 30-Day Launch Sequence
✅ The Day 1–2 Checklist: Immediate Momentum
Identify 3 Brokerages: Do not over-analyze. Pick three based on proximity and reputation.
Call the Managers: Request a "New Agent Interview." Do not wait for an "opening."
Audit Your Finances: Make sure you can cover 3–6 months of dues + basic expenses.
Phase 1: The Mandatory First Step – Hang Your License
Practically speaking, you can’t operate solo in California. Your license becomes usable when it’s placed under a supervising broker. Your broker sponsors your license and provides the supervision and compliance umbrella that lets you practice.
Who is this for?
The Solo Agent: You want to build your own brand from Day 1 and keep a higher split.
The Team Agent: You want provided leads and high accountability.
ADHI Recommendation: For most brand-new agents, training beats split—by a lot. A training-heavy team environment provides the systems you need to survive Year 1.
The Brokerage Interview Scorecard
Onboarding: Is there a structured 30-day plan or just a desk?
Costs: What are the monthly tech, desk, and E&O (Errors & Omissions) fees?
Live Training: Can you shadow a listing presentation or an inspection this week?
Directive: Schedule 3–5 interviews. Your goal is a qualified launchpad for your first 12–24 months. If you’re still navigating the timing of your application, read Do You Need to Join a Brokerage Before Applying for a License?.
Phase 2: Setup Week – Activating Your Toolkit
Once sponsored, your first week is about technical setup. Avoid the "Branding Black Hole" and focus on permission-to-play tasks.
Your First 7-Day Setup Checklist
Task
Action Item
Compliant Signature
Include your Name, DRE License #, and Brokerage info (required for compliant advertising).
CRM Import
Export your phone and social media contacts. This is your "Sphere of Influence."
MLS & Supra
Get your MLS login and set up your Supra key for lockbox access.
The "Ask" Rule
Bookmark your broker's guidelines. When unsure on a disclosure, pause and ask your broker.
Phase 3: Your First 30 Days – The "Conversation Engine"
In real estate, Activity > Results. You cannot control a closing, but you can control your scoreboard.
Your First 30-Day Activity Scoreboard
10 New Conversations: Direct, two-way dialogues about the market.
5 Value-Add Follow-Ups: Sending a useful report or link (not just "checking in").
1 Hosted/Shadowed Open House: Your field laboratory for meeting neighbors.
1 Practice RPA: Write a mock Purchase Agreement using your broker’s templates.
Reality Snapshots
The “Ghost” Agent: I’ve seen students pass the exam but wait 60 days to pick a broker. By then, their momentum is dead. The knowledge from the exam has a half-life; use it immediately.
The Branding Trap: One agent spent $500 on a custom logo before their first sphere call. Six months later, they were out of the business with a beautiful, empty website.
The Open House Win: A new agent hosted an open house for a top producer. They didn't sell that house, but met a neighbor who listed with them four months later. That one conversation turned into a $25k commission.
The Top 3 Post-License Traps
"I need a perfect brand first": Your brand is competence and responsiveness. Use your brokerage's templates for 6 months while you learn the contracts.
Tool Overload: You will be pitched "guaranteed leads" by dozens of vendors. The Fix: Use only what your brokerage provides for the first 90 days.
The Expert Fear: You don't need to know everything. Your script is: "That's a great question. Let me confirm this with my broker/manager so I give you the exact answer."
FAQ
"Can I get my license first and choose a broker later?"
Technically yes, but you are losing momentum. Read Top Reasons People Fail to Get Licensed in California to see why delay is the enemy of success.
"What if I feel unprepared?"
The exam proves you know the law; the first 30 days prove you can follow a system. If you haven't finished your hours yet, check Can You Take the Exam Before Completing All 135 Hours? to speed up your timeline.
"What does my broker actually do?"
They are your regulatory partner. They review your files for compliance, provide legal contracts, and pay your commissions. They are the "adult in the room" for your professional liability.
Your Next Step
Getting licensed was the "license to learn." Now, you must execute. If you are still navigating the pre-license requirements, solidify your foundation with our complete California Real Estate License Guide.
Open your calendar now and block 9:00 AM – 11:00 AM tomorrow for "Brokerage Research and Outreach." Treat it like an appointment.
|

TL;DR: The Bottom Line
The Answer (in plain English): No — you can’t be authorized to schedule or take the California real estate exam until the Department of Real Estate Read more...
TL;DR: The Bottom Line
The Answer (in plain English): No — you can’t be authorized to schedule or take the California real estate exam until the Department of Real Estate (DRE) verifies you’ve completed all 135 hours (three 45-hour courses).
The Risk: Submitting your application while you’re “still finishing” your last course is the fastest way to trigger a DRE deficiency notice and delay.
The Solution: Finish your courses, secure your certificates, and follow the "clean-file sequence" to move from candidate to licensee without bureaucratic friction.
Most confusion comes from mixing up applying to the DRE with scheduling an exam date—scheduling your state exam can only happen after DRE approval.
The Truth Table: What You Can (and Can’t) Do Right Now
Action
Possible before 135 hours?
Outcome / Practical Advice
Submit DRE application
Yes (don’t)
Triggers a deficiency notice and adds weeks of delay.
Get Authorization to Schedule
No
The DRE won’t issue an exam invite until your file is 100% complete.
Choose an exam date
No
You can’t access the eLicensing calendar until you’re approved.
Study & exam prep
Yes
Recommended — this is the only “shortcut” that actually works.
The Speed Trap: Why "Almost Done" Is Still a "No"
In my 20-plus years of training thousands of agents at ADHI Schools, I’ve seen one mistake repeat more than any other: the Speed Trap.
It usually starts with a highly motivated candidate who is halfway through their third course. They look at the DRE’s current processing times—which fluctuate—and think they’ve found a loophole. They decide to mail their exam application today, assuming that by the time a DRE processor actually opens their envelope, they will have finished the course and can just "send in the final certificate later."
This is a high-stakes gamble that almost nobody wins. The DRE does not "hold" your spot in line while you finish your homework. If a processor opens your application and the course completion certificate is missing, the process doesn’t pause—it breaks. You won’t just lose time; you’ll lose your momentum and you'll be waiting for a deficiency notice and a new review cycle before you can fix it.
The DRE’s system is built to verify eligibility first — clean files move faster than hopeful ones. In practice, the fastest candidates aren’t the ones who rush—they’re the ones who submit a file with nothing for the DRE to question.
The 135-Hour Rule, Explained Simply
To qualify for the California real estate salesperson exam, state law requires the completion of three DRE-approved pre-licensing courses, totaling 135 hours:
Real Estate Principles (45 hours)
Real Estate Practice (45 hours)
An Elective Course (45 hours—most of our students choose Finance, Appraisal, or Legal Aspects)
Enrollment in these courses is subject to California’s minimum time-in-course rules (usually enforced as a minimum number of days per course). You cannot "crash" these courses in a weekend; the regulatory framework is designed to ensure a minimum level of exposure to the material before you are given the ability to test out.
The "Completed" Checklist
The DRE only considers a course "complete" when you have checked these three boxes:
Time Requirement: You have spent the mandated number of days enrolled in the course (18 calendar days typically).
Examination: You have passed the final exam for that specific course with a score of 60% or higher with ADHI Schools.
Documentation: You have received a formal course completion certificate or transcript showing the exact course title and your legal name as it appears on your government-issued ID.
Until you have all three certificates in your possession, you are not an eligible candidate for the state exam.
The Real Answer: "Exam Before Hours" Scenarios
Let’s break down the specific scenarios candidates use to try and bypass the timeline.
Can I schedule the exam before finishing 135 hours?
No. In California, you don’t simply call a testing center and pick a date like you would for a haircut. You must first apply to the DRE. They review your education proof, and only then do they issue an Authorization to Schedule (also known as an Exam Invite). Until you’re approved, you’re not “in line” for an exam seat.
Can I take the state exam before finishing 135 hours?
No. There is no "provisional" testing. The education is a statutory prerequisite. Without the 135 hours, you aren't a candidate; you're just someone with an incomplete application.
What if I’m 90% done with my last course?
No. The DRE does not recognize partial credit. Whether you have 0 hours or 134 hours, the result is the same: Ineligible. You must wait until the final certificate is issued before mailing your application packet.
What if my course is done, but I’m waiting for my certificate?
No. Do not mail your application with a note saying "Certificate coming soon."
What if I finished courses years ago?
Only If. In many cases, older course completion records can still be usable, but the safest move is to verify your course titles and the provider's approval status to make sure you're applying under current DRE rules. If you are unsure if your older classes still count, check our California Real Estate License Guide to ensure your education aligns with today’s standards.
The Fastest Path: The "Clean-File" Sequence
If you want to get licensed as quickly as possible, stop looking for shortcuts and follow this proven sequence. This is the timeline we see work most efficiently for our students.
Complete the 135 Hours: Finish Principles, Practice, and your Elective.
Gather Your Proof: Secure all three course completion certificates. Ensure your name matches your government-issued ID exactly.
Submit the "Combined" Application: Use form RE 435 (Salesperson Exam/License Application). Most first-time applicants should use the combined path so you don’t create a second processing cycle after passing.
The Waiting Window: Once your application is mailed, the DRE enters a review period where they process your file.
Pro-Tip: If you want the full, granular step-by-step from choosing your courses to passing the state exam, start with our California Real Estate License Guide.
What You Should Do While Waiting for Your Exam Date
The period between mailing your application and receiving your Authorization to Schedule is not "dead time." If you just sit and wait, you are actually slowing yourself down. Use this window to handle the "back-office" of your new career:
Live Scan Fingerprints:You don't have to wait until you pass the exam to do your background check. Doing it now means your license can be issued almost immediately after you pass.
Master the Material: The 135 hours of pre-licensing education is the "what." Now you need to learn the "how" of passing the exam. This is when you should be high-quality exam prep tools.
Brokerage Interviews: You can't actually sell real estate without a broker. Use this time to interview different firms. You can learn more about this by reading: Do You Need to Join a Brokerage Before Applying for a License?.
Planning Your Launch: And if you’re trying to plan the first 30 days after activation, read: What Happens After You Get Your California Real Estate License?.
Name Matching Audit: Double-check that your certificates, your application, and your driver’s license all use the same name. If one says "Jim" and the others say "James," fix it now.
3 Costly Mistakes That Will Slow You Down
1. The "In-Progress" Application
As discussed, mailing your application while still enrolled in a course is a guaranteed delay. The DRE is a high-volume government agency; they do not have the resources to "match" a late certificate to an existing file easily. Your file will be set aside, a DRE deficiency notice will be generated, and you will likely have to start the waiting clock all over again.
2. Using the Wrong Application Form
Candidates often use the "Exam Only" form (RE 400) because it's shorter. However, this means after you pass the exam, you have to submit another application for the license itself. This can add significant time to the total process. Always use the combined exam and license application to bypass that second wait.
3. Underestimating the State Exam
I've seen students finish their 135 hours, wait for an exam date, and then fail the exam because they thought the state test would be as easy as the course quizzes. If you fail, you have to reschedule and pay the fee again. This is one of the Top Reasons People Fail to Get Licensed in California.
FAQ: Your Timeline Questions, Answered
Can I apply to the DRE before finishing classes?
Technically, you can mail the form, but it will be treated as a deficient file and you’ll receive a deficiency notice. The DRE requires all three course completion certificates to be included in the initial packet to prove eligibility.
What is an "Authorization to Schedule"?
This is the document the DRE sends you once they have approved your 135 hours and your application. It grants you access to the eLicensing system where you can finally pick your date, time, and location for the exam.
How long are the course certificates valid?
Currently, there is no expiration date on pre-licensing course completions in California.
Is there any way to skip the 135 hours?
Only if you are a member of the California State Bar.
What happens if I pass the exam but haven't picked a broker?
Your license will be issued in "Inactive" status. You won't be able to perform any acts requiring a license or earn commissions until you officially "hang your license" with a broker. See What Happens After You Get Your California Real Estate License? for the next steps.
Speed Comes From Sequence, Not Shortcuts
In the world of California real estate, "slow is smooth, and smooth is fast." The desire to rush the process is understandable—this is a career that offers incredible freedom and income potential. But trying to take the California real estate exam before completing 135 hours is a tactical error that almost always backfires.
True efficiency is found in the "clean-file" sequence: complete your courses, gather your proof, and submit a perfect application. By doing the work correctly the first time, you ensure that once you pass the exam, you are ready to hit the ground running.
Next step (don’t guess):
Start here: California Real Estate License Guide
Ready to begin your courses? → ADHI Schools Pre-Licensing Packages
Choosing a broker next? → Do You Need to Join a Brokerage Before Applying for a License?
|
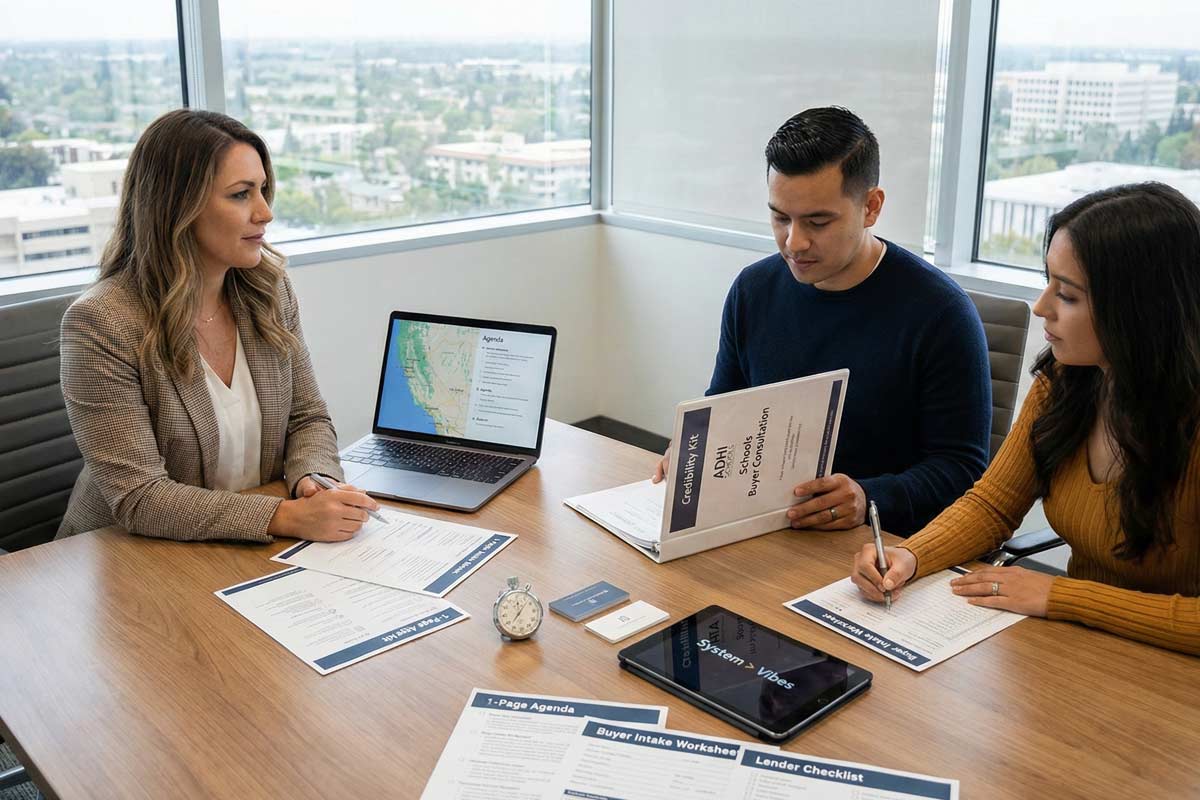
A buyer consultation is a structured first meeting where you confirm readiness, set expectations, and build a clear plan to tour and write offers without chaos.
The greatest fear for a newly licensed Read more...
A buyer consultation is a structured first meeting where you confirm readiness, set expectations, and build a clear plan to tour and write offers without chaos.
The greatest fear for a newly licensed agent is the "imposter moment"—that split second during a meeting where you worry the client will realize you’ve never closed a deal.
After 20+ years of training thousands of California agents, I can tell you the secret to overcoming this: System > Vibes. Buyers aren’t buying your resume; they are buying your process. A buyer isn't looking for a historian; they are looking for a pilot. They want someone who can navigate the turbulence of the California market, protect their earnest money, and reduce their risk. Your first buyer consultation isn't a casual chat—it is a structured risk-reduction meeting. When you lead with a system, your experience level becomes secondary to your competence.
Quick Start: The Buyer Consultation Essentials
The Credibility Kit: A physical or digital packet that proves you are organized.
The 45-Minute Agenda: A timed sequence that keeps you in the driver’s seat.
The "Pro" Questions: Moving the conversation from "what" they want to "why" they want it.
Defined Next Steps: Never leave a meeting without a calendar invite for the next milestone.
The Real Purpose of a Buyer Consultation
Most new agents treat the first buyer consultation like a casual meet-and-greet. That’s backwards. The buyer consultation is where you set expectations, confirm readiness, and create a shared plan—so nobody wastes weekends touring homes that were never realistic.
The Two Topics You Must Cover Early: Representation + Compensation
In today's market, transparency is your highest-value currency. Your goal isn’t to “sell” an agreement. It’s to remove confusion: who represents whom, how compensation works, and what gets confirmed before you ever write an offer.
The Script: "Before we look at homes, I’ll explain how representation works and how agents get compensated so there are zero surprises later. My job is to make this simple and protect you."
First Buyer Consultation Checklist (What to Bring)
Don't show up with just a business card. To look like a pro, you should provide a "Credibility Kit" (physical or a clean PDF). This functions as your "silent resume."
1-Page Agenda: Shows you value their time and have a plan.
Buyer Intake Worksheet: A form to capture their needs.
Lender Checklist: Documents needed for a full underwritten pre-approval.
"How I Work" One-Pager: Explicitly states your communication hours and showing protocols.
Buyer Profile Snapshot: A proprietary summary containing:
Core search criteria & geographic "must-haves."
Timeline and move-in constraints.
Financing status and monthly comfort zone.
Top 3 "Dealbreaker" features.
Agreed-upon communication pace.
Offer-Ready Checklist: What must be true before writing an offer (pre-approval verified, proof of funds ready, decision-makers aligned).
The 45-Minute Consultation Agenda
Control the clock, and you control the room. Follow this timed sequence to ensure you cover the essentials without rambling.
Time
Section
Purpose
0–2 Min
The Frame
"Today is about making sure you’re protected and ready."
2–12 Min
Goals & Constraints
Deep dive into their "Why" and their timeline.
12–20 Min
Financing Reality
Verify pre-approval status; discuss monthly comfort vs. max qualification.
20–35 Min
The Market & Process
Explain the CA purchase process and representation/compensation.
35–45 Min
Next Steps
Confirm representation, set the showing plan, and schedule the first tour.
Conversion Scripts: The Open and The Close
The "how" you say it matters as much as the "what."
Opening Frame Script (2 minutes)
"Here’s the plan: we’ll confirm your goals, your financing readiness, today’s market reality, and how we’ll work together. By the end, you’ll have a clear next step on the calendar. Does that sound like a good use of our time?"
Closing Script (Lock Next Step)
"Based on what you told me, the next step is simple: we’ll confirm financing, I’ll send 8–12 verified options, and we’ll tour on [Day]. I’m going to send the calendar invite now—does 10:00 AM or 1:00 PM work better?"
Buyer Consultation Questions for New Agents
A pro asks; an amateur tells. Use these questions to diagnose the situation.
Motivation & Timing
"What happens if we don’t find a home in the next 60 days?"
"On a scale of 1–10, how ready are you to move into a new home right now?"
Financing Readiness
"Are you fully pre-approved (credit run + docs reviewed), or just pre-qualified?"
"What monthly payment feels comfortable—not just what you can technically qualify for?"
"Do you have proof of funds ready for down payment and closing costs if we need to move fast?"
Risk + Offer Strategy
"If we love a home, are you the type who wants to move fast and compete—or do you prefer to wait for a ‘perfect deal’?"
"How do you feel about inspections: are you cautious and thorough, or more comfortable taking calculated risks to win a property?"
Decision + Communication
"When a decision needs to be made, how do you prefer to communicate—call, text, or email?"
"If the right home hits on a weekday, can you tour within 24–48 hours?"
5 Mistakes That Hurt New Agent Credibility
I’ve seen these errors cost agents five-figure commissions.
Selling Yourself Instead of the Process: Buyers care about their house. Talk 20% about you and 80% about the steps you take to protect them.
Skipping the Financing Talk: Make it a standard policy: "Before we do private tours, I need a real pre-approval on file so we don’t fall in love with a home we can’t win."
The "Zillow Trap": Zillow is great for discovery. My job is to verify what’s truly available and what’s already in escrow—so you don’t waste time chasing ghosts.
No Defined Next Step: Never end with "Let me know if you see anything." Always set a specific time for the next follow-up.
Ignoring the Spouse/Partner: Only talking to the "vocal" one. Always ask the quieter partner for their thoughts.
Warning: Rookie Red Flags
Refuses to share any financing info or talk to a lender.
Won't commit to having all decision-makers present for the consult.
Refuses to commit to any calendar date or next step.
Scripts for Success
Avoid high-pressure sales talk. Use these "consultative" lines instead. For more help on delivery, see our guide on how to practice real estate scripts effectively.
Handling Unrealistic Criteria: "I want to be honest—at that price point in this neighborhood, we usually see homes that need significant work. Are you open to a fixer, or should we look one town over?"
The "I Don’t Guess" Rule: "That’s a great question regarding the zoning. I don’t want to give you a 'maybe'—let me verify that with the city and get back to you by 5:00 PM."
FAQ: Buyer Consultation Long-Tail Queries
What if the buyer isn't pre-approved yet?
Don't refuse the meeting and use the consultation to introduce them to your preferred lender and explain that in California, an offer without a pre-approval is usually noncompetitive.
How do I handle a buyer who only talks about Zillow?
Acknowledge it as a discovery tool, then pivot to your MLS access. "My system provides real-time data on which homes are actually available and which are already in escrow."
What if they refuse to sign a Buyer Representation Agreement?
Don't panic. Focus on the value of your "Credibility Kit."
If they still won't sign, work with your broker to offer a "trial period" for the first three showings. This is part of the negotiation basics for new California agents that builds trust through flexibility.
How do I avoid looking "new"?
By learning how to avoid the ‘new agent mistakes’ that hurt credibility, such as being disorganized or over-promising. Professionalism is a choice.
The buyer consultation is your opportunity to move from "agent" to "trusted advisor." By following a system, you remove the anxiety of the unknown. Once you've mastered the buyer side, you'll find these skills translate when you learn how new agents should handle their first listing appointment.
If you are ready to build a business based on systems and results, the first step is getting your foundation right.
Start a Real Estate Career in California with ADHI Schools today.
|

It starts with a burst of energy. You decide to take control of your career, enter a new industry, and prepare to get your first clients.
But then, life happens. The 135-hour requirement feels like Read more...
It starts with a burst of energy. You decide to take control of your career, enter a new industry, and prepare to get your first clients.
But then, life happens. The 135-hour requirement feels like a mountain. The DRE website looks like a maze of 1990s-era forms. Suddenly, six months have passed, and you haven’t even scheduled your exam.
This is the "Licensing Spiral": a cycle where administrative confusion and life interruptions kill your momentum until your goals disappear entirely.
In my 20+ years of coaching thousands of candidates at ADHI Schools, I’ve realized that failing to get licensed is rarely about a lack of intelligence. It is almost always a result of predictable, procedural friction points. If you fix the one friction point you’re stuck on, the rest becomes straightforward.
Key Takeaways
Process > Intelligence: Administrative errors kill more careers than the actual exam does.
Timelines Matter: Processing times and scheduling delays can quietly derail you.
Momentum is King: If you aren't moving forward, you are moving backward. Use the rescue checklist below to restart.
The 60-Second Licensing Map
To get your license, you must follow this exact sequence. If you are currently stalled, you are stuck at exactly one of these five steps:
Complete 135 Hours: Finish three approved college-level courses.
Apply & Schedule: Submit your Combined Exam/License Application to the DRE.
Pass the State Exam: Score 70% or better on the 150-question test.
Submit License Application: Ensure background checks and fees are finalized.
Affiliate with a Broker: Find a sponsoring broker to "activate" your license.
For a complete, step-by-step blueprint of the licensing journey, see the California Real Estate License Guide.
10 Reasons People Fail (And How to Fix Each)
1. The "Casual Study" Fallacy
The Mistake: Picking up the material only when you "have time."
The Consequence: You lose continuity and momentum, making it harder to retain complex legal concepts as you move through the modules.
Fix Today: Open your calendar and block out exactly 90 minutes for tomorrow morning. Consistency beats intensity every time.
2. Misunderstanding the Application Window
The Mistake: Waiting until you have "mastered" every page of the material before looking at the DRE application.
The Consequence: DRE processing can take weeks. Waiting to “feel like you’re ready” before applying adds a massive "dead zone" where your knowledge goes cold.
Fix Today: Understand the nuances of the timeline by reading Can You Take the Exam Before Completing All 135 Hours? to see when you should actually apply.
3. The "Name Mismatch" Error
The Mistake: Using a nickname or maiden name on your Live Scan (fingerprints) that doesn’t match your official DRE application.
The Consequence: This creates a manual "flag" in the DRE system, potentially delaying your eligibility by 30–60 days while they reconcile your files.
Fix Today: Look at your government-issued ID. Ensure every form you sign matches that ID character-for-character.
4. The Memorization Trap
The Mistake: Taking the same practice quiz 50 times until you "know the answers."
The Consequence: You aren’t learning the law; you’re learning the pattern of a quiz. When the DRE rephrases the question on exam day, you will fail.
Fix Today: Do mixed sets of questions and track wrong answers by topic. If you can’t explain the logic of the correct answer out loud, you don’t know it yet.
5. The "Post-Pass" Momentum Kill
The Mistake: Celebrating the passing score but failing to file the final paperwork or pay the licensing fees.
The Consequence: Your passing score has an expiration date. If you don't file the application for your license promptly, you will have to retake the entire state exam.
Fix Today: Decide whether you are going inactive vs. active, and complete the post-pass steps immediately. Follow our guide on What Happens After You Get Your California Real Estate License? to ensure you cross the finish line.
6. Paralysis by Analysis (The Research Trap)
The Mistake: Spending weeks in online forums asking "Which school is best?" instead of starting.
The Consequence: Research is often just a sophisticated form of procrastination used to mask the fear of starting a new career.
Fix Today: Start with ADHI Schools—ideally today—and finish Lesson 1 of your first course. Clarity comes from action.
7. Distraction by Brokerage Interviews
The Mistake: Interviewing 10 different brokerages before you even have an exam date.
The Consequence: You are focusing on Step 5 when you are still at Step 1. This drains the mental energy you need for the state exam.
Fix Today: Realize you don't need a broker to get the process started. Get the facts here: Do You Need to Join a Brokerage Before Applying for a License?
8. Underestimating Logistics & Fees
The Mistake: Failing to budget for the multi-step fee structure.
The Consequence: You pass the exam but "wait for the next paycheck" to pay the licensing fee, which turns into a multi-month delay.
Fix Today: Set aside the DRE exam/license fees plus Live Scan vendor fees now so money never becomes a stall point.
9. Trusting Forum Myths Over DRE Facts
The Mistake: Following advice from "someone on Reddit" regarding current DRE regulations.
The Consequence: Regulations change. Relying on outdated anecdotes can lead to rejected applications or missed deadlines.
Fix Today: Only trust official DRE publications or ADHI Schools that handles these filings daily.
The 10-Minute Rescue Checklist
If you are here...
Your next 60 minutes...
The Momentum Builder...
Haven't started courses
Enroll in ADHI Schools.
Complete Chapter 1 immediately.
Stuck mid-course
Audit your calendar; identify the "leak."
Block 90 mins for tomorrow; no excuses.
Finished courses, no exam date
Submit your application (eLicensing preferred).
Verify your ID name matches exactly.
Waiting for DRE processing
Establish a "Study Retention" schedule.
Keep studying 20–30 min/day to prevent decay.
Passed, but no license yet
Check your status on eLicensing.
If not a combo app, submit the license app quickly.
FAQ: Common Licensing Questions
Can I take the California real estate exam before finishing my 135 hours?
You must complete the three required courses to be eligible for an exam date. However, you can often save time by understanding exactly when to submit your application and what documentation to send so you don’t create a "dead zone" while the DRE processes your file. See our 135-hour timing guide for the specific strategy.
Do I have to use eLicensing for my application?
No, but the DRE states that eLicensing is significantly faster for processing. If you choose to use paper (Form RE 435), it must be mailed with original signatures.
What’s the most common reason people fail the California real estate exam?
Over-thinking. Candidates often try to apply "real world" logic or stories they heard from friends rather than relying on the specific legal definitions found in the textbook.
The Path Forward: Stop Stalling
Stalling is a normal part of the process, but it doesn't have to be the end of your story. The difference between a "former student" and a "top producer" is simply the willingness to fix these procedural errors and keep moving.
For the step-by-step map: Start with the California Real Estate License Guide.
For the "After-Pass" plan: Read What Happens After You Get Your California Real Estate License?
For a proven system: If you want the courses, the structure, and the veteran coaching to avoid these mistakes entirely, ADHI Schools is built for exactly that.
Let’s get to work.
|
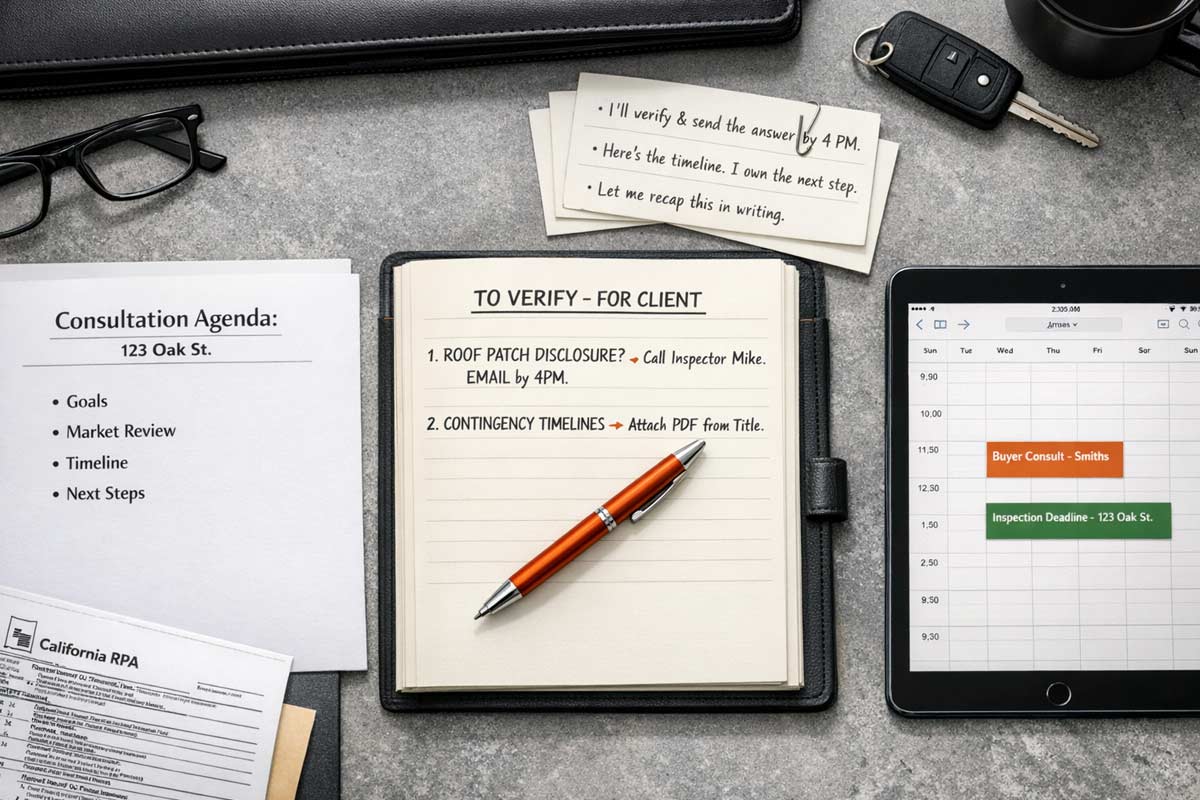
You’re at a coffee shop with a potential seller. They lean in and ask: “What’s the risk if we don’t disclose that old roof patch from three years ago?”
You hesitate. You glance at your phone. Read more...
You’re at a coffee shop with a potential seller. They lean in and ask: “What’s the risk if we don’t disclose that old roof patch from three years ago?”
You hesitate. You glance at your phone. You say, “I think…”
In that three-second pause, you just had credibility bleed.
Clients don't fire you because you’re new; they leave because you look unprepared, vague, or chaotic. Professionalism is not a personality trait—it is a system of repeatable signals.
TL;DR: The New Agent Credibility Fix
No Guessing: “I’ll verify and follow up by ___.”
Bring Structure: Agenda + comps + next steps (every time).
Own the Calendar: Deadlines don’t manage themselves.
Disclosures = Risk Management: Early delivery, clean tracking, zero surprises.
Practice Decision Trees: Scripts are branching logic, not lines to memorize.
12 New Agent Mistakes That Kill Your Credibility
1. The "I Think" Guess
The Mistake: Answering a technical or market question with "I think..." or "I’m pretty sure..."
Why It Hurts: In California, “I think” sounds like “I’m gambling with your equity.”
The Professional Fix: Use the Expert Deferral Script: "Great question. I’m not going to guess. I’m going to verify it and text/email you the correct answer by 4:00 PM."
Credibility Phrase Bank (Steal These):
“I’m not guessing.I’ll verify and send you the exact answer by 4:00 PM.”
“Here’s the timeline. I’ll own the next step and keep you ahead of deadlines.”
“Let me translate this into plain English, then we’ll decide.”
“I’ll recap this in writing so nothing gets lost.”
2. Showing Up Without a Printed Agenda
The Mistake: Entering a first listing appointment and asking,
"So, what would you like to talk about?"
Why It Hurts: If the client has to lead the meeting, they don't need you.
The Professional Fix: Bring three copies of a one-page agenda: one for them, one for you, and one as a backup. It signals you have a process for their success from day one.
3. Over-Talking to Fill the Silence
The Mistake: Talking incessantly because you’re nervous.
Why It Hurts: Silence is a high-status negotiation tool; over-talking signals nervousness and uncertainty. Calm beats charisma.
The Professional Fix: Study negotiation basics to understand that the person asking the questions controls the room. The first person who starts explaining is usually the one giving away leverage.
4. Robotic Script Delivery
The Mistake: Using a script exactly as written without adjusting for tone or context.
Why It Hurts: You sound like a telemarketer. Clients can sense when you’re "doing a routine."
The Professional Fix: You must practice real estate scripts until they become "decision trees"—you know the intent of the words, not just the order.
5. Skipping the Buyer Discovery Phase
The Mistake: Taking a buyer to see houses before conducting a formal first buyer consultation.
Why It Hurts: You look like a tour guide. It suggests you have no system for protecting their time.
The Professional Fix: Push for an office or Zoom consultation. Use a standardized questionnaire to uncover their "must-haves" vs. "nice-to-haves."
6. Vagueness on California Timelines
The Mistake: Not explaining the common contingency periods (e.g., 3, 7, or 17 days) clearly.
Why It Hurts: California contracts are timeline-heavy. If a client is surprised by a "Notice to Perform," you lose their trust instantly.
The Professional Fix: Create a "Transaction Calendar" for every client. Explain the most common contingency timelines in your contract before they sign.
Micro-checklist:
Put all deadlines in a shared calendar invite.
Send a one-page timeline PDF the same day.
Confirm the “Next deadline” at the end of every call.
The Contingency Scare: A rookie agent forgot to track the inspection contingency deadline. On day 18, the listing agent sent a "Notice to Perform." The buyer panicked, thinking they were in trouble (they may have been if the inspections weren’t even ordered). The agent had to spend three days in "damage control" because they hadn't pre-framed the timeline.
7. Not Pre-Framing the RPA Before the First Offer
The Mistake: Waiting until the offer is written to introduce the 25-page California Residential Purchase Agreement.
Why It Hurts: Clients feel ambushed by massive paperwork. Ambush destroys trust.
The Professional Fix: Give a 3-minute “RPA orientation” during the consult: what they’ll see, what matters, and how you’ll translate it into plain English.
8. Sloppy Email and Documentation
The Mistake: Missing subject lines, typos, or disorganized attachments.
Why It Hurts: Sloppy emails = sloppy contracts (in the client’s mind).
The Professional Fix: Use a clear format: [Property Address] - [Document Name] - [Action Required].
9. Answering Outside Your Expertise
The Mistake: Giving tax, legal, or structural engineering advice.
Why It Hurts: It’s a liability and makes you look like you don't understand professional boundaries.
The Professional Fix: Build a "Partner List." When asked about taxes, say: "That’s a great question for a CPA. I have two my clients use; would you like their contact info?"
10. Being "Always Available"
The Mistake: Answering every text in 30 seconds at 11:00 PM.
Why It Hurts: It signals you aren't busy. High-demand professionals have boundaries.
The Professional Fix: Set communication expectations early. Tell clients you respond between 8:30 AM and 6:30 PM. Add: "Emergencies are different—if something is truly time-sensitive, call me."
11. Reactionary Negotiation
The Mistake: Passing an offer to a client without a summary or strategy.
Why It Hurts: It makes you a "delivery person," not a negotiator.
The Professional Fix: Before calling the client, analyze the offer against the comps and prepare a "Net Sheet."
12. Treating Disclosures as "Admin" instead of Protection
The Mistake: Treating disclosures like paperwork instead of risk management.
Why It Hurts: The fastest way to lose trust with a real estate client is a surprise after the fact.
The Professional Fix: Always default to the TDS. If you’re asking whether it’s disclosable, treat it as disclosable until your broker says otherwise.
Micro-checklist:
Deliver disclosures as early as possible.
Track the exact date of receipt and review.
Confirm in writing: “No surprises later.”
Common Rookie Realtor Mistakes (Quick List)
Guessing on technical questions instead of verifying.
Winged meetings without a printed agenda.
Filling silence with over-explanations.
Robotic script reading instead of conversational mastery.
Skipping the formal consultation to go "tour" houses.
Fumbling CA timelines like contingency removals.
Ambushing clients with the 25-page RPA at the last minute.
Messy email habits that signal a lack of discipline.
Giving legal/tax advice outside of professional scope.
Lacking boundaries around late-night availability.
Presenting offers without a summary or strategy.
Downplaying disclosures and risking future lawsuits.
The Credibility System: Your Daily Protocol
To Start a Real Estate Career in California and actually thrive, you need to turn these fixes into daily discipline:
Prep (30 min): Comps + form set + agenda + timeline before every meeting.
Lead the Meeting: Frame → Discovery → Recommendation → Next Step.
Recap in Writing (2 hours): Bullets + deadlines + who owns what in an email.
Own the Next Step: If it’s important, it gets a specific date and time on the calendar.
FAQ: Building Credibility in California
How do I sound confident if I’m brand new?
Confidence comes from the process, not the result. If you follow a checklist, you don't have to be confident in yourself—you just have to be confident in the system.
Should I admit I’m new?
Don't lead with it, but don't lie. Pivot to your team:
"I’m a newer associate at [Brokerage Name], so you get my full focus, backed by my broker’s 30 years of experience and our firm's legal team."
What if a client asks how many deals I’ve done?
Don’t inflate numbers. Be honest and pivot to process:
"You’re getting my full focus, plus broker oversight and a transaction system that prevents mistakes in timelines and disclosures."
Your Professional Path Forward
You don’t need a decade of experience to be the most professional person in the room.
You simply need a repeatable process that removes doubt.
Pick Your Lane (Do this this week):
Buyers: Master your first buyer consultation so you stop being a tour guide and start being a decision coach.
Sellers: Run a real first listing appointment with a printed agenda and a clear pricing conversation.
Confidence: Practice real estate scripts as decision trees so you don’t freeze when clients throw curveballs.
Stop trying to sound experienced. Start sounding prepared.
|
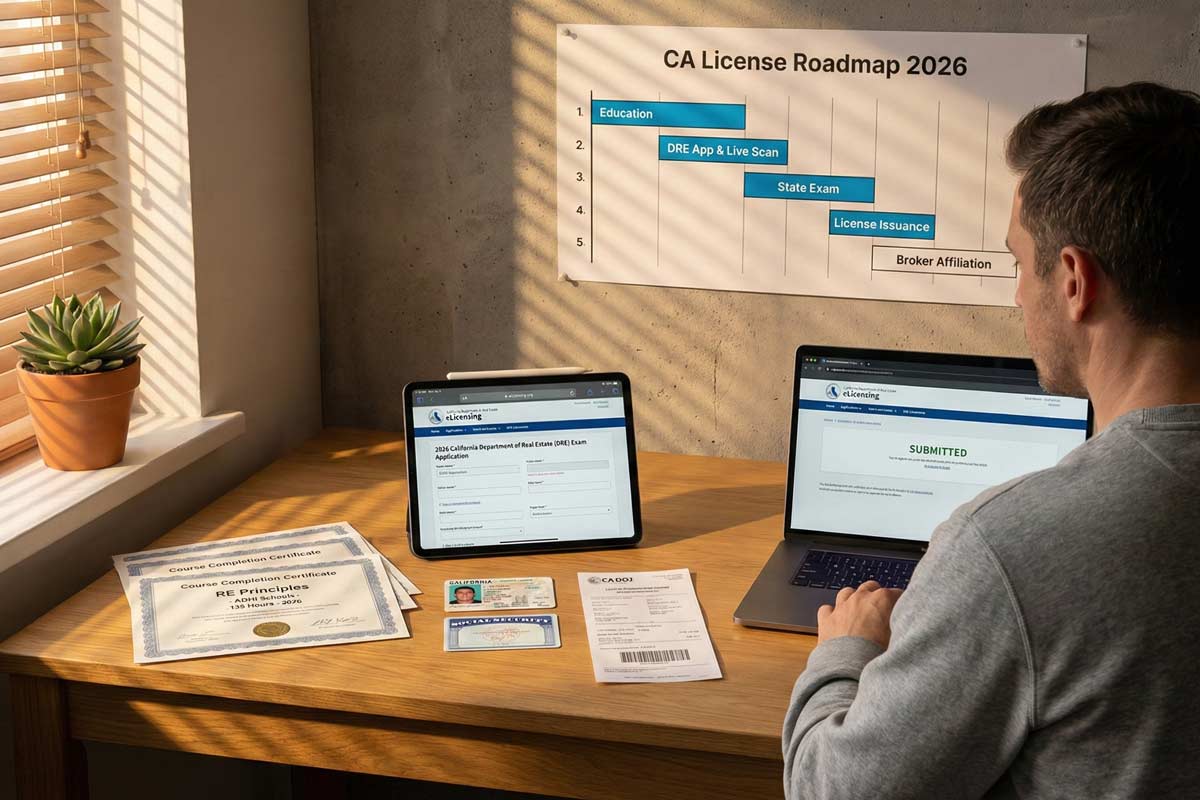
The “Order of Operations” Confusion
The path to a California real estate license is often clouded by outdated advice, social media "gurus," and aggressive brokerage recruiting scripts. This creates Read more...
The “Order of Operations” Confusion
The path to a California real estate license is often clouded by outdated advice, social media "gurus," and aggressive brokerage recruiting scripts. This creates a massive point of confusion: many aspiring real estate professionals believe they must be "hired" before they can even apply for the state exam.
Mistaking this sequence leads to lost momentum and unnecessary procedural errors.
The typical order is: pre-license school → exam application → passing the state exam → license number issuance → brokerage affiliation.
In my 20+ years of guiding thousands of students at ADHI Schools, I’ve seen this confusion cause more delays than the exam itself. This guide provides the exact roadmap to avoid those traps.
Do You Need a Broker to Apply for a California Real Estate License?
No—you don’t need a broker to apply for or take the California real estate exam. You can complete the education and application without a sponsoring broker affiliation. But you can’t legally practice real estate or earn commissions until your license is placed with a supervising brokerage.
Do You Need a Broker to Take the California Real Estate Exam?
Absolutely not. The Department of Real Estate (DRE) allows any individual who has met the 135-hour education requirement to sit for the exam. You are applying as an individual, not as a representative of a firm. You can take the exam as an individual, regardless of brokerage affiliation.
The Correct California Timeline: A Step-by-Step Roadmap
Following the state-mandated order of operations is the only way to ensure you don’t waste time.
Complete Your 135 Hours of Pre-License Education: You must finish three college-level courses. Can You Take the Exam Before Completing All 135 Hours? No—you must have your certificates in hand first.
Apply for the State Exam & Submit Fingerprints: You submit your application and Live Scan fingerprints to the DRE. You do not need a broker’s signature for the exam application.
Note: The biggest avoidable delays are simple mismatches—your name, ID, and course certificates must match exactly.
Pass the California Real Estate Salesperson Exam: This is your primary hurdle.
Receive Your License Number from the DRE: The DRE issues your license number after clearing criminal background. You can complete this entire process independently and without broker affiliation.
Affiliate with a Brokerage to Practice (“Hang Your License”): Once you have a license number, you must place your license with a supervising broker so you can legally practice and earn commissions.
Pro Tip: If you want the full start-to-finish roadmap, use our California Real Estate License Guide.
Key Terms Demystified
Understanding DRE terminology prevents "bureaucratic paralysis."
“Applying for a License” vs. “Practicing”: Applying is between you and the State. Practicing is between you and a Broker. You can do the first without the second.
“Hanging/Placing Your License”: This means officially associating your license with a Broker of Record. This is what moves your license into a status that allows for commissions.
Independent Contractor Reality: You are a 1099 contractor. The broker supervises your licensed activity; however, you generate your own business unless the brokerage specifically provides leads.
What Happens After You Get Your California Real Estate License? The focus shifts from "passing the test" to "building a business."
When (and Why) to Talk to Brokerages Early
Research is smart; commitment is premature. You should interview brokerages while you wait for your exam date to assess:
New Agent Training: Does the broker have a formal mentorship program?
Commission Splits & Fees: What is the actual "take-home" after all fees?
Lead Generation Support: Do they provide leads or just "coaching"?
Compliance Support: Who reviews your contracts to keep you out of court?
Costly Mistakes to Avoid
Waiting to Apply Until You Find a Broker: I’ve watched students wait 90 days "shopping brokerages" while their exam eligibility window and motivation evaporated. Don't wait. Apply the moment you have your certificates.
Choosing a Brand Over Training: I once spoke to an agent who picked a famous global brand for the "vibe," but quit after 4 months because no one showed them how to actually get business. Top Reasons People Fail to Get Licensed in California often trace back to a lack of early support.
Losing Momentum After the Exam: The gap between passing the exam and finding a broker should be days, not months.
Your 7-Day Action Plan
Day 1-2: Finish your current education course module.
Day 3: Draft a shortlist of 3-5 local brokerages to research.
Day 4: Prepare 8 questions to ask future brokers (focus on training and splits).
Day 5: Double-check your DRE exam/license application for errors (name match, IDs, and certificates).
Day 6-7: Submit your application to the DRE.
Frequently Asked Questions (FAQ)
Can I apply for the CA real estate exam without a brokerage?
Yes. Affiliation is not required to apply for or take the exam.
Do I need a sponsor broker for the exam?
No. Sponsoring brokers are required for practicing, not for taking the exam.
Can I interview brokerages before I’m licensed?
Yes, and you should. Most brokers are happy to speak with prospective agents who are currently in school.
What if I join a brokerage now—does it speed up the DRE?
No. The DRE processes applications in the order received, regardless of which brokerage you intend to join.
What if I pass the exam but don’t pick a brokerage?
You will have a license number, but you cannot legally represent clients or collect a penny in commission until you associate your license with a broker.
Can my license expire if I don’t join a brokerage right away?
Your license remains valid once issued, but you must still meet renewal requirements and continuing education deadlines every four years, regardless of whether you are affiliated with a broker.
Next Steps on Your Licensing Journey
The brokerage choice is critical for your success in the field, but it is not a prerequisite for the state exam. Focus on your 135 hours and your application first.
For the complete, step-by-step licensing roadmap (start to finish), use our California Real Estate License Guide.
|

Your hand hovers over the dial. The script is pulled up on your screen, but the words feel unnatural and obvious at the same time.
In your head, you already sound like a telemarketer.
You’re terrified Read more...
Your hand hovers over the dial. The script is pulled up on your screen, but the words feel unnatural and obvious at the same time.
In your head, you already sound like a telemarketer.
You’re terrified of blanking mid-sentence or, worse, getting hit with a question that knocks you off your path.
Here is the field-tested truth:
Top-producing agents aren't "naturals."
They’re just prepared.
Whether you are working a buyer lead, a social media inquiry, or a guest at an open house, scripts are your foundation. This isn't about memorization; it's about building the muscle memory required to stop worrying about your next word and start listening to the client’s needs.
The Core Thesis: Scripts aren't lines to memorize. They are reps to build automaticity. You are training your brain to handle the structure of a deal so your mind is free to think and lead.
The 3-Level Progression: From Memorization to Mastery
In my 20+ years coaching California agents, I’ve seen thousands try to "wing it." They fail because they have no floor. Use this ladder to build your skills.
Level 1: Memorize the FRAME (The "GPS" of the Call)
Most agents fail because they try to memorize a script word-for-word. The moment a prospect goes off-script, the agent’s brain reboots.
The Goal: Know the structural milestones of the interaction.
The Drill: Summarize your script into three "anchor" points.
Example Frame (Universal Buyer Lead):
Connection: "I saw you were looking at the Main Street property—what was it about that home that caught your eye?"
Motivation: "Are you looking for something with that specific layout, or just that neighborhood?"
The Ask: "I’m seeing a few others in that pocket with similar features; would you like to see those this weekend?"
Level 2: Drill for Fluency (Diagnostic Reps)
Note: These characters are diagnostic tools to help you find your "natural" baseline; they are not your final delivery voice.
The Goal: Pacing and tonal control.
The Drill: Set a 60-second timer. Say your script 5 times, changing your "character" each rep:
Whispering: Focuses on crisp enunciation.
Over-excited: Highlights where you sound too "salesy."
Calm/Bored: Helps you find a neutral, professional baseline.
Fast-paced (Stress Test): Tests your ability to keep words fluid under pressure.
Final Rep: The "Curiosity" voice—slow, helpful, and inquisitive.
Level 3: Pressure-Test with Chaos
In the real world, people interrupt. They say, "I'm busy," or "Who is this again?"
The Goal: Progressive recovery.
The Drill: Have a partner interrupt you mid-sentence with a random objection. Your goal isn't to be perfect—it's to see how quickly you can get back into the "Frame."
The Target: Aim for a 7-second recovery initially, working your way down to a 3-second pivot back to the conversation.
The ADHI 10-Minute Daily Script Workout
This is your non-negotiable morning habit. Like a pre-flight checklist, it must be done before you touch the phone.
Min 1–2: Warm-Up. Read your script aloud. Just get used to the sound of your own voice in the room.
Min 3–5: Record & Replay. Use a voice memo. Listen for "um", "like", and "you know." Fix one verbal tic per session.
Min 6–8: Objection Reps. Pick one objection and drill the response 5 times using the Level 2 diagnostic characters.
Min 9–10: The Coffee Shop Test. Say the core message as if you were explaining it to a friend. If it sounds like a lecture, simplify the language.
The “Don't Sound Robotic” Fix: The 1-1-1 Method
Robotic agents deliver monologues. Professionals lead dialogues. Use this formula to stay human:
1 Consistent Opening Line: Your anchor. (e.g., "Hi [Name], this is [Your Name] with [Brokerage].")
1 Personalized Sentence: Use a specific observation. "I noticed you were looking at that listing on Main Street—that specific layout is quite rare for this pocket of the city."
1 Clean Question: This shifts the energy. "Is that the specific style of home you're looking for, or are you open to other layouts?"
The Big 5 Objections: Recovery Drills
"We already have an agent."
Response: "That's great. It's so important to have someone you trust in this market."
Pivot: "If anything ever changes, what's the best way for me to stay in touch with you?"
"I'm just looking."
Response: "Of course, most of my best clients started out just browsing."
Pivot: "Are you looking for a 'forever home' or more of an investment opportunity?"
"How did you get my number?"
Response: "I’m an agent with [Brokerage] and I’m following up on your inquiry regarding the property on [Address/Area]."
Pivot: "I apologize if I caught you at a bad time—were you still looking for information on that home, or has your search changed?"
"Will you cut your commission?"
Response: "I understand that the fee is a factor in your net return. I’m curious, is your priority the cost of the service, or the net amount you walk away with at closing?"
Pivot: "Would you be open to seeing how our specific marketing and negotiation services are designed to protect that net return?"
"Send me an email."
Response: "I'd be happy to. I have a lot of data I can send."
Pivot: "To make sure I don't clutter your inbox with things you don't need, which two or three things are most important to you right now?"
The Bridge: From Practice to Production
Fluency equals authority. When you don't fumble for words, you look like a seasoned professional who understands the market.
The "Messy" Middle: To stay calm and lead the conversation when escrow hurdles arise, master the Negotiation Basics for New California Agents.
Securing the Listing: Knowing your frame keeps you in control when you learn How New Agents Should Handle Their First Listing Appointment with confidence.
The Buyer Consultation: Fluency is your best tool for answering tough questions during your How to Prepare for Your First Buyer Consultation.
Building Credibility: You can learn How to Avoid the “New Agent Mistakes” That Hurt Credibility simply by sounding like a peer to the veteran brokers you'll be negotiating against.
The 7-Day Challenge
Commit to the 10-Minute Daily Workout for exactly seven days. Do not skip a morning. By Day 8, the phone won't feel like a 500-pound weight. You are building a system that turns "fear of the phone" into a reliable, professional skill.
If you’re ready to master the skills that separate the top earners from the rest, the next step is building your professional foundation. Our Start Real Estate Career in California guide is where your journey begins—start it with a system designed for success.
FAQ Section
What scripts should I learn first? Focus on the "Lead Follow-up" script. Most agents lose money not because they can't find leads, but because they don't know how to handle the first 60 seconds of a return call.
How do I practice scripts without a partner? Use the "Record & Replay" method. Record yourself on your phone, wait 10 minutes, and listen back as if you were the client. You will immediately hear where you sound "salesy" or unsure.
How long should I practice scripts daily? 10 to 15 minutes of high-intensity practice is better than an hour of casual reading over a script. Quality of focus matters more than the clock.
What is the #1 practice mistake? Practicing in your head. If the words aren't physically coming out of your mouth, you aren't training your vocal cords or your brain for the "live" environment.
|

TL;DR: The Negotiation Mindset
Preparation > Personality: You don’t win by being the loudest person in the room; you win by having the best data and a cleaner file.
Trade, Don't Cave: Read more...
TL;DR: The Negotiation Mindset
Preparation > Personality: You don’t win by being the loudest person in the room; you win by having the best data and a cleaner file.
Trade, Don't Cave: Never give a concession (like a price drop) without getting something in return (like a shorter contingency period).
The Silence Protocol: State your position, then stop talking. The first person to fill the silence usually loses leverage.
Negotiation isn’t about "winning" a fight; it’s about navigating a series of high-stakes trade-offs to reach a closing. For most new agents, the first counteroffer feels like a personal attack or a sudden emergency.
Negotiation is one piece of your first-year system—right alongside client consultations, scripts, and credibility. If you want the full roadmap for your first 12 months, start here: Start Your Real Estate Career in California.
Phase 1: Prep the File (Don’t Negotiate From Vibes)
New agents often enter negotiations with "hope" as their primary strategy. Professional negotiators use data. Before you pick up the phone to discuss an offer, you must be the most informed person in the transaction.
The Three-Point Data Anchor
The Comps: Have the 3 most relevant sales ready (closest match, most recent; expand the radius/time if the area is thin).
The Motivation: Why is the other party moving? A seller who already bought their next home has a different "pain point" than one testing the market.
The Broker's Pulse: Call the listing agent before writing the offer. Ask: "What is most important to your seller besides price?" Sometimes it’s a specific closing date or a rent-back period.
Phase 2: Set the Frame (The Pre-Negotiation)
The biggest mistake is starting the negotiation when you receive the counteroffer. The negotiation actually starts at your first client meeting. If you haven't managed your client's expectations, you’ll spend more time negotiating against them than against the other agent.
This is exactly why your first buyer consultation matters—your negotiation leverage is built before you ever write an offer. See: How to Prepare for Your First Buyer Consultation.
The Script: Managing the "Lowball" Urge
"I understand you want a deal, but in this market, an insulting offer doesn't start a negotiation—it ends the conversation. If we want them to take us seriously, we need to show them we are a serious, qualified buyer."
Phase 2B: Listing Appointments Are Where Negotiation Leverage Is Created
Most new agents think negotiation starts at the counteroffer. On the listing side, it starts when you set pricing strategy, condition expectations, showing windows, and how you’ll handle repairs and credits. If you can’t frame that conversation confidently, you’ll “give away” leverage later in escrow.
Read this before you take your first seller meeting: How New Agents Should Handle Their First Listing Appointment.
Phase 3: Make Clean Moves (State, Reason, Silence)
When it’s time to deliver an offer or a response, brevity is your best friend. In California's competitive market, "clean" offers move to the top of the pile.
Clean offers come with proof: a fully underwritten approval, verification of funds, and a timeline that matches the seller’s reality. A clean offer has a strong price, a solid lender, and minimal "clutter" (unnecessary personal property requests).
The Script: Delivering a Response
"My clients have reviewed your counter. We are coming up to [Price], but we are keeping the inspection period at 10 days to ensure a fast move for your seller. This is our best move to keep the deal together."
State your number. State your reason. Stop talking. If you want these to come out calm under pressure, you don’t “read” scripts—you drill them. Use this system: How to Practice Real Estate Scripts Effectively.
Phase 4: Trade, Don't Cave
A "concession" is a gift. A "trade" is a business move. If the seller asks for a $5,000 credit for repairs, don't just say yes or no. Use it to improve your client's position elsewhere.
The "If/Then" Strategy
"If we agree to the $5,000 repair credit, then we need the buyer to xxxxx." (Note: High-stakes moves like removing contingencies should only be done if your buyer is fully informed and your broker supports the strategy based on the specific file.)
"If we move the closing date up by two weeks, then we need the seller to leave the appliances."
The "Silence Protocol": 3 Rules for High-Stakes Calls
Strategic silence is the hardest skill for new agents to master because they feel the need to "sell" their position.
Deliver the "Hard" News: State the price or the refusal clearly.
Count to Ten (Internally): Do not add "I know it's a lot" or "My clients were thinking...".
Wait for the "Blink": Let the other agent respond first. They will often reveal their client's true bottom line just to fill the quiet.
Avoid These "New Agent Mistakes"
Most negotiation failures are really credibility failures. If you want the full “don’t look new” checklist, read: How to Avoid the “New Agent Mistakes” That Hurt Credibility.
The "Don't Say This" Table
Instead of saying...
Say this...
Why?
"My clients are really nervous."
"My clients are very focused on the inspection results."
Avoids sounding weak; stays focused on the contract.
"I'm new, so I'm not sure if..."
"I'll double-check the current market data and get back to you."
Protects your authority.
"They'll probably take $X."
"We are prepared to discuss terms that reflect current market value."
Never give away your client's bottom line without a formal counter and consent from your client.
Real-World Scenarios: From Battle to Close
Scenario A: The Multiple Offer Bidding War
The Situation: You represent a buyer. There are 5 other offers. The listing agent says, "Bring your highest and best."
The Play: Don't just raise the price. Negotiate on terms.
Script: "We’ve tightened our timelines and provided a full underwritten approval from the lender. We aren't just the highest offer; we are the most certain to close."
The Logic: Sellers take a slightly lower price if it means 100% certainty they won't have to go back on the market in three weeks.
Scenario B: Inspection Repair Credit Without Killing the Deal
The Situation: Buyer wants a $7,500 credit. Seller says no—“we’re not fixing anything.”
The Play: Offer two clean options (not a fight).
Script: “Totally understood. To keep momentum, we can do Option A: $X credit and we release inspection immediately, or Option B: no credit and we adjust price to reflect the defect based on contractor bids. Which is better for your seller?”
Logic: You’re trading certainty and speed for dollars—cleanly.
FAQ: California Negotiation Essentials
How do I negotiate if I’m a brand-new agent?
Lean on the data, not your tenure. When you cite specific comps and market trends, the other agent is negotiating against the market, not your experience level.
What matters most besides price in California negotiations?
Certainty and speed. In a high-demand market, sellers prioritize offers that limit contingencies (if safe), offer a fast closing, or provide a "rent-back" period that lets them move without stress.
How do I ask the listing agent what the seller wants?
Be direct. "Besides the price, what are the two most important things to your seller in an ideal offer?" This often reveals needs regarding the closing date or specific repairs.
Should I waive contingencies to win a bidding war?
Only under the guidance of your broker and after a thorough discussion with your buyer. It is a high-risk move that can lead to a lost deposit if the deal falls through. I would only recommend this is in a narrow set of scenarios where all parties are going into it with eyes wide open and fully understand the consequences.
Pre-Negotiation Checklist (Understand This Before Every Negotiation)
Before you counter, confirm you have:
3 Comps + Data Sentence: Why is your number justified?
The Motivation Matrix: Timeline, rent-back needs, and certainty.
Concession Menu: What will you trade (not give away) to get the deal?
Broker Approval: Direct guidance on high-stakes terms (contingencies/timing).
|

You’ve passed the real estate exam, hung your license with a broker, and got your first box of business cards.
Then, the silence hit.
Most new agents in California fall into the "motivation spiral." Read more...
You’ve passed the real estate exam, hung your license with a broker, and got your first box of business cards.
Then, the silence hit.
Most new agents in California fall into the "motivation spiral." You start with high energy, realize you don't have a boss telling you what to do, and quickly drift into "research" (scrolling Instagram) or "branding" (tweaking a logo no one has seen). Before long, the excitement turns to dread.
In my experience coaching thousands of new agents through ADHI Schools, I’ve seen this pattern over and over. Failure in this business rarely comes from a lack of talent; it comes from a lack of a plan and a measurable scoreboard. If you want to survive your first year, you need an operational field manual, not a 40-page theoretical document.
A business plan is not a static document. It’s a weekly operating system you should execute on even when you’re tired.
The 1-Page Real Estate Business Plan (Copy/Paste This)
A business plan is simply a set of decisions made in advance so you don’t have to "think" when you wake up.
The 60-Minute Build Checklist
Open a blank document and answer these points. If you spend more than an hour on this, you’ve drifted into procrastination.
Target Client: Pick two zip codes or one demographic (e.g., first-time buyers in Riverside).
Your Offer: Pick one "rookie-safe" value prop (see below).
Your ONE Lead Pillar: SOI, Open Houses, Cold Outreach, or Social Media.
Weekly Calendar: Set fixed blocks for prospecting and follow-up.
Weekly Activity Scoreboard: Define your "Input" numbers.
Budget & Runway: How much cash is in the bank today?
Tech Setup: Is your MLS, CRM, and e-signature software active?
14-Day Proof: Define what “working” looks like in two weeks (e.g., 20 conversations + 1 appointment held).
5 Rookie-Safe Offers (Choose One)
New agents often struggle with "positioning" because they lack a track record. Instead of selling "experience," sell a specific process:
The Hyper-Local Listing Concierge: "I run a pricing + prep timeline so sellers don’t guess—want me to walk you through it?"
The First-Time Buyer Roadmap: "I’ve mapped out the local lender and grant programs for first-timers; should I send you a copy?"
The Condo Seller Packet: "I have a pre-listing kit for this building with the HOA requirements and recent comps; want to see it?"
The Open House Matchmaking Offer: "I’ll send you the top 3 deals in your specific price range every Tuesday; want on the list?"
The Pricing & Prep Walkthrough: "I can give you a 30-minute walkthrough with a repair/ROI checklist to maximize your net; are you free Tuesday?"
To refine how you present these, review these Branding Tips for New California Agents.
The Scoreboard: The Numbers That Control Your Motivation
New agents quit because they focus on "closings," which are lagging indicators. You can’t control when a deal closes, but you can control how many people you talk to today.
When you feel the "dread" setting in, look at your scoreboard. In my experience, if the numbers
Activity (Input)
Weekly Target
Daily Target (Mon-Fri)
Why It Matters
New Conversations Logged
50
10
Finding "hand-raisers."
Follow-Ups
75
15
Most closings come from the 4th+ contact.
Appointments Held
2
—
Face-to-face (or Zoom) builds trust.
Contacts Added + Notes
50
10
If it isn't in the CRM, the lead doesn't exist.
are high, your progress becomes predictable. This is the secret to How to Stay Motivated as a New Agent.
Your Example Weekly Calendar (Copy/Paste)
You cannot manage what you do not schedule. Use this as your baseline:
Mon–Fri 9:00 AM – 11:00 AM: Lead pillar activity (Calls, Invites, DMs).
Mon–Fri 11:00 AM – 12:00 PM: Follow-up + CRM notes.
Tue/Thu 4:00 PM – 6:00 PM: Preview homes (Inventory research).
Sat/Sun: Open House (Host if possible; attend if you can't get one yet) + Sunday night prep.
Sun 7:00 PM – 7:20 PM: The 20-Minute Reset. Clean CRM, set follow-ups, and schedule next week’s prospecting blocks.
The 90-Day Execution Plan: A Brutally Specific Grind
Weeks 1–2: The Launch Phase
Build Your SOI List: Export your phone and email contacts. Goal: 120 names.
The Outreach Script: Call 5 people and text 5 people per day. "I’m with [Brokerage] now and I specialize in [Offer]. If you hear anyone mention buying or selling this year, I’d be grateful if you’d connect us."
The CRM: Log every single interaction.
Weeks 3–8: The System Phase
Implement 1-3-7-21: Follow up with every new lead on Day 1, Day 3, Day 7, and Day 21.
Market Knowledge: Preview 5 homes per week in your target zip codes.
Weeks 9–12: The Review & Diagnostic
The Scoreboard Audit:
If 0 conversations: You have a discipline/system issue.
If conversations but no appointments: You have an offer/script issue.
If appointments but no clients: You have a follow-up/conversion issue.
The Reset Rule: If you miss a day, don't spiral. Reset the clock to zero and start fresh tomorrow morning.
Choose Your ONE Lead Pillar (Stop the Chaos)
1. SOI/Referrals (Sphere of Influence)
Daily Actions: 5 calls, 5 texts, 5 social media interactions.
Success Metric (14 Days): 50 outreaches + 5 coffee meetings or consultations.
2. Open Houses
The Offer: "I’ll send you the 3 best buys in this neighborhood this week—text me your price range."
Daily Actions: Mon-Wed: Secure a listing. Thu-Fri: Prepare "Invite Lists." Sat-Sun: Host the event.
Success Metric: 10 guest sign-ins via QR code + 10 follow-up calls made by Monday noon.
3. Cold Outreach (Expireds/FSBOs)
Daily Actions: 2 hours of morning calls to homeowners who failed to sell or are trying to sell alone. Follow your brokerage policy and DNC rules; don't freestyle.
Success Metric (14 Days): 100 contacts + 10 real conversations + 1 appointment held.
4. Social Media Machine
Daily Actions: 3 short videos per week, 10 DMs to local followers, 1 weekly "market update" text to your SOI. Use these Social Media Best Practices for Realtors to ensure you’re actually creating leads.
Budget & Runway (The Part Everyone Avoids)
California is an expensive state for real estate professionals. You must know your "burn rate."
The Formula: Runway = (Savings / Monthly Burn)
Startup Estimate: DRE Fees, MLS dues, Association Dues (NAR/CAR), and E&O insurance. Treat $2,000–$4,000 as a planning estimate.
The Reality Check: If you don't have 6 months of savings, you probably need a "paid runway"—a side job, savings, partner income, or a brokerage lead source. Desperation is when agents start cutting corners on disclosure, honesty, and compliance. This financial pressure is a major reason Why Most New Agents Quit in the First Year.
“Busywork Traps” to Identify and Avoid
If a task doesn’t involve a conversation with a human, it’s likely a trap.
The Training Loop: Watching endless YouTube videos instead of prospecting.
Logo/Website Tinkering: Nobody cares about your font if you don't have a listing.
The CRM Perfection Trap: Rebuilding your CRM tags and pipelines instead of actually using it to call people.
The Checklist Rule: If the task doesn't directly create a conversation or an appointment, it's not a priority today.
Mini Case Studies: The Plan in Action
The "Passive Poster"
The Problem: Posted on Instagram daily but had 0 leads.
The Fix: Switched to the "Social Media Machine" pillar. They added 10 DMs per day to local residents.
Result: They secured two serious buyer consultations and a warm listing lead within 60 days.
The "Timid Rookie"
The Problem: Afraid to call their SOI.
The Fix: Used the "First-Time Buyer Roadmap" offer. It gave them a reason to call ("I have a new map for first-time buyers, want a copy?").
Result: Logged 50 CRM notes in a week and set their first "Appointment Held" by Friday.
Your Next 3 Steps
Fill out the one-page plan now. Don't wait for "perfect" clarity.
Set your weekly calendar. Use the template above to block your time.
Start your scoreboard. Log your first 10 conversations tomorrow morning.
Want the full roadmap?
Read our comprehensive guide: Start a Real Estate Career in California
It lays out the timeline, exact costs, and what to do first.
FAQ: Real Estate Business Planning
What should my real estate business plan include?
At a minimum, it must include your target market, your primary lead generation pillar, a daily activity scoreboard, and a budget for California-specific dues and fees.
Do I need a business plan to join a brokerage?
Technically, no. Most brokerages will hire anyone with a license. However, without one, you’re relying on hope instead of a system.
How many hours a day should a new agent prospect?
In my experience, a new agent should spend at least 2 hours every morning on lead generation and 1 hour on follow-up.
How much money do I need to start?
Aim for 6 months of living expenses. If you can’t, ensure you have a "paid runway" (side income) so you don't make desperate decisions out of financial fear.
How long should a business plan be?
One page. If it’s longer, you won't look at it. If you won't look at it, you won't follow it.
|

The “license high” is real.
You finish your real estate courses, pass the California state exam, and hang your license with a reputable brokerage. For a few weeks, adrenaline carries you. Then the Read more...
The “license high” is real.
You finish your real estate courses, pass the California state exam, and hang your license with a reputable brokerage. For a few weeks, adrenaline carries you. Then the silence hits. Your phone doesn’t ring. Your inbox is empty. The Instagram-ready office you built feels like a stage set for a play that never starts.
This is the Motivation Collapse—the predictable emotional drop-off that occurs when licensing ends and the tactical reality of real estate begins.
In my 20+ years of training and supervising thousands of California agents across multiple market cycles, I’ve learned that the ones who survive aren’t the most “inspired.” They are the ones who realized that motivation is not the problem; the lack of a structure is.
Diagnosis: Why New Real Estate Agent Motivation Dies
Before you can fix your motivation, you must understand why it’s failing. It isn’t a character flaw; it’s a structural misalignment.
Delayed Feedback Loops: Real estate has no immediate payoff. You can work 60 hours a week for three months and have $0 to show for it.
The “No Scoreboard” Problem: Without a boss or a clock-in system, you have no objective measure of success. If you didn’t close a deal today, you feel like you failed, even if you did the right work.
Toxic Social Comparison: You see "Top Producers" on social media posting about $10M listings. Comparing your "Chapter 1" to their "Chapter 20" leads to immediate FOMO.
Identity Whiplash: You went from being a "Student" with clear goals to a "Business Owner" with total ambiguity.
If this sounds like your current daily reality, you aren't failing; you're just operating without a scaffold.
This transition is one of the core reasons Why Most New Agents Quit in the First Year. If you’re still orienting yourself, start with our complete guide on how to Start a Real Estate Career in California before trying to optimize your mindset.
The Reframe: Discipline Over Feelings
Motivation is a feeling, and feelings are unreliable. If you only prospect when you "feel" like it, you don't have a business; you have a hobby.
The Trap of Productive Procrastination
I see this constantly: A new agent spends three weeks tweaking hex colors on a logo, another rewrites their bio for the tenth time, and another sits with ten CRM tabs open but makes zero calls.
None of those actions risk rejection—still the brain labels them as “work.”
In reality, this is just fear dressed up as an office task. To survive, you must pivot to discipline—doing the high-value, high-fear work precisely because you don’t feel like doing it. This is a foundational element I cover when teaching How to Create a Real Estate Business Plan (New Agents).
5 Survival Systems to Combat Real Estate Burnout
To stay in the game, stop chasing "inspiration" and implement these five operational systems.
Activity-Based Scoreboards: Stop tracking income; you can't control it yet. Start tracking inputs. Create a daily scoreboard for things you 100% control: outbound calls, hand-written notes, and face-to-face meetings scheduled. If you hit your numbers, you won the day—regardless of your bank balance.
Calendar-First Discipline: Your calendar is your only boss. Block 8:00 AM to 11:00 AM for lead generation. No email, no "office chatter," and no social media scrolling. If it isn't on the calendar, it doesn't exist.
Lead Generation Before Branding: You cannot brand a business that has no clients. I’ve watched agents spend thousands on lifestyle photography before they could even explain a California RPA. Priority 1 is direct outreach. Branding Tips for New California Agents should support your outreach, not replace it.
Energy Management (Not Hustle): The "24/7 hustle" narrative is a recipe for a short career. Identify your "Peak Energy" times for negotiations and "Low Energy" times for administrative tasks. Burnout is a system failure, not a lack of effort.
The Isolation Kill Switch: Isolation is where doubt festers. When you are a new agent, your own head is a "bad neighborhood"—don't go in there alone. Mandate a weekly meeting with your broker. Also, learn How New Agents Should Use Social Media in 2026 to build a professional community, not just to compare yourself to influencers.
Tactical Reality Check: What “Normal” Actually Looks Like
Many agents quit because they have a distorted view of the timeline. Here is the non-glamorous reality of a successful first year in the California market:
Timeline
The Reality of Progress
Months 1–3
Invisible Skill-Building. You are learning how to talk and handle rejection. Expect $0.
Months 4–6
The Pipeline Phase. Initial leads are warming up. You might enter your first escrow.
Months 7–12
The Stabilization Phase. Consistent daily activity starts to yield predictable closings.
Most agents quit in Months 2–4. This isn't because they failed at the job; it's because they failed to realize that "nothing happening" is often just invisible competence-building.
Zoom Out to the Career Arc
Motivation is a spark, but systems are the fuel. As you move through your first 18 months, you will find that "staying motivated" becomes less of a struggle because you are becoming competent. Confidence is simply the byproduct of repeated, disciplined action.
If you want to shorten the painful part of this curve, your next step isn’t finding more motivation—it’s choosing structure over motivation. Start with the fundamentals, then layer on the tactics.
FAQ: Staying Motivated as a New Agent
Q: How long does it take for a new real estate agent to get their first lead?
A: In California’s competitive market, a lead can be generated on Day 1 through your sphere of influence, but a "cold" lead typically requires 30–60 days of consistent daily prospecting before a pipeline begins to form.
Q: How many hours should a new agent spend on lead generation?
A: You should spend 70% of your work week on lead generation until you have at least three active escrows. In a standard 40-hour week, that is roughly 28 hours of direct outreach.
Q: What is the best way to handle the "slow periods" in real estate?
A: Shift your focus from "results" to "refinement." Use the slow periods to audit your systems, update your CRM, and increase your outbound volume to ensure the next peak arrives sooner.
|
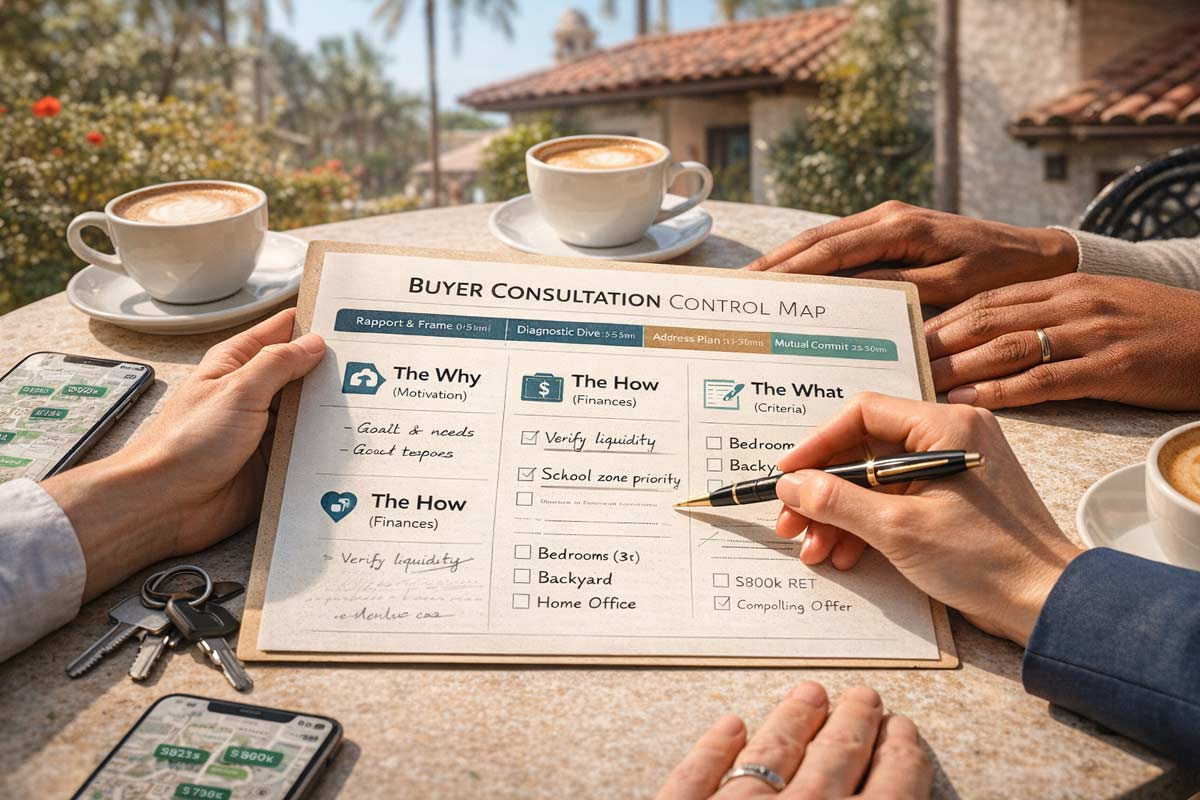
TL;DR: The Agent’s Quick-Start Guide
The Mission: Transition from an "unpaid tour guide" to a "fiduciary consultant" by leading a structured diagnostic process.
The 15-Minute Phone Flow: A verbatim Read more...
TL;DR: The Agent’s Quick-Start Guide
The Mission: Transition from an "unpaid tour guide" to a "fiduciary consultant" by leading a structured diagnostic process.
The 15-Minute Phone Flow: A verbatim script to qualify leads and book the deep-dive consultation.
The 30-Minute Playbook: A timed framework for the in-person meeting to uncover "deal-killer" obstacles.
California Precision: Language focused on the C.A.R. RPA, contingency periods, and deposit protection.
The High-Stakes First Conversation
In the high-speed California market, a transaction rarely dies because of a bad inspection—it dies because of a missed question in the first meeting. I have seen countless escrows in markets like the Inland Empire or Orange County implode because an agent didn't verify if a down payment was liquid, coming from a 1031 exchange, or was a gift fund that hadn't yet been documented.
The buyer consultation is your Transaction Control Room. It is the single most important leverage point for preventing 90% of future transaction drama. By the end of this guide, you will have a word-for-word framework to build trust, verify financial credibility, and establish yourself as a professional advisor.
Agent Action: Print the 30-minute agenda in Section C and place it in a professional folder.
Psychology/Why It Works: : Buyers relax when the process is clearly led. When you lead with a visible agenda, you signal that you are a project manager capable of navigating the complex California disclosure environment.
The 5 Goals of a Flawless Buyer Consult
Before you conclude the meeting, you must have clarity on these five success metrics:
The “Why”: Their true motivation and "hard-stop" timeline (e.g., school start dates or lease ends).
The “How”: Verified financial readiness (Monthly comfort zone vs. max approval).
The “What”: Core non-negotiable criteria vs. lifestyle dealbreakers.
The “Process”: Understanding of the California RPA and how contingency windows protect the deposit.
The “Commitment”: Completion of "Gate 1" (Lender verification) and an agreement on the search cadence.
The 30-Minute Consultation Agenda: The Control Map
Time
Phase
Focus
Verbatim Transition Line
0–5 mins
Rapport & Frame
Establish the agenda and your role as a fiduciary.
"To respect your time and ensure we are prepared to win, I’ve prepared an agenda for our strategy session. Shall we dive in?"
5–15 mins
Diagnostic Dive
Uncover motivation, timeline, and financial documentation.
"Before we look at property, I want to understand the 'why' behind this move. What happens if you don’t find a home in 90 days?"
15–22 mins
Criteria & Reality
Separating needs from wants; neighborhood specifics.
"If we found a home that was perfect but lacked [Feature X], would that be a dealbreaker or a 'maybe'?"
22–27 mins
The CA Process
Explaining the RPA, speed of market, and disclosures.
"In California, clarity is our best tool. Let’s talk about how the contract protects your deposit during the investigation period."
27–30 mins
Next Steps
Securing the first "Commitment Gate" and scheduling.
"Based on our talk, I’m confident we can achieve this. Are you ready to follow the three steps we discussed to get started?"
THE CORE SCRIPT: Verbatim Dialogue
1. The 15-Minute Phone/Zoom Qualification (Initial Contact)
Agent Action: Use this flow to vet leads coming from your Open House Script Script or a recent Cold Calling Script session.
Step / You Say:
Buyer Response / Objection:
Your Verbatim Response:
Opener: "I'd love to help. To ensure you're in a position of strength, I always start with a 15-minute Strategy Call. Do you have your calendar?"
"Can't we just meet at the house today?"
"I understand! To ensure we are credible when we talk to the seller, I need to verify our strategy first. Does 4 PM work for our call?"
Objection: Weekends
"We only want to see houses this weekend."
"I'd love to show you. To be competitive, we need to have our strategy locked in before we hit the field. Let's do a 15-min call now to prep."
Objection: Signing
"We don't want to sign any exclusive agreements yet."
"No problem. Our first meeting is just to see if we're a fit. We'll review representation later per office policy when you're ready to view property."
Objection: Rates
"We're worried about these high rates."
"Valid concern. You may be able to refinance later if market conditions allow, but it’s not guaranteed. Let's find a payment that works today."
The Close (No Pre-App): "Most buyers find it helpful to talk to a local lender before we meet so we know our exact 'Comfort Zone.' Shall I have my partner call you?"
"We haven't talked to a bank yet."
"That's the best first step. I'll have them reach out so we have the numbers ready for our meeting on Tuesday."
2. Core Objection Handling + Consult Spine (In-Person)
0-5 mins: Establishing Leadership
You Say: "My goal today is to move you from 'browsing' to a position of credibility. In California, winning a home means being better prepared than the competition. We’re going to walk through your timeline, your monthly comfort zone, and the contract protections. Ready?"
5-15 mins: The Discovery (Motivation & Money)
You Say: "Regardless of what a bank says you're 'approved' for, what is the absolute maximum monthly check you want to write—including taxes and insurance? Regarding your down payment, are those funds currently liquid in a US bank account, or is any part of that a gift from family?"
If they say "I don't know": "That's exactly why we're meeting. Let’s look at recent sales in [Neighborhood] to see what that monthly payment might look like."
15-22 mins: Criteria vs. Inventory
You Say: "If a home is perfect but near a busy intersection, is that a 'Maybe' or a 'Hard No'?"
If they want to "Keep options open": "I understand, but in this market, being too broad leads to 'search fatigue.' Let’s pick the top 3 'must-haves' so we can act fast when they hit."
22-27 mins: The California RPA Talk
You Say: "In California, the contract provides windows for investigation, appraisal, and loan. Your deposit is generally protected during these windows, but that protection depends on the contract terms, timing, and your performance. We will follow broker supervision at every step to ensure your interests are guarded."
27-30 mins: The Path Forward (Commitment Gates)
You Say: "To get started, we follow these gates: 1. Verify your monthly comfort with my lender. 2. A 'Test Tour' to calibrate your criteria. 3. When you're ready to write offers, we'll formalize representation per office policy. Shall we schedule that tour?"
The Diagnostic Question Bank: Uncovering Deal-Killers
Agent Action: Use these categories to interpret buyer readiness. This is the same diagnostic level required for a successful Listing Presentation Script.
Category
The Questions to Ask
What the Answer Means (Interpretation)
Timeline
"When does your current lease end?" / "When do you start the new job?"
If 12 months, they are "researching."
Another Agent
"How long have you been looking, and have you worked with another pro?"
If they've seen 20+ homes and haven't bought, there may be a deeper motivation/finance issue.
Readiness
"If the perfect home hits on a Tuesday, can you see it that afternoon?"
If they insist on "weekend only," they will likely lose out on the best CA inventory.
Payment vs. Max
"If the bank approves $5k but your comfort is $4k, which number are we using?"
Always search within the "Comfort Zone" to prevent mid-escrow cold feet.
The “California Reality” Talk: Setting Process Expectations
In California, you are a project manager. Use this fiduciary-focused language:
The Credible Offer: "To be competitive, your offer needs to be credible. This means having a lender who has cleared your file. This documentation is commonly required for a credible offer and is sometimes requested by listing agents early in the process."
Contingency Removal Flow: "The RPA has default timelines for you to investigate the property. Deposit protection depends on your performance. Once contingencies are removed, the deposit is at risk if you fail to close. We move with precision at every gate."
The Disclosure Avalanche: "You will receive Natural Hazard Disclosures (NHD), Transfer Disclosures (TDS), and more. My role is to summarize the 'Red Flags' for you."
7 Deadly Sins of the First Buyer Meeting
Sin: Showing homes without a consultation.
Fix: Use the first showing as the "entry" to the strategy session.
Sin: Promising a "guaranteed" refinance.
Fix: "Rates may shift, but we must ensure you are happy with this payment today."
Sin: Failing to identify "Gift Fund" delays.
Fix: Ask: "Is the gift already in your account?" on Day 1.
Sin: Ignoring the "Contingent" Buyer.
Fix: Use your Door-Knocking Script knowledge to see if they have a home to sell first.
Sin: Talking more than listening.
Fix: Follow the 70/30 rule.
Sin: Letting the buyer dictate a "Weekend-Only" search.
Fix: Explain the speed of the CA market.
Sin: Failing to book the next "Gate."
Fix: Never leave the table without the Lender Call or the Test Tour on the calendar.
The Post-Consultation System: Templates
The Immediate Follow-Up Email
"Hi [Name], great meeting today! I’ve set up your custom search for [Area]. I’ve also introduced you to [Lender Name] via CC to verify your Monthly Comfort Zone. Looking forward to our 'Test Tour' this Sunday at 10:00 AM."
The 24-Hour Check-In Text
"Hey [Name], just checking in. Did you have a chance to connect with [Lender] yet? Once that’s verified, we can officially lock in our Sunday tour times. Let me know!"
The "Lost Buyer" Script
"Hi [Name], I haven't heard back, so I'll assume your plans have changed. I’ll pause your search for now. Out of curiosity, was there a specific factor that led to the change? Best of luck!"
The Agent’s One-Page Consultation Checklist
Before: Review their lead source (e.g., from a recent door-knocking or cold-calling session).
During: Verify "Hard-Stop" timeline and liquidity of funds.
During: Explain the RPA contingency flow and deposit risk.
After: Log motivation, timeline, funds source, and dealbreakers in CRM.
After: Schedule the next touchpoint immediately.
FAQ: California Buyer Consultation
"How do I bring up the representation agreement without scaring them?"
"This document simply formalizes my commitment to you. It ensures I am legally bound to protect your interests above everyone else's. We’ll review this in detail before we write our first offer."
"What if they’re not pre-approved—do I show homes?"
"I’m happy to do one 'test tour' so we can calibrate your criteria, but to be credible with sellers and protect your time, we'll need that pre-approval before the second outing."
"How detailed should my CRM notes be?"
Document the operational facts: Motivation, hard-stop dates, funds source, decision-makers, and current lender status. This builds the foundation of your California Real Estate Agent Skills Guide.
From Consult to Career
A professional buyer consultation is the anchor of a high-performance business. To build a sustainable career, you must bridge the gap between finding leads and managing transactions with precision. Whether you are winning a listing or securing a buyer, the principle is the same:
Control the process, or the process will control you.
For more advanced strategies on building your professional foundation, visit the California Real Estate Agent Skills Guide.
Disclaimer: This guide is provided for educational purposes by ADHI Schools. Real estate practices, forms, and laws are subject to change. Always consult with your designated broker regarding specific office policies and legal compliance.
|

TL;DR: Winning a listing in California isn't about being a "closer"; it’s about positioning yourself as the project manager for an owner’s equity. This guide provides a step-by-step system for the Read more...
TL;DR: Winning a listing in California isn't about being a "closer"; it’s about positioning yourself as the project manager for an owner’s equity. This guide provides a step-by-step system for the entire appointment—from the initial tour to the final signature.
Compliance Disclaimer: This article is for educational purposes only. All real estate activities in California must be conducted under the supervision of a licensed broker. Agents must comply with all California Department of Real Estate (DRE) regulations, Fair Housing laws, and local MLS rules. Always verify specific disclosure requirements and local "Clear Cooperation" policies with your broker.
The Role of the Professional Consultant
In the California market, homeowners are looking for a high-level advisor to navigate a complex legal and financial process. When you walk into a home, your goal is to provide a framework that reduces risk and protects the seller's final net check. Mastering this consultative dialogue is a core pillar of the California Real Estate Agent Skills Guide and is what separates top producers from those who simply "wing it."
1. Pre-Appointment Intelligence: The Foundation Call
Walking into a listing appointment blind is a primary cause of agent anxiety. Use this 5-minute conversation to identify potential deal-breakers and earn the right to lead the meeting.
The Script:
"I’m looking forward to our meeting on [Day] at [Time]. To make our time efficient, I have a few quick questions."
"What are the top two or three things you're looking for in the agent you hire to represent you?"
"Besides yourself, are there any other decision-makers who will be involved in the sale or the move?"
"On a scale of 1 to 10, how would you rate the condition of the home? What would it take to make it a 10?"
"If we agree on the marketing plan and the pricing strategy, is there any reason we wouldn't be ready to move forward with the paperwork that night?"
2. THE MAIN SCRIPT: The Consultative Flow
Part 1: The Arrival & The Tour
Stage Direction: Be warm, keep it professional, and stay standing. Let the seller lead the tour, but maintain control of the conversation.
Say: "Before we sit down, show me the home through your eyes. I’ll ask a few 'buyer-style' questions as we walk so I can hear how you describe the features. Also, point out any specific showing friction—like pets, work-from-home schedules, or any repairs you’ve been considering."
The Condition Conversation:
Say: "You mentioned the home is a [Number on a scale of 1-10]. Looking at this [Specific Room/Repair], do you feel this is something we should address before we go live to maximize your price, or would you prefer to price the home 'as-is' and prioritize a faster, more convenient sale?"
Why it works: It frames the repair as a strategic choice for the seller, not a personal criticism.
Part 2: Setting the Agenda & Discovery
Stage Direction: Transition to the kitchen or dining table. Sit where you can see all decision-makers.
Say: "Thank you for the tour. I have a three-part agenda: First, I want to understand what a 'win' looks like for you. Second, I’ll explain the process of taking the property to market. Third, we’ll look at the data to choose a list price. Does that work for you?"
The Discovery Questions (Defining Success):
"What is the one thing you don’t want to happen during this process?"
"Have you sold a home before? What was your favorite (and least favorite) part of that experience?"
"If you had to pick one: is price, timing, or certainty the most important to you?"
"If we received a full-price offer with your preferred closing date tomorrow, would you take it?"
Transition: If they are buying another property, this is the natural moment to mention your Buyer Consultation Script to ensure both sides of their move are synchronized.
Part 3: The Marketing & Launch Strategy
Say: "We don't just 'list' a home; we launch it. Depending on your needs for privacy or speed, we have a few options. Generally, a high-impact launch looks like this:
Professional Assets: High-end photography and 3D tours.
Proper Marketing: We market the property's features (e.g., 'remodeled kitchen,' 'quarter-acre lot') to reach the widest audience while remaining compliant.
The Launch Window: We often go live on a Wednesday or Thursday to build momentum for the weekend.
The Showing Window: Using a targeted Open House Script strategy, we aim to maximize market overlap and compress the showing window to create a sense of demand."
The Condition Conversation:
Say: "You mentioned the home is a [Number on a scale of 1-10]. Looking at this [Specific Room/Repair], do you feel this is something we should address before we go live to maximize your price, or would you prefer to price the home 'as-is' and prioritize a faster, more convenient sale?"
Why it works: It frames the repair as a strategic choice for the seller, not a personal criticism.
Part 4: The Pricing Decision Framework
Say: "The market determines value; I help you position the home to capture it. We generally look at three buckets:
Aspirational: Testing a higher price. This requires patience and may lead to price reductions.
Market Value: Pricing in line with recent sales to attract steady traffic.
The Competitive Launch: Pricing slightly under market to maximize visibility, which often drives the final price to its true ceiling."
The KPI Principle: "We will agree on activity targets based on your specific neighborhood and price point. If we don't see the expected engagement within the first 14 days, the market is telling us we need to adjust our position. Does that seem like a fair way to monitor our progress?"
3. Offer Strategy: Beyond the Price
Say: "Once offers arrive, I provide a summary that goes deeper than just the sales price. We focus on the 'net probability' of the deal:
Contingency Strength: We analyze how long until the buyer's deposit is truly non-refundable.
Appraisal Risk: We address potential appraisal gaps early to avoid mid-escrow price drops.
Lender Strength: I personally vet the buyer's lender to ensure they can close.
Credits/Concessions: We review the likelihood of buyer requests for repair credits, which can eat into your final check. My goal is to protect you from 'deal fall-apart' risk after you’ve already started packing."
4. Objection Playbook: Acknowledge → Clarify → Counsel → Question
"We want to wait until spring / when rates drop."
Acknowledge: "I understand wanting to time the market perfectly."
Clarify: "Are you more concerned about the price you’ll get for this home, or the rate you’ll get on the one you’re buying?"
Counsel: "In California, when rates drop, buyer demand can surge, but so does your competition. Right now, inventory is lower, which gives us more leverage. If you wait, you may get more for your home, but you’ll likely pay more for the next one."
Question: "Would you rather beat the spring competition or join it?"
"Can you cut your commission?"
Acknowledge: "I appreciate you bringing that up. Every dollar of your equity matters."
Clarify: "Are you asking because you’re looking to reduce the total cost of the sale, or have you heard a lower fee elsewhere?"
Counsel: "My fee covers the launch, the professional assets, and the negotiation process that protects your net equity from credits and concessions. If we cut the budget that finds the best buyers, it can result in a lower final check for you."
Question: "Do you want to optimize for the lowest fee or the highest probability of achieving your target net?"
"We don't want open houses / We want privacy."
Acknowledge: "I completely understand. Having strangers in your home is a big ask."
Clarify: "Is it a security concern, or just the inconvenience of the schedule?"
Counsel: "We can do showings by appointment only. However, a compressed showing window shows buyers they have competition, which is often what triggers higher offers. We can set a very limited window—say, two hours on a Saturday—to minimize the disruption."
Question: "If we focused on one managed window to maximize your price, would you be open to that?"
"We’re interviewing 3 agents—why should we choose you?"
Acknowledge: "You should! This is a major decision."
Counsel: "I’m not here to promise you the highest number just to get your signature. I’m here to implement a risk-management system. I focus on proactive marketing, vetting the buyers' financial strength, and a weekly communication loop so you are never left in the dark."
Question: "Do you want the agent who gives you the most optimistic number, or the agent with the most logical plan to protect your net?"
5. Closing: Three Ways to Get the Signature
The Decision-Recap Close: "You said your top priorities were moving by August and protecting your net equity. Based on our launch plan, this is the strategy that hits those marks. Shall we get the paperwork started?"
The "Next Step" Close: "I have the photographer's schedule open for Tuesday or Wednesday. Which works better for you so we can stay on our launch timeline?"
The "No-Sign" Control Move: "I respect that you need to discuss this privately. I’ll leave you the CMA summary, the Net Sheet, and our Launch Calendar. I’ll call you tomorrow—would 10:00 AM or 4:00 PM work better for a 5-minute check-in?"
6. Follow-Up: The "Movement" Sequence
If you are prospecting for new business using a Door-Knocking Script, the same persistence must apply to your follow-up.
Immediate Text: "Great meeting you. I've confirmed my photographer's availability for Tuesday. I'm sending the draft timeline and the three core comps we discussed to your email now."
The "Lost Listing" Move: If they choose another agent, send a polite note: "Congratulations on choosing a partner. I’m always looking to improve—was there one specific thing the other agent offered that I missed?" This is a professional Cold Calling Script technique that often leads to future opportunities even if you lose out on the immediate business.
7. The Printable One-Page Script (Rehearsal Guide)
1. The Agenda
"First, your goals; second, the launch plan; third, the price. Does that work?"
2. Discovery & Condition
"What is the one thing you don't want to happen?"
"Price, timing, or certainty—which is #1?"
"Address this repair now to maximize price, or sell 'as-is' for speed?"
3. Pricing Buckets
Aspirational: Testing the high end; requires patience.
Market: Pricing with the data to attract steady traffic.
Competitive: The "Launch Price" to maximize visibility and offers.
4. Key Objection Responses
Commission: "I negotiate to protect your net equity, not just my fee."
Wait: "Beat the spring competition or join it?"
Privacy: "We can compress the showing window to one managed time."
5. Offer Strategy
"We focus on contingency strength, appraisal risk, and credit protection to ensure we close."
6. The Close
"I have Tuesday open for photos. Shall we get started?"
"I'll call you tomorrow at [Time] for your decision."
FAQ: California Listing Appointments
"What is the Clear Cooperation Policy?"
Rules vary by local MLS and brokerage, but it generally requires a listing to be submitted to the MLS within one business day of being marketed to the public. This often increases exposure and can increase competition compared to "pocket listings." Keep in mind that your broker and local MLS guidelines govern the specific implementation.
"How should I dress?"
Clean, neutral, and professional. Aim for one step more polished than the seller’s everyday attire to reinforce your role as a consultant.
Master your craft. A script is just the foundation; your consistency is what builds the business. For a deep dive into the technical and interpersonal skills required to dominate the California market, visit our California Real Estate Agent Skills Guide.
|

Most new agents treat an open house like a museum tour. They stand near the kitchen, offer a bottle of water, and hope someone asks, "How do I buy this?"
After training California agents for over 20 Read more...
Most new agents treat an open house like a museum tour. They stand near the kitchen, offer a bottle of water, and hope someone asks, "How do I buy this?"
After training California agents for over 20 years, I can tell you that hope is not a strategy. If you leave the house with five names on a sign-in sheet but zero appointments, you didn't run an open house—you ran a free tour for the neighborhood.
The open house is a controlled conversation. Your goal is not to "sell" the house; your goal is to demonstrate enough competence that a visitor chooses you as their advisor.
The California Legal Guardrails
In California, compliance is how you protect your license during small talk. I’ve seen new agents lose trust instantly because they casually implied representation during small talk before establishing agency boundaries.
Agency Representation Clarity
In California, you need to be clear about who you represent to avoid "implied agency," but you don't need to be a buzzkill. Instead of a formal disclosure, weave your role into a question about their situation.
The "Listing Agent" Pivot
Instead of stopping buyers mid-sentence, wait for a natural beat in the conversation and use one of these:
The Casual Mention: "Just so you know how I fit into the puzzle—I’m actually representing the owners on this listing. Are you working with an agent to help you navigate the paperwork, or are you just out exploring on your own today?"
The "Resource" Angle: "Since I'm the listing agent here, I'm focused on the seller's side. If you have an agent already, that’s great—I’ll make sure they get all the reports. If you're unrepresented, I can show you how I help buyers stay protected in these neighborhood searches."
Fair Housing & Steering
Do say: “I can point you to objective resources like public safety data, school boundary maps, and commute-time tools so you can make an informed decision.”
The Gear Checklist: What to Bring
Property Info Packet: A clean, branded sheet with key specs.
The "Comps" Snapshot: A list of 3–5 nearby homes that sold in the last 6 months.
Property Info Packet QR: A flyer with a QR code linking to reports and info.
Sign-In System: Tablet or high-quality physical sheet with a heavy pen.
The "Field Notes" Pad: To jot down details about visitors after they leave.
Business Cards & Shoe Covers: Bring 20% more than you think you need.
The 10-Minute Pre-Open Setup
The Path: Open all interior doors and turn on every light. Identify the "bottleneck" (usually the kitchen) where you will spend most of your time.
3 Value Anchors: Know three facts not on the flyer (e.g., "The HVAC was replaced in 2023 per the seller").
The Safety Check: Ensure you have two exits. If a visitor makes you uncomfortable, trust your gut.
The Open House Flow (10–15 Minute Timeline)
A successful interaction should follow a repeatable system:
0–2 Minutes: Greeting + The Frame. Meet them at the door. Set the expectation for the visit.
2–6 Minutes: Rapport + Context. Let them walk the main area. Ask a "soft" question about their search.
6–10 Minutes: Qualification. Dig into their timeline, motivation, and representation status.
10–15 Minutes: The Strategy Invite. Offer the 15-minute Strategy Session.
How to Capture Contact Info Without Being Weird
If a visitor refuses the sign-in sheet, use these low-friction alternatives:
The QR Option: “No worries on the sheet—if you scan this QR code, it’ll pull up the info packet and I can text you the inspection highlights directly.”
The "Text-to-Get" Option: “If it’s easier, just text ‘PACKET’ to my cell at [Number] and I’ll auto-reply with the link to the disclosures.”
The Minimalist Approach: “I totally understand. If you just want to leave a first name and a phone number, I can send you price updates so you don't miss out.”
The Core Script (Word-for-Word)
The Greeting
Agent: "Hi! Welcome in. Are you folks from the neighborhood, or are you looking for a home in this area?"
The Frame (Sign-In Logic)
Agent: "For security and to ensure I can send you the info packet and property details later, we ask all guests to sign in. While you do that, what’s the one thing you’re looking for that this house must have?"
The Qualifying Question
Agent: "This is a great 3-bedroom, but a lot of people in this price point are also looking at [Nearby Neighborhood]. Have you had a chance to see anything over there yet?"
The Pivot to Value
Agent: "It sounds like you’re looking for a fixer with a view. I’m actually tracking a few homes that match your criteria but aren't widely marketed yet. Would you like me to send those over?"
The 12 Most Common Open House Situations
Situation
Exact Script to Use
Just Looking
"That is the best way to start. Is this the first one you've seen today?"
Have an Agent
"Great! I'll be a resource today. I can send the info packet to you and your agent."
Lowest Price?
"Sellers are looking for fair market value. I have a list of comps here if you'd like to see them."
What's Wrong?
"Every house has a story. I have the info packet and available reports via QR code here."
Roof/HVAC Age?
"I'll check the seller disclosures and listing file and text you the exact year today."
Take Offer Today?
"They are open to offers. Are you in a position to move quickly, or just testing waters?"
Silent Visitor
"Take your time. Tell me what you’re comparing this against—I might know a better fit."
Nosy Neighbor
"You know this street best. What should a buyer know about this block?"
The Investor
"Let’s chat for 2 minutes after this group leaves about cap rates for my other listings."
Tire-Kicker
"I need to stay near the door, but here's my card—the 3D tour is on our website."
Unrepresented
"Buying in CA is a chess match. Are you free Tue at 4:00 or Wed at 6:00 for a strategy session?"
Scouting Agent
"Welcome! Do you have a specific client in mind, or just keeping tabs on inventory?"
Neighbor Pivot: When you meet a neighbor who "knows everything," use that rapport to bridge into The Best Listing Presentation Script for California Agents.
Rookie Mistake List (Hard Truths)
Talking Too Much: If you are talking, you aren't qualifying. Ask a question, then wait.
Speculating on Price: Never say, "I think they'll take $X." It compromises the seller.
Getting Emotionally Hijacked: I once saw a rookie spend 40 minutes talking to a chatty neighbor while three qualified buyers walked through without a greeting. Stay focused.
The Open House Goal: 1 Next Step Per Qualified Visitor
A "lead" is only a lead if they are Qualified.
Qualified = Timeline + Motivation + Financing Clarity + Representation Status.
Your goal for every qualified visitor is a Buyer Consultation Script (California Agents) or a strategy session.
The In-Person Close
"Based on what you told me, you’ll save a lot of time if we do a quick 15-minute strategy session—just to map your timeline, financing, and what a winning offer looks like. What’s better: Tuesday at 4:00 or Wednesday at 6:00?"
The Follow-Up System
Same-Day Text (if they have opted-in): "Hi [Name]—great meeting you at [Street]. If you’re not already working with an agent, I’m happy to do a quick 15-min Strategy Session. Want to do Tue 4:00 or Wed 6:00?"
Same-Day Email: "Subject: As promised: [Street] Info Packet. Attached are the documents. I also included 3 similar homes I'm watching this week."
3-Day Follow-Up: "Hi [Name], did you have a chance to drive the neighborhood again? Most find the traffic is quieter on weekday evenings."
7-Day Follow-Up: "I'm calling 10 buyers who saw the house last weekend for seller feedback. What was your impression of the price vs. condition?"
The Skill Stack: Open House Activity Report
Mastering the open house is the foundation for all Real Estate Agent Skills (California). Use this workflow to turn one open house into three more leads:
The Neighbor Outreach Play:
Same Day: Write 3 bullets of buyer feedback (price/condition/feature complaints).
Next Day: Contact 10 neighbors: “We had X groups through; here’s what buyers are saying.”
Offer: A free “pricing range snapshot” for the block.
CTA: A 10-minute “sell-or-hold” consult.
This is the perfect organic reason to use your Door-Knocking Script for California Neighborhoods or a Use Cold Calling Script That Doesn’t Sound Salesy to demonstrate you are the neighborhood expert.
Frequently Asked Questions (FAQ)
Do I have to sign-in at an open house in California?
There is no state law requiring sign-ins, but it is a standard practice for property security and to fulfill your fiduciary duty to the seller to track interest.
What do I say if someone asks if it’s a safe neighborhood?
Avoid characterizing the area. Say: "I'm not permitted to provide subjective opinions on safety, but I can point you toward the local police department's public data page."
How do I follow up if they don't answer my first text?
Wait 48 hours and send a "Value-Add" follow-up: "Hi [Name], a similar house just hit the market two blocks away at a lower price point. Want me to send you the link?"
Next Step: A script is just the foundation; your consistency is what builds the business. For a deep dive into the technical and interpersonal skills required to dominate the California market, visit our Real Estate Agent Skills (California) to see how this fits into your broader business plan.
|
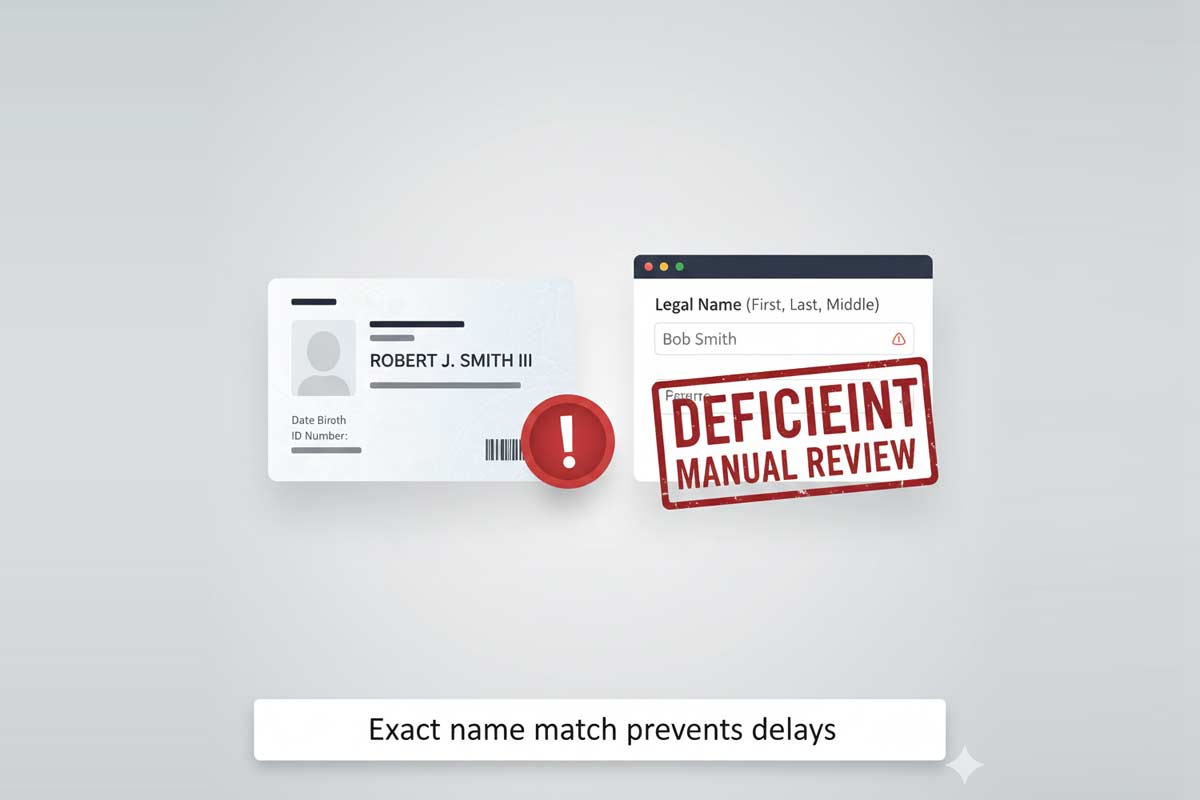
In my 20+ years helping candidates navigate the California Department of Real Estate (DRE), I have seen perfectly prepared students wait longer than needed for an exam date because of a minor clerical Read more...
In my 20+ years helping candidates navigate the California Department of Real Estate (DRE), I have seen perfectly prepared students wait longer than needed for an exam date because of a minor clerical error. The DRE is a high-volume agency that requires precision; a single mismatch between your ID and your application can lead to a delayed status that halts your progress until the error is corrected.
This guide is your operator’s manual for the DRE application process. Follow these steps to avoid preventable delays and move as efficiently as possible toward your exam date.
The "Fast Path" California Real Estate Exam Checklist
Use this checklist to verify your readiness before logging into the eLicensing system.
Verify Course Completion: Secure your three completion certificates from a DRE-approved provider like ADHI Schools.
Match Your ID Exactly: Your application name and certificates must mirror your government-issued ID (including middle names, hyphens, and suffixes like Jr. or III).
Select Your Path: Choose "Exam Only" (not recommended) or "Combined Exam and License" (recommended).
Create eLicensing Account: Register your profile on the official DRE website.
Live Scan (Path Dependent): Complete fingerprints upfront if choosing the Combined path (recommended).
Prepare Disclosures: If you will be answering "Yes" to any background questions, gather relevant court records now.
Set Up Communication: Use a consistent email address and add the DRE domain to your "safe sender" list to avoid missing updates in your spam folder.
Review and Submit: Perform a final screen-by-screen review for typos before paying.
Note: Requirements change—always confirm current DRE fees and document standards in your eLicensing account.
Step 1: Confirm Your Eligibility
Before applying for the California real estate exam, ensure you meet the basic requirements:
Age: You must be 18 or older.
Integrity: You must be truthful on your application.
Education: You must have completed three DRE-approved courses: Real Estate Principles, Real Estate Practice, and one elective.
Don’t guess. Ensure your certificates are from a DRE-approved provider. If your document doesn’t clearly list the provider name and course titles exactly as shown on your completion certificate/transcript, contact your school before you apply.
Step 2: Choose Your Application Path
Selecting the wrong path is a major source of confusion for new applicants.
Salesperson vs. Broker: Most candidates begin with the Salesperson application. Broker forms are for those with two years of full-time experience or a qualifying degree as defined by DRE broker qualification rules.
Exam Only vs. Combined:
Exam Only: This allows you to schedule the test. You apply for the actual license only after you pass the exam.
Combined Exam and License: This is generally the most efficient route, but it requires you to have your fingerprints and documents perfectly organized upfront. Once you pass, the DRE can often move straight to the license issuance process.
Do I need Live Scan before I apply? If you choose the "Exam Only" path, no. If you choose the "Combined" path, yes—you must complete the Live Scan before submitting.
Step 3: Document Preparation and Name Consistency
In my experience, one of the most common causes of a Deficient application is a name mismatch. If your ID says "Robert J. Smith III" but your application says "Bob Smith," the DRE system may flag your file for manual review.
Have these ready:
Government-issued ID: Your government issued identification must mirror your course completion certificates.
Course Completion Certificates: You need the course titles and completion dates exactly as they appear on your certificates.
Background Documentation: Answer every background question on the application exactly as asked. If you answer "Yes" to any question regarding prior criminal convictions or charges (such as a DUI or expunged item), have the certified court records ready to avoid delays.
Step 4: Submit the Application in eLicensing
Using the eLicensing portal is significantly faster and more trackable than a paper application.
Login: Access the DRE eLicensing portal.
Select Application: Choose your path (Salesperson Exam or Combined).
Data Entry: Input your course details carefully.
Uploads: Attach clear, right-side-up PDF copies of your documents. Blurry photos or upside-down scans can trigger manual review delays.
Payment: Use a credit or debit card for immediate fee processing.
STOP: The Pre-Submit Review
Before you click "Submit," perform this quick check of the Common mistakes applicants make on DRE forms. This review is your best defense against avoidable delays.
Verify these points:
Is your Social Security Number or ITIN correct?
Did you upload all three required certificates?
Is your name an exact match for your ID and certificates?
Are your "Yes/No" background answers fully transparent and truthful?
Step 5: Fingerprints and Background Checks
For the Combined Path, you must complete a Live Scan at a participating service provider. The Live Scan operator must use the exact DRE-specific form and codes. If your name is misspelled on the fingerprint form, the DRE may not be able to link the results to your application, delaying approval until the results can be manually matched.
Step 6: What Status Changes Mean in eLicensing
Once submitted, your application enters the DRE queue. You can track progress via your portal. You may see statuses such as:
Processing: The DRE has received your application but has not yet reviewed it.
Additional information needed: Information is missing or incorrect. Check your email (and spam folder) immediately for a deficiency notice.
Exam Eligibility / Ready to Schedule: You are approved and can now select your exam date and location.
Pro Tip: Monitor the DRE Processing Timeframes page online. If their current processing date passes your submission date and you haven't heard anything, it's time to follow up.
Step 7: Fixing Problems Fast
If the DRE flags your application as Deficient, speed and precision are vital.
Missing Documentation: If a certificate failed to upload, log in and add the correct PDF immediately.
Specific Requests: If the DRE requests a name clarification or a document to explain a name change, provide exactly what they ask for without delay.
Incomplete Disclosures: If the DRE requests more info on a prior background issue, provide the certified records immediately.
Rushing is the primary cause of errors. Take ten extra minutes during the initial application to avoid the frustration of a pended file.
FAQ
How long does it take to get an exam date? Wait times fluctuate based on DRE volume. Check the "Current Processing Timeframes" on the DRE website for the most accurate estimate.
Can I change my exam date? Yes, you can reschedule via eLicensing. Rules and potential fees depend on how close you are to the exam date; confirm these details within your eLicensing account.
What happens if I fail the exam? You can apply for a re-take through eLicensing. You do not need to redo your education, but a re-examination fee will apply.
Secure Your Most Efficient Path
Don't let bureaucracy stand between you and your career. By being precise with your paperwork now, you ensure the cleanest possible path to the exam room.
For a complete look at the entire licensing process—from your first course to your first day at a brokerage—use our California Real Estate License Guide.
|
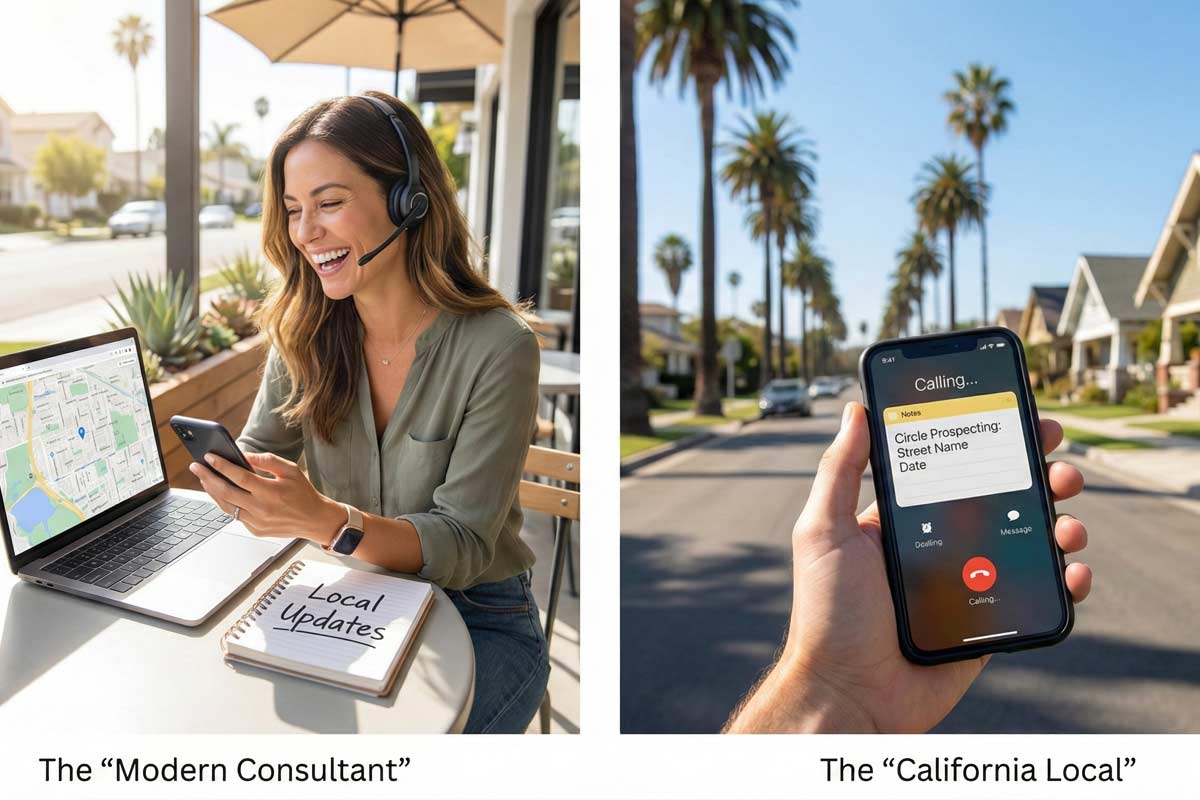
The Real Reason Cold Calling Feels “Salesy” (And How to Fix It Fast)
Most new agents pick up the phone like a hunter: “How do I get a listing? How do I get an appointment?”
That intent changes Read more...
The Real Reason Cold Calling Feels “Salesy” (And How to Fix It Fast)
Most new agents pick up the phone like a hunter: “How do I get a listing? How do I get an appointment?”
That intent changes your voice. You rush. You over-explain. You push.
To stop sounding salesy, you don’t need a “slicker” script. You need a cleaner objective:
Your job is not to sell on the first dial. Your job is to start a professional conversation.
To stop sounding salesy, you don’t need a “slicker” script. You need a cleaner objective:
We do that with a simple framework:
Permission + Local Context + Micro-Commitment
By the end of this guide, you’ll have 3 word-for-word scripts, a 10-point objection cheat sheet, and a 7-day plan you can run immediately.
The “Conversation-First” Framework: The 5-Step Blueprint
Here’s the structure closers use because it’s low-pressure and repeatable:
Permission Opener (disarm & respect)
Clear Reason for the Call (specific, local, honest)
Tiny Value Hook (a micro-insight)
Easy Diagnostic Question (invites dialogue, not defense)
Low-Pressure Next Step (a micro-commitment, not a meeting)
Script vs. Mindset: Rookie vs. Closer
Feature
Rookie (Salesy) Approach
Closer (Professional) Approach
Primary goal
Get appointment/listing now
Start a professional relationship
Opener
“Hi, I’m looking for the owner…”
“I know I’m calling out of the blue—quick question…”
Value hook
“I can get you top dollar!”
“A couple homes near you moved fast—local activity is changing.”
Handling “No”
Push harder or hang up
Offer a micro-exit (email / quick follow-up time)
Success metric
Appointments set
Quality contacts + scheduled follow-ups
Coaching note: You’re not trying to “win” the call. You’re trying to earn permission to continue.
Script #1: The Universal Permission Opener (Word-for-Word)
Never pitch someone who hasn’t agreed to listen.
Variant A: Friendly & Professional
“Hi [Name], this is [Your Name] with [Brokerage]. I know I’m calling out of the blue—do you have 60 seconds, or did I catch you at a bad time?”
Pacing: Say it slowly. Then stop talking.
Variant B: Neighborly Inquiry
“Hi [Name], [Your Name] here. I’m a local agent—do you mind if I ask you a quick question about the neighborhood?”
Variant C: Calm & Direct
“Hi [Name], [Your Name] with [Brokerage]. I’ll be brief—is now a bad time?”
(This often gets a “No, go ahead.”)
If they say “No” / “I’m busy” (Micro-Exits)
Don’t vanish. Preserve the relationship.
Text pivot: “No problem at all. Would it be easier if I just texted you a one-line local update instead?” (Follow your laws regarding opt-in text messaging)
Time lock: “Totally fair. Would later today or tomorrow morning be better for a 2-minute question?”
Your win: permission to call back at a specific time.
Script #2: California Circle Prospecting (Truthful Versions Only)
Circle prospecting = calling around a real market event (sale, listing, open house activity, inventory shift).Rule: Only say what you can verify. No fake buyers. No fake “off-market” talk.
Before you call: pick ONE true local fact
Examples you can verify quickly:
“A home around the corner sold fast.”
“Inventory is tight in this ZIP.”
“A few homes have been sitting longer recently.”
Keep it simple. You’re not delivering a data report—just a reason you’re relevant.
Version A (ONLY if true): You actually have an active buyer
“Hi [Name], I’m [Your Name] with [Brokerage]. I know this is out of the blue—do you have 60 seconds?”(Pause)“I’m calling because I’m actively representing a buyer looking for a home in this immediate area, and inventory has been tight.”
Diagnostic question (low pressure):
“Have you heard of anyone nearby who might be planning a move in the next few months?”
Version B (always safe): Inventory tracker (no fake buyer)
“Hi [Name], [Your Name] with [Brokerage]. Quick question—do you have 60 seconds?”(Pause)“I’m calling because I’m tracking inventory in this area for a few households who want to move locally, and I’ve noticed there hasn’t been much fresh activity right around you.”
Tiny value hook (no made-up stats):
“In some pockets nearby, homes have been moving quicker than people expect—so I’m checking in locally.”
Diagnostic question:
“If you ever moved—what would trigger it for you? More space, downsizing, job change…?”
Prefer face-to-face over phone? Use: Door-Knocking Script for California Neighborhoods
Script #3: Warm Follow-Up (After Open House, Sign-In, Lead Form)
This is where new agents stop being “random callers” and start being professionals.
Structure: Gratitude → Specific recall → Diagnostic → Easy offer
“Hi [Name], it’s [Your Name] with [Brokerage]. Thanks again for stopping by my open house at [Address] on [Day].”
“Quick question—when you left, was that home a hard ‘no,’ or are you still comparing options?”(Pause)“Based on what you told me you want, would it be helpful if I sent you two or three similar options to look at tonight?”
Coaching note: The goal is not to schedule a 60-minute meeting. It’s to earn the next conversation.
To generate better warm leads (and better follow-up notes), master: Open House Script for New Agents
The 10-Point Objection Cheat Sheet (California Edition)
Use this structure:
Acknowledge → Pivot → Ask (micro-commitment)
1) “Not interested.”
Rookie panic move: “Okay, bye.”
Closer response: “Totally understand. I didn’t expect you to be thinking about selling today. I’m just calling as a local resource—would you be open to me emailing you a one-line local update once in a while so you can track your equity?”
Goal: permission to talk (or permission for a short follow-up)
2) “I already have an agent.”
Rookie panic move: “Oh… okay.”
Closer response: “That’s great—having someone you trust matters most. Quick question: if they were unavailable and you needed a second opinion fast, would you be open to keeping one backup contact?”
Goal: permission to stay in their orbit
3) “Just send me the information.”
Rookie panic move: “What’s your email?” (and they vanish)
Closer response:“Happy to. Quick preference: are you more interested in what’s selling right now, or what your home might be worth in today’s market?”
Goal: steer them into a 2-question conversation, then capture contact
4) “How did you get my number?”
Rookie panic move: “Uhh… a lead provider?”
Closer response: “Fair question. I use lawful, reputable public-record and neighborhood data tools. And if you’d rather not be contacted again, just tell me and I’ll make sure you’re removed.”
Goal: keep trust + respect opt-out
5) “Call me later.”
Rookie panic move: “Okay.” (and they forget you)
Closer response: “No problem—what’s better: today at 5 or tomorrow morning? I’ll keep it to two minutes.”
Goal: lock a specific time
6) “Take me off your list / Stop calling.”
Rookie panic move: argue or explain
Closer response: “Absolutely. I’ll remove you right now. Have a good one.”
Goal: compliance and professionalism (protect your license and your broker)
7) “Are you calling to list my house?”
Rookie panic move: immediate pitch
Closer response: “Not necessarily. I’m calling to be a local resource and understand what homeowners are seeing and planning. If you ever moved, would you stay local or head somewhere else?”
Goal: open dialogue without pressure
8) “What’s your commission?”
Rookie panic move: quote numbers to a stranger
Closer response: “Good question. Fees depend on the service level and the situation. If you ever wanted to explore it, I’d walk you through a clear fee schedule—are you thinking about selling soon or just curious?”
Goal: determine intent and avoid negotiating on cold call
9) “Rates are too high / Market is awful.”
Rookie panic move: debate headlines
Closer response: “Totally fair—headlines are loud. That’s why I focus on local reality. Would it be helpful if I sent you a simple local snapshot so you can see what’s actually happening near you?”
Goal: permission to send local info
10) “Wrong number / I’m a renter.”
Rookie panic move: scramble into a pitch
Closer response: “Thanks for telling me—my mistake. Before I let you go, are you planning to buy in [City] this year, or not on your radar?”
Goal: only if the tone is friendly; otherwise exit clean
Next step when you actually secure a meeting:Prepare for that buyer consult with: Buyer Consultation Script (California Agents)
The System: Scorecard + 7-Day Launch Plan
New Agent Weekly Scorecard
Metric
Target (Week 1)
Notes
Dials
25–50/day
Consistency > hero days
Conversations (2+ min)
2–5/day
If 0, opener/timing/list issue
Contacts captured
1–3/day
Micro-commitment strength
Follow-ups scheduled
1–2/day
Lock times, don’t “floating follow-up”
Appointments
Bonus
Don’t obsess Week 1
Diagnosing your bottleneck (coach yourself)
Low conversations (e.g.,
|
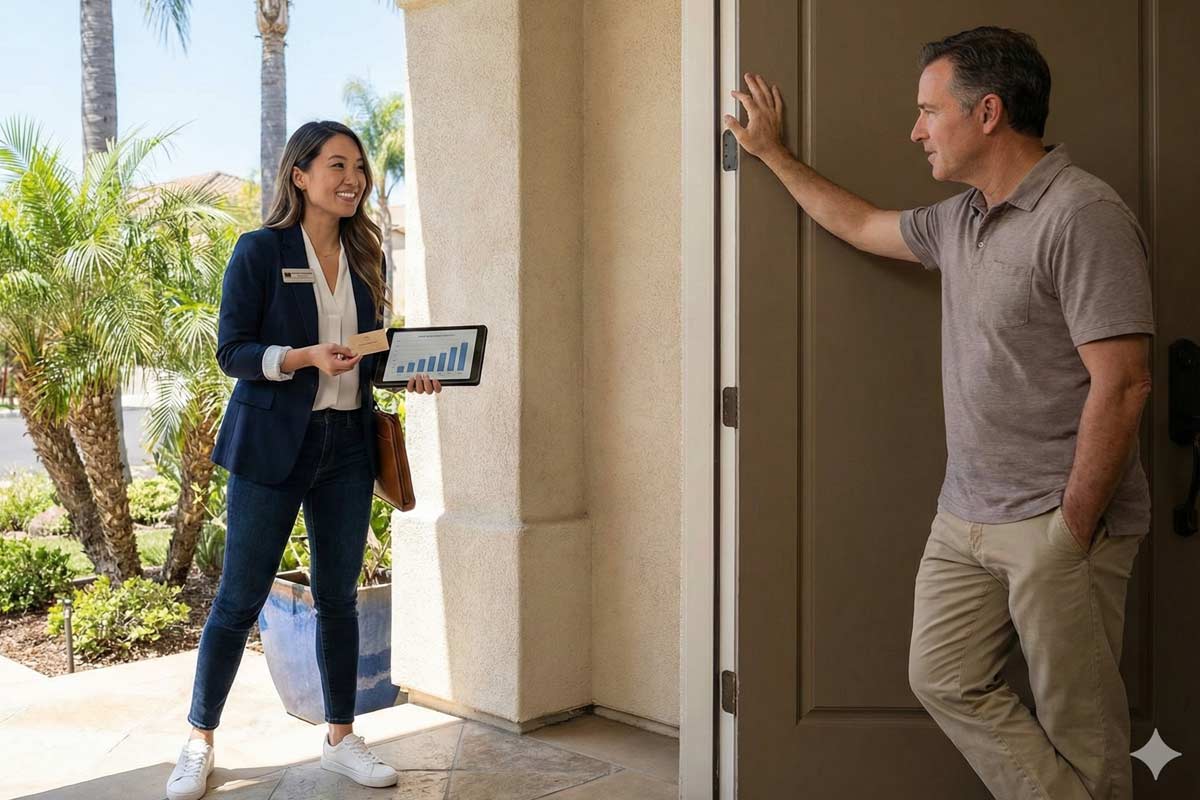
The Anxiety is Real (And It’s Your Advantage)
You’re standing on a porch in an Irvine cul-de-sac or a tree-lined street in Sacramento. Your mouth is dry, your hands are slightly clammy, and you’re Read more...
The Anxiety is Real (And It’s Your Advantage)
You’re standing on a porch in an Irvine cul-de-sac or a tree-lined street in Sacramento. Your mouth is dry, your hands are slightly clammy, and you’re staring at the doorbell. You’re worried about being "that agent"—the annoying solicitor who gets the door slammed in their face.
Here is the truth: that anxiety is your greatest asset. In 20 years of coaching California agents, I’ve found that the "licensed and scared" rookie is often the most successful door-knocker because they are empathetic, not pushy. Using a door-knocking script for California neighborhoods isn't about "closing" someone on their porch; it's about professional neighborhood networking.
Reframe the task: You are a local expert providing data to homeowners in a complex market.
The Bridge Line: Your license lets you practice real estate. Prospecting skills like this get you paid.
The 3-Part Mindset: Permission, Context, Micro-Ask
To stop sounding "salesy," every interaction must follow this professional flow:
Permission: Acknowledge their time immediately.
Context: Why are you here specifically today? (e.g., a nearby sale or neighborhood report).
Micro-Ask: A low-stakes question that doesn't require a "yes" to a listing appointment.
Mastering these California Real Estate Agent Skills is the difference between random prospecting and a repeatable system.
The Pro’s Setup: What to Bring (and What to Avoid)
New agent panic usually stems from feeling unprepared. Carry yourself like a consultant by following this gear list:
The "Must-Have" List
Visible Name Badge: Clearly identifying your name and brokerage.
Minimalist Flyer: Exactly one relevant piece of data (e.g., a "Just Sold" flyer or Market Snapshot).
Slim Notepad & Pen: For taking notes after you walk away from the door.
Digital Contact Card: A QR code on your phone or a clean business card.
The "Never-Do" List
No Large Binders: These scream "long presentation" and trigger immediate rejection.
No Clipboard Theatrics: You aren't a city inspector; don't try to look like one.
Never Step Inside: Even if invited, politely decline to keep the interaction professional and safe.
Don't Ramble: If you can't get to your point in 20 seconds, you've lost them.
What to Say When the Door Opens (The 10-Second Version)
If you are nervous about the first few seconds, use this universal, low-pressure opener to lower the homeowner's guard:
"Hi, I'll be very brief—I'm [Name] with [Brokerage]. I’m just doing a quick neighborhood update to provide some info on [specific local house or report]."
Word-for-Word Scripts (For 6 Key Scenarios)
1. "Just Listed / Just Sold" Notice
Goal: Establish yourself as the active agent on the block.
The Opener: "Hi, I'll be brief—I’m [Name] with [Brokerage]. I wanted to give you a quick update that your neighbor’s home on Elm Street just hit the market/sold."
The Micro-Ask: "When a home like that moves, it usually impacts values on the rest of the street. If it's helpful, I can email you the final sales price once it closes so you have the data? If not, no worries at all."
Graceful Exit: "I'll get out of your hair—have a great day!"
2. Open House Invitation
Goal: Invite neighbors to build your local database.
The Opener: "Hi! I’m hosting an open house around the corner at 123 Maple this Saturday. We’re doing a 'Neighbors Only' preview from 10:00 to 11:00."
The Micro-Ask: "Are you curious what this one sells for compared to yours? What’s the best email to send you the final number after it closes?"
Next Step: To fill the room, pair this with an Open House Script for New Agents.
3. "Market Update" Knock
Goal: Provide value to identify future sellers.
The Opener: "Hi, I'm [Name]. I’m doing some research for a report on [Neighborhood] home values. Many neighbors are asking if the market is cooling off or staying hot."
The Micro-Ask: "I’m putting together a 1-page summary of local trends, like median days on market. Would you like me to email that over when it’s finished? No pressure either way."
4. "Buyer Need" / "Pick Your Neighbor"
Goal: Find off-market inventory for a specific client.
The Opener: "Hi, I’m [Name]. I’m working with a family who loves this specific street, but as you know, there’s nothing for sale right now."
The Micro-Ask: "Have you heard of anyone on the block mentioning a move? And totally separately—are you personally considering a move in the next year, or just staying put?"
Next Step: If they mention they might move, transition to the Buyer Consultation Script (California Agents).
5. The "Professional Valuation"
Goal: Move a "What's my home worth?" comment into an appointment.
The Script: "That’s the million-dollar question. Online 'Zestimates' are often off—sometimes by a lot—because they don't know your specific upgrades."
The Micro-Ask: "I can run a quick net sheet and comp set so you have a realistic range of what you’d walk away with in today’s market. Would you want to do that sometime next week?"
Next Step: If they say yes, be ready with The Best Listing Presentation Script for California Agents.
6. The "Professional Valuation"
Goal: End the interaction when they are busy or uninterested.
The Script: "I completely understand! If appropriate for your neighborhood, I’ll leave my card here—it has my cell if you ever have a quick real estate question. Have a great day!"
Objection Handling: Your Quick-Response Bank
Objection
Your Response (Validate + Exit)
"I'm busy."
"I apologize for the interruption! I'll leave this info here for you. Have a productive day."
"We have an agent."
"That's great! It's vital to have a pro you trust. If you ever need a second opinion, I'm always available."
"How'd you get my address?"
"I'm just working the immediate area today because of [Anchor Property/Report]—it's part of how I stay updated on the neighborhood!"
"Not interested."
"No problem at all! I appreciate your time. Have a great afternoon."
The Conversation Outcomes Scorecard
Outcome
Frequency
What to Do Next
No Answer
Most common
Move to the next door immediately.
Polite Rejection
Frequent
Log the address to avoid double-knocking.
Quality Conversation
Occasional
Log name + house color + specific topic.
Contact Captured
Rare / high-value
Send an immediate “nice to meet you” follow-up.
California Reality: Safety, Compliance, & Disclaimers
Professional Standard: Municipal solicitation ordinances and HOA rules vary significantly across California. Respect all posted “No Soliciting” signs and private property restrictions.
Disclaimer: This guide provides practical training on communication and marketing for real estate professionals. It does not constitute legal advice. Always check your local city ordinances, HOA rules, and brokerage policies regarding door-to-door canvassing.
Safety & Access Rules:
Respect gates and access controls; do not "tailgate" into private communities.
Stay outside the threshold at all times and maintain a 6-foot distance from the door.
Carry a charged phone and let a colleague know your route.
End any conversation immediately if your intuition flags a concern.
The Follow-Up System (The 2-Minute Rule)
The moment you walk away from a door where you had a conversation, stop and log it. In my years of coaching, I’ve seen that the "friendly follow-up" is where the commissions are actually made.
Text Message (follow all opt-in laws): "Hi [Name], it was great meeting you on [Street] today! Just sending my digital contact info so you have it. — [Your Name], [Brokerage]"
Value-Add Email: "Hi [Name], as promised, here is that market snapshot for [Neighborhood]. Inventory is currently [high/low] compared to last year. Let me know if you have questions!"
FAQs for Featured Snippets
Q: Is door knocking legal in California?
A: Rules vary by municipality and HOA. You must check local city ordinances, respect all "No Soliciting" signs, and respect gates or access controls in private communities.
Q: What is the best door-knocking script for California neighborhoods?
A: Use a "Context-Based" opener: "Hi, I'm [Name]. I'm not here to sell anything, I just wanted to share an update on a home that recently sold on your block."
Q: What is the best time to door knock?
A: Target 4:00 PM to 6:30 PM on weekdays or 10:00 AM to 12:00 PM on Saturdays for the highest engagement rates.
Q: How do I handle a "No Soliciting" sign?
A: Respect the sign and move to the next house. Maintaining a professional reputation is more important than any single lead.
Your "Quick Start" 1-Hour Plan (Do This Today)
Print 20 flyers for a "Just Listed" or "Market Update."
Pick a 20-house radius (avoid "No Soliciting" zones).
Knock doors 1-5. Your only goal is to say the script out loud.
Log every contact in your phone immediately.
Send a "nice to meet you" text (following all opt-in laws) within 60 minutes to anyone who shared contact info.
Door-knocking is just one spoke in your prospecting wheel. To round out your skills, pair this with the Cold Calling Script That Doesn’t Sound Salesy to keep your pipeline full regardless of the weather.
|